Home Improvements: Pallet Pot Rack
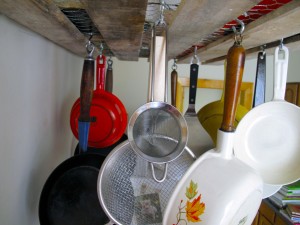
I frequently tell people that I live on “Pallet Row.” Take a walk around my neighborhood, and you’ll come across dozens of discarded pallets, which is great because a little TLC can transform these into some great furniture. We already have a coffee table and matching ottoman that we constructed from found wooden skids. Somehow, in the past few months I’ve amassed so many pots and pans, that Sam and I decided to draw up plans to make a pot rack from pallets. On Sunday, we finished the construction and hung it up– it’s a great space saver AND a beautiful way to display all of my skillets!
Pallet Pot Rack
SUPPLIES
- 1 pallet
- 4′ x 4′ chicken wire
- 6 wire coat hangers
- Heavy chain
- Staples
- 2 1/4 x 4″ toggle hook bolts with nuts* (we bought the hook bolts separately and replaced the standard bolt with those)
- 2 1/4 x 4 inch toggle bolts with nuts
- 4 washers (to fit the bolts)
- S-hooks
TOOLS
- Circular Saw
- Hammer
- Nail Puller
- Nails
- Drill
- Phillips head screwdriver
- Staple gun
- Wire cutters
- Measuring Tape
Cut your pallet in half, or to the desired size. (Sam used the circular saw to do this.)
Step 2
Remove the middle bar of the pallet (using a nail puller, or the back of your hammer) taking care not to split the wood, because you will be reattaching it.
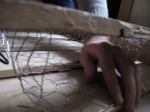
Measure and cut a piece of chicken wire so that it fits across your pallet.
Step 4
Use a staple gun (or, alternatively, a hammer and staples) to staple the chicken wire in place. Staple across each of the wooden bars. Hammer the staples in.
Step 5
Replace the middle bar that was removed, back over the chicken wire, using a hammer and nails, or, a drill and screws.
Step 6
Use wire cutter to cut the top of each wire hanger off, and bend the remaining wire so that it’s relatively straight. Form a hook at one end of each piece. Weave the wire through the chicken wire so that it crosses with the wooden bars. Cut the excess wire off; hook the end, and use the staple gun the staple securely into place. Repeat with each of the remaining wires, spacing evenly. There should be three wires across each side.
Using a hammer and nail, or, for even more security, a nut and bolt, secure a length of chain onto each side of the pallet. That is, you’ll attach chain on the inside front part of the left plank, and then do the same on the right plank. The chain will ultimately hang at about a 45 degree angle from hook bolts on the wall, so you’ll need to measure to see how much you’ll need.
Step 8
Alright! You have a pot rack! Now you need to hang it. Measure where on the wall you want it to hang, and draw a faint line. Measure an equal distance from each side of the rack to put your toggle bolts in. Drill holes in the wall where each of the toggle bolts should go. Then, one person should hold up the pot rack (that was me) while the other person puts those bolts in, and tightens with a screwdriver. At this point your pot rack should be able to hang with no additional support from you and should even be able to bear significant weight. But, you are going to create additional supports.
Step 9
Mark on the wall where the chain should go so that it hangs at a 45 degree angle. Drill holes where it should go. Then, screw in your toggle hook bolts, securing each with a washer. Hook the chain on. Almost there! You just need to put some pots on this thing.
Place S-hooks on the heavy coat-hanger wire. Hang pots and pans from the hooks. Additional hooks can be placed directly through the chicken wire, but they should only hold lighter-weight items. The top of the pot rack can also be used as a shelf for additional storage. (We put a dutch oven and some stock pots up there.)


j
Pingback: Projects Using Wood Pallets
Pingback: Five Creative Space Savers « TuckItAway.com
Pingback: Milwood homes for sale | Milwood home search | Milwood Neighborhood | Austin REALTOR® Kim Wilson of Regent Property Group LLC
Pingback: DIY Roundup: 5 Projects Using Wood Pallets | The Writing on the Wall
Pingback: organizing and storage ideas for pots and pans and cookware | Make Create Do
How do you think this would hold up to cast iron pans?
It’s incredibly durable and works great for cast iron pans. I don’t know if you can tell from the picture, but most of the pans I own and have hanging on it are enameled cast iron (vintage Le Creuset and Descoware). It always has 7-9 of these hanging from it, and additional cast iron dutch ovens on top. Definitely sturdier than the previous, commercially purchased pot rack I had!
Pingback: 7 Pallet rack design ideas, great for repurposing and recycling
Pingback: 7 Pallet rack design ideas, great for repurposing and recycling | Fresh Furniture
Pingback: Cool Pallet Projects | Homestead Basics
Pingback: DIY Pot Rack Ideas - Everyday Items Can Become Cool Pot Racks
How tall are your ceilings. I have standard 8′ ceilings. I am wondering if a pot rack is I good idea for that ceiling height.
Sorry for the late response– somehow missed this comment. When I had this pot rack up, I had standard height ceilings and it worked well– it was positioned above a buffet table, so there was no chance of anyone hitting their head– and I was able to reach all of the hanging skillets without a step stool. I did use a step stool to reach the pots that it held on top.
I’ve since moved to another apartment in Greenpoint that has drop ceilings in the kitchen, so I unfortunately can’t use the pot rack now, but I’m holding onto it for the next place!
Pingback: DIY: 16 Amazing Pallet Projects with Tutorials! | cincysavers.com
Pingback: Pallet Pot Rack DIY Tutorial | Hip Home Making
Pingback: DIY: 16 Amazing Pallet Projects with Tutorials!
Pingback: 10 DIYs to Make Your Kitchen Feel Bigger - Maker Crate
Pingback: 80 Wood Pallet DIY Projects | Rilane - We Aspire to Inspire
Pingback: DIY Furniture Projects Made Of Whole Pallets
Pingback: DIY Furniture Projects Made Of Whole Pallets | Club Oferteproprietari.ro
Pingback: Meubels van pallets: creatief met hout
Pingback: 16 Awesome Ways to Recycle and Reuse Wooden Pallets
Pingback: 10 DIY Wood Pallet Projects for the Kitchen - Well Done Stuff
Pingback: 27 DIY Pallet Furniture Ideas - Chic and Affordable
Pingback: 40+ Creative DIY Pallet Furniture Project Ideas & Tutorials - Noted List
Pingback: Top 30 The Best DIY Pallet Projects For Kitchen • DIY All in One
Pingback: 12 Cool DIY Kitchen Pallets Ideas That You Have To Try | Interior Design Blogs
Pingback: 40+ Creative Pallet Furniture DIY Ideas And Projects
Pingback: 27 Creative Furniture Ideas Made from Pallet - G. S. Gumilar
Pingback: 40+ Creative Pallet Furniture DIY Ideas And Projects | Architecture & Design
Pingback: Amazing DIY Kitchen Pallet Project Ideas
Pingback: 50 Wonderful Pallet Furniture Ideas and Tutorials | Outdoorbeing
Pingback: Awesome DIY Furniture Projects
Pingback: The 35 Best DIY Kitchen Decorating Projects – Cute DIY Projects
Pingback: DIY Kitchen Decorating Tutorials
Pingback: 14 tips på kreativa pyssel som kan förändra ditt hem. Nummer 13 hade vi aldrig sett tidigare!
Pingback: DIY: 16 Amazing Pallet Projects with Tutorials! | Megan Fenno
Pingback: 40+ Creative Pallet Furniture DIY Ideas And Projects - JodiCraft
Pingback: Wood Pallets Projects To Give Your Home That Rustic Look
Pingback: 10 DIY Wood Pallet Projects for the Kitchen – My CMS
Pingback: Top 30 The Best DIY Pallet Projects For Kitchen - Healthy Stuff
Pingback: 50+ Tutorials and Ideas for DIY Furniture from Wooden Pallets!
Pingback: 40+ Creative Pallet Furniture DIY Ideas And Projects –
Pingback: 40+ Creative Pallet Furniture DIY Ideas And Projects - Buzz Crank
Hi, there! I searched for an email but couldn’t find one, so I hope it’s ok to try to contact you this way. I’m an editor for Remodelaholic.com and am writing to request permission to use one photo from this tutorial for the pallet pot rack in an upcoming post. We’d like to feature it in a round up and would include a backlink and clear credit to you.
Additionally, we routinely publish round-up style posts on our site and if you’re willing to allow us to use one photo from other posts you’ve done, we would love to add you to our directory of sites to feature. As a bonus, your site would then be on our radar for possible Facebook shares as well.
Please let me know if this would work for you. Thanks for your consideration!
~ Kimberly
bugaboo blog
remodelaholic.com
Hi Kimberly,
You’re welcome to use the tutorial and any photos from it.
Cheers,
Jacquie
Pingback: 40+ Creative Pallet Furniture DIY Ideas And Projects | Proud Nurses
Pingback: 40+ Creative Pallet Furniture DIY Ideas And Projects | Home Design
Pingback: 30 DIY Pallet Projects You Must Try - Ritely.com
Pingback: Amazing DIY Furniture Projects - DIYCraftsGuru
Pingback: 40+ Creative Pallet Furniture DIY Ideas And Projects – Home Design
Pingback: Repurpose Old Wood | Creating Spaces
Pingback: 55 Creative DIY Pallet Project Ideas & Tutorials - Crafts Booming
Pingback: 40+ Creative Pallet Furniture DIY Ideas And Projects – Gadgets News Today
Pingback: 150 Cheap & Easy Pallet Projects - Prudent Penny Pincher
Pingback: 20 Awesome DIY Pallet Furniture Projects For Your Home | homedesignfind
Pingback: 20 Awesome DIY Pallet Furniture Projects For Your Home - The Veranda of ideas
Pingback: 150 SIMPLE & INEXPENSIVE PALLET PROJECTS! – The Lifestyle Hacks | Food Recipes, Fitness, & DIY
Pingback: 30 Easy DIY Pallet Furniture Ideas - Lost At E Minor