In contradiction to what people believe, organizing your kitchen neatly will not make you broke. As long as DIY projects and regular cleaning are on your list of efforts, you’ll enjoy your own well-organized kitchen for years to come.
The deal is to get crafty in creating new items from the old ones or repurposing some unused stuff.
Don’t know where to start? Relax! Here are twelve simple DIY kitchen projects that will leave you with some required extra storage afterward.
12 Simple DIY Kitchen Storage Projects Video:
12. A DIY Hood Fan With Storage Idea
 This idea will successfully get rid of your dull hood fan cabinets above the stove. While customizing the hood fan cover will cost you to loosen the overhead cabinet’s storage, it’s a way to have both the storage and a customized-looking hood fan.
First, gather plywood to build the box using wood glue and an air gun. Attach the box atop the hood with wood screws and drill. After that, attach the front door while installing a continuous hinge using small gold wood screws. Lastly, finish your piece by staining the whole unit in your preferred color.
11. A Knife and Cutting Board Drawer Transformation by “Queen Bee Of Honey Dos”
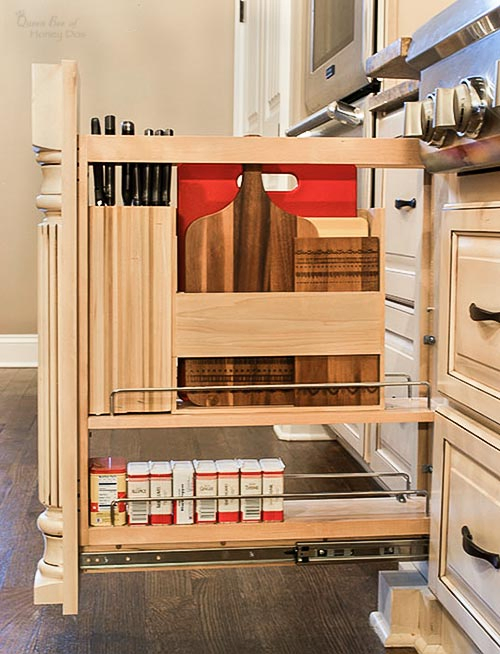 For safety storage, you need this drawer to hide your knives. The requirements include planks, square dowel rods, square dowel, food-grade wood glue, mineral oil or else to finish a cutting board, brackets, clamps, sandpaper or sander, and pin nailer or brad nailer.
Begin by measuring the drawer opening’s width before cutting all the dowels and planks precisely according to the measured sizes. Then, build the knife block with openings to accommodate all the scissors and knives.
Continue the project by adding storage for the cutting boards. After that, it’s optional to attach the cutting board storage with the knife block or to separate them. Add corner brackets afterward to secure their place.
10. An Easy DIY Wood Spice Drawer Organizer from Decorhint
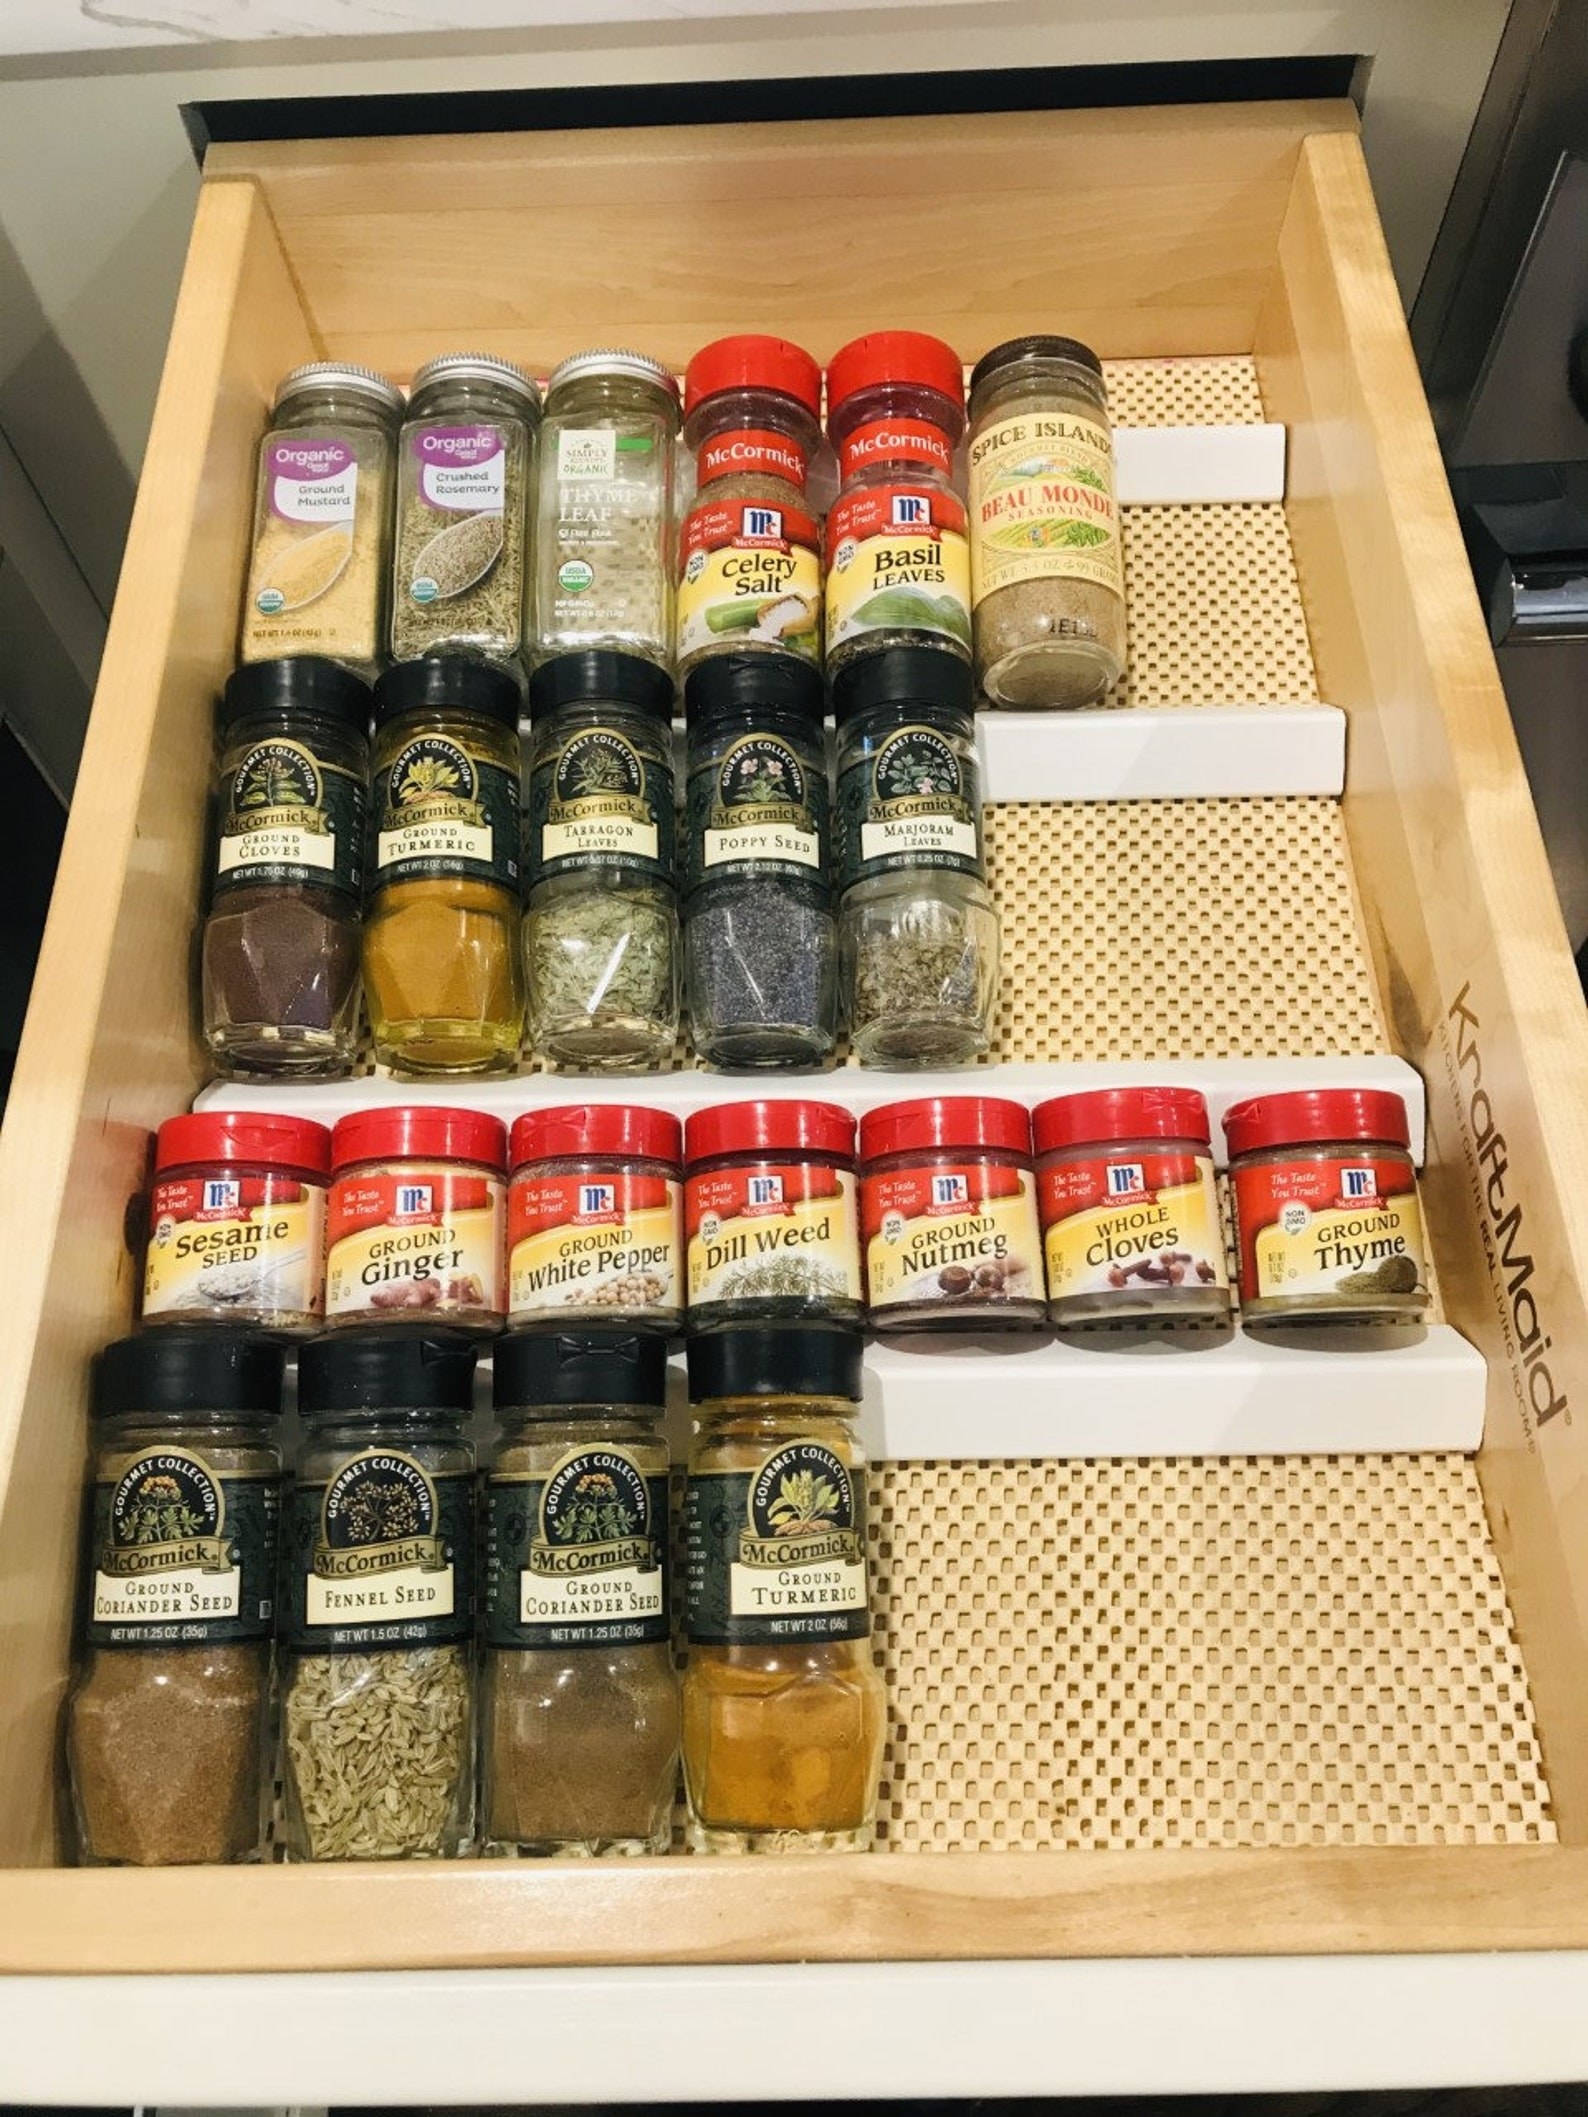 Do you always find your spices messy inside your drawer? If that is the case, try to make this spice drawer organizer.
First, measure the width and length inside your drawer. You will also need to measure the height of your spice containers. These measurements will determine the dimension of your racks.
Then, cut the wood to length. The length should equal your drawer, and the width should be a bit larger than the height of your spice containers.
Next, attach the wood spice riser, whose length should be equal to your drawer and the width is 2″, to each wood rack using wood glue and brad nailers. Insert the rack into your drawer and enjoy organizing your spices.
9. A Rustic yet pretty kitchen drawer transformation from Golubka Kitchen
![]() Rustic look has never failed to carve out the warmth in any room, including the kitchen. You can find many ways to add a little bit of rustic touch to your cooking space. One of which is to create these wooden-crate drawers.
Rustic look has never failed to carve out the warmth in any room, including the kitchen. You can find many ways to add a little bit of rustic touch to your cooking space. One of which is to create these wooden-crate drawers.
These drawers are easy to make. First, create the frame that hosts the drawer. If you already have one, you only need to find several vintage fruit crates and make a twist if necessary.
If the crates do not fit because they are longer than the frame, try disassembling them so that you can cut them to length and rebuild them.
Consider installing a wooden board with drawer slides in each opening. Then, you can position the crate on it. This way, the crate can slide smoothly on tracks, giving you easy access.
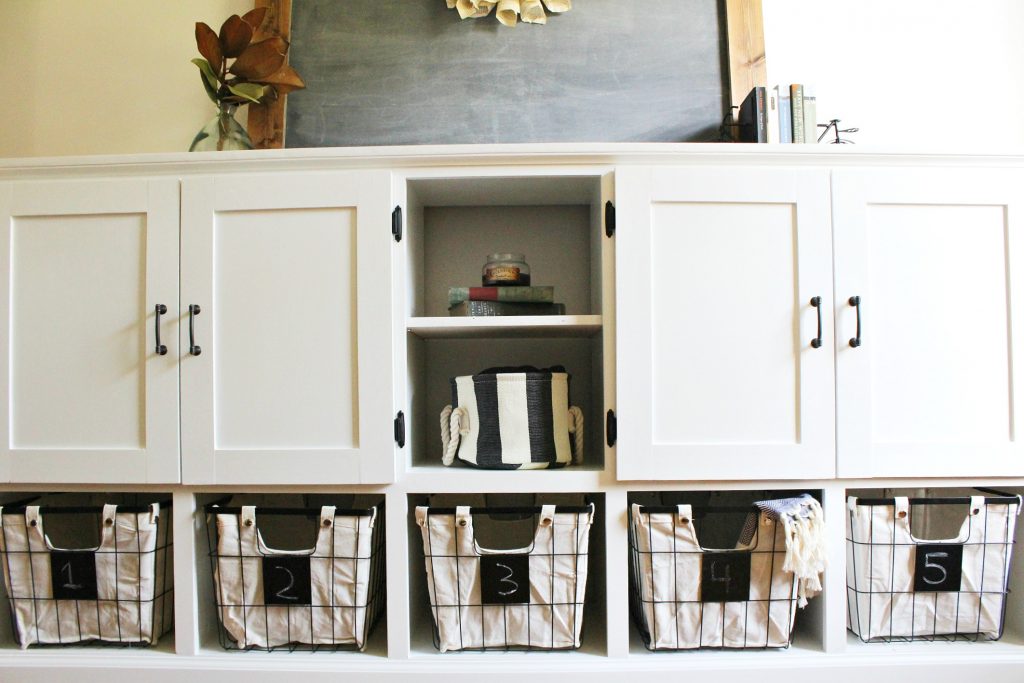
8. A Drawer Organization Project for Tea Holics
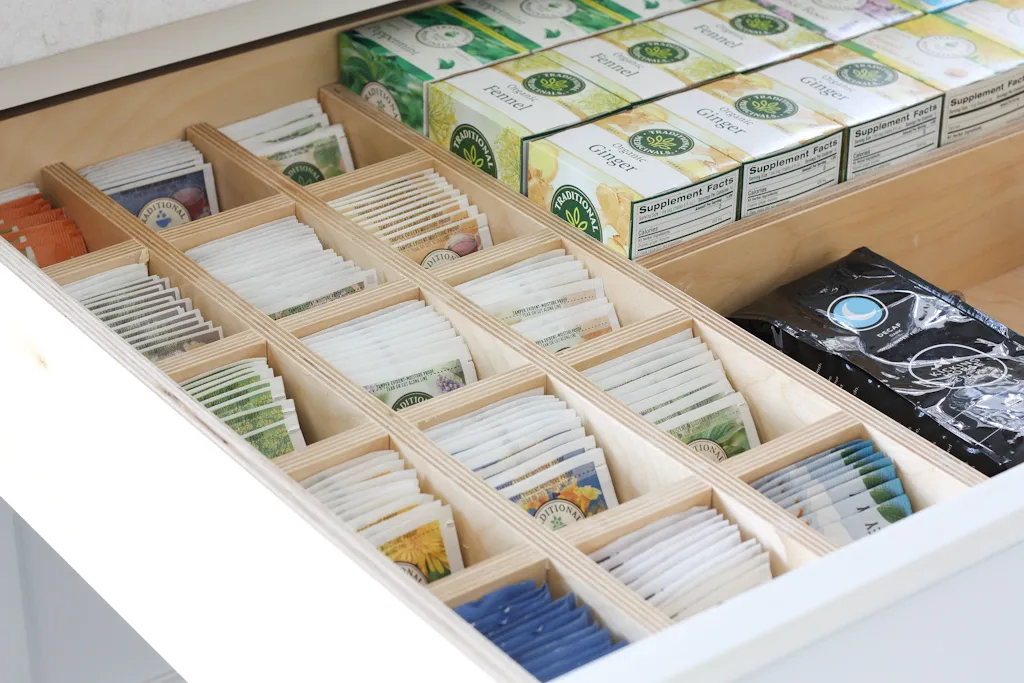
For this reason, this drawer divider can be the best solution for you because it is not fixed to the drawer. It is only an insert that fits snugly into the drawer. Since it is an insert, you can slip them in and out, making cleaning much easier.
7. Use the awkward space for a Pantry Cabinet
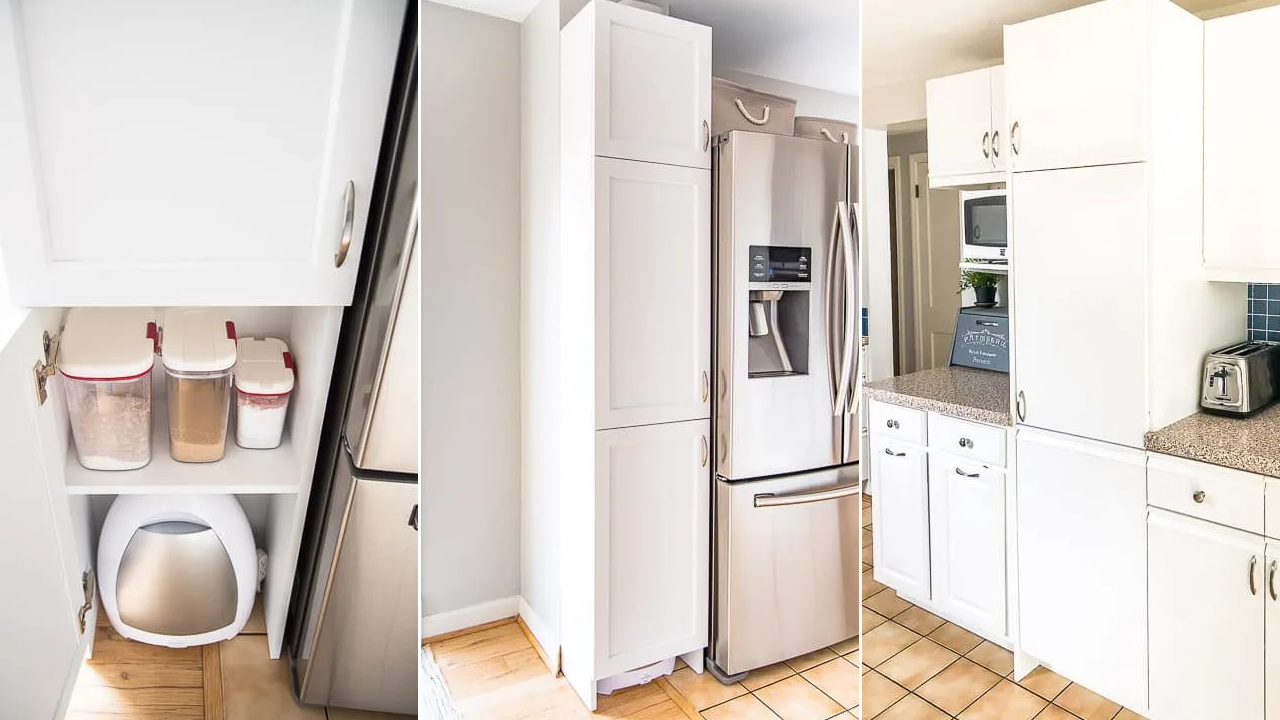 Using a single sheet of plywood, you can occupy the awkward space in your kitchen to host a DIY pantry cabinet. You must pay attention to the height, the dimension of the door handles, and the direction of the opening door since it’s a DIY project.
The first step is to prepare the cut plywood pieces by drilling pocket holes, sanding the surfaces, and cleaning the dust afterward. Then, assemble the pantry cabinet with the help of corner clamps to hold the big pieces upright if you have no assistance.
After that, paint and install the pantry cabinet to the wall before attaching the cabinet doors. Now, it leaves you only with the final step, organizing your new pantry.
6. A Mounted Trashcan under the sink
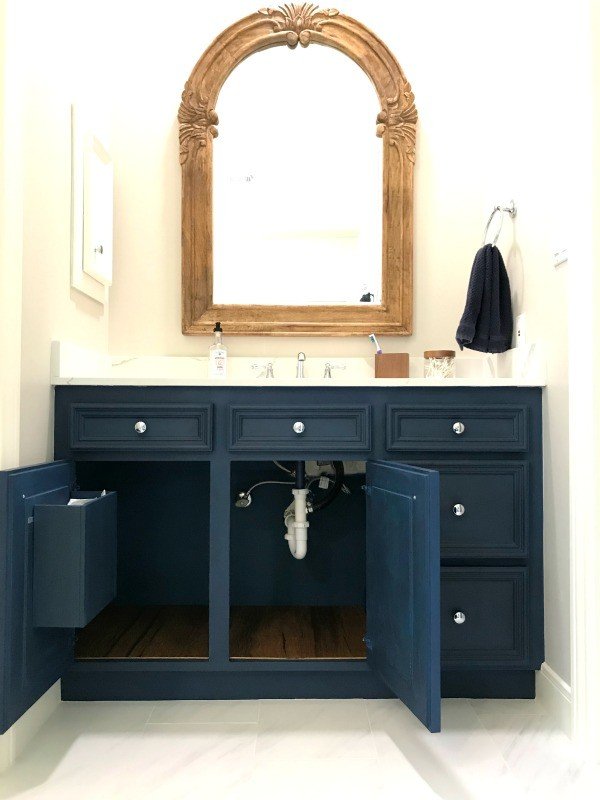 Trashcan is a must-have element anywhere, especially in the kitchen. But sometimes, its appearance can disturb the whole view. If it also happens to yours, hiding the trashcan is a clever solution. The deal is to mount it on the inside part of the cabinet door.
First, decide the can dimension that fits your cabinet and cut a ½” plywood into the bottom and the front sizes. Then, sand all of them and remove the dust afterward. Assemble the pieces using glue and brad nails. Wipe the excess glue, if any, then use wood filler as required. Next, apply paint and stain in a color that suits your cabinet. Attach the angle brackets, mount the trashcan on the cabinet door, and your kitchen will be trashcan-free!
5. A Two-tiered Diy Bread Box Project Idea
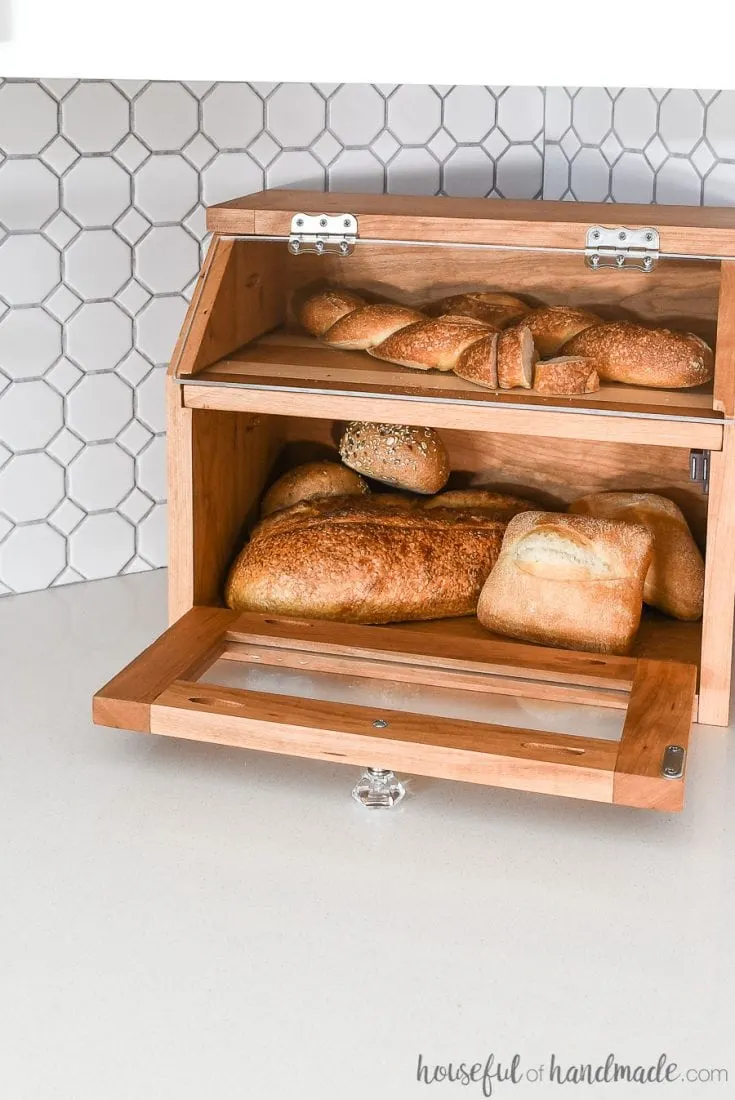 Enjoying bread with tea is another level of happiness. Thus, you need to make sure that you store your favorite loaves well and do not run out of them. For this reason, you need to build this two-tiered bread box.
First, build the sides by cutting the front and back side boards. Then, create a 45-degree angle on the top of the front sideboard. After that, attach the boards together. Remember to place the pocket holes on the inside. They also must mirror the two sides.
This bread box features a built-in cutting board. Thus, you will also need to get the assembled side pieces and router a groove on the inside to house the cutting board. The groove should be ¼” deep and ¾” thick. The most important thing is that the groove must stop at ¾” from the back.
Then, assemble the bottom and back, attach the bottom to the side, and attach the back. When attaching the top, ensure it is flush to the back and hangs over each edge 14″.
Finally, build the door from wooden board and plexiglass. Then, create the cutting board shelf using two 1x2s of a different species to give it stripes.
4. A Three-Tier Spice Rack Idea
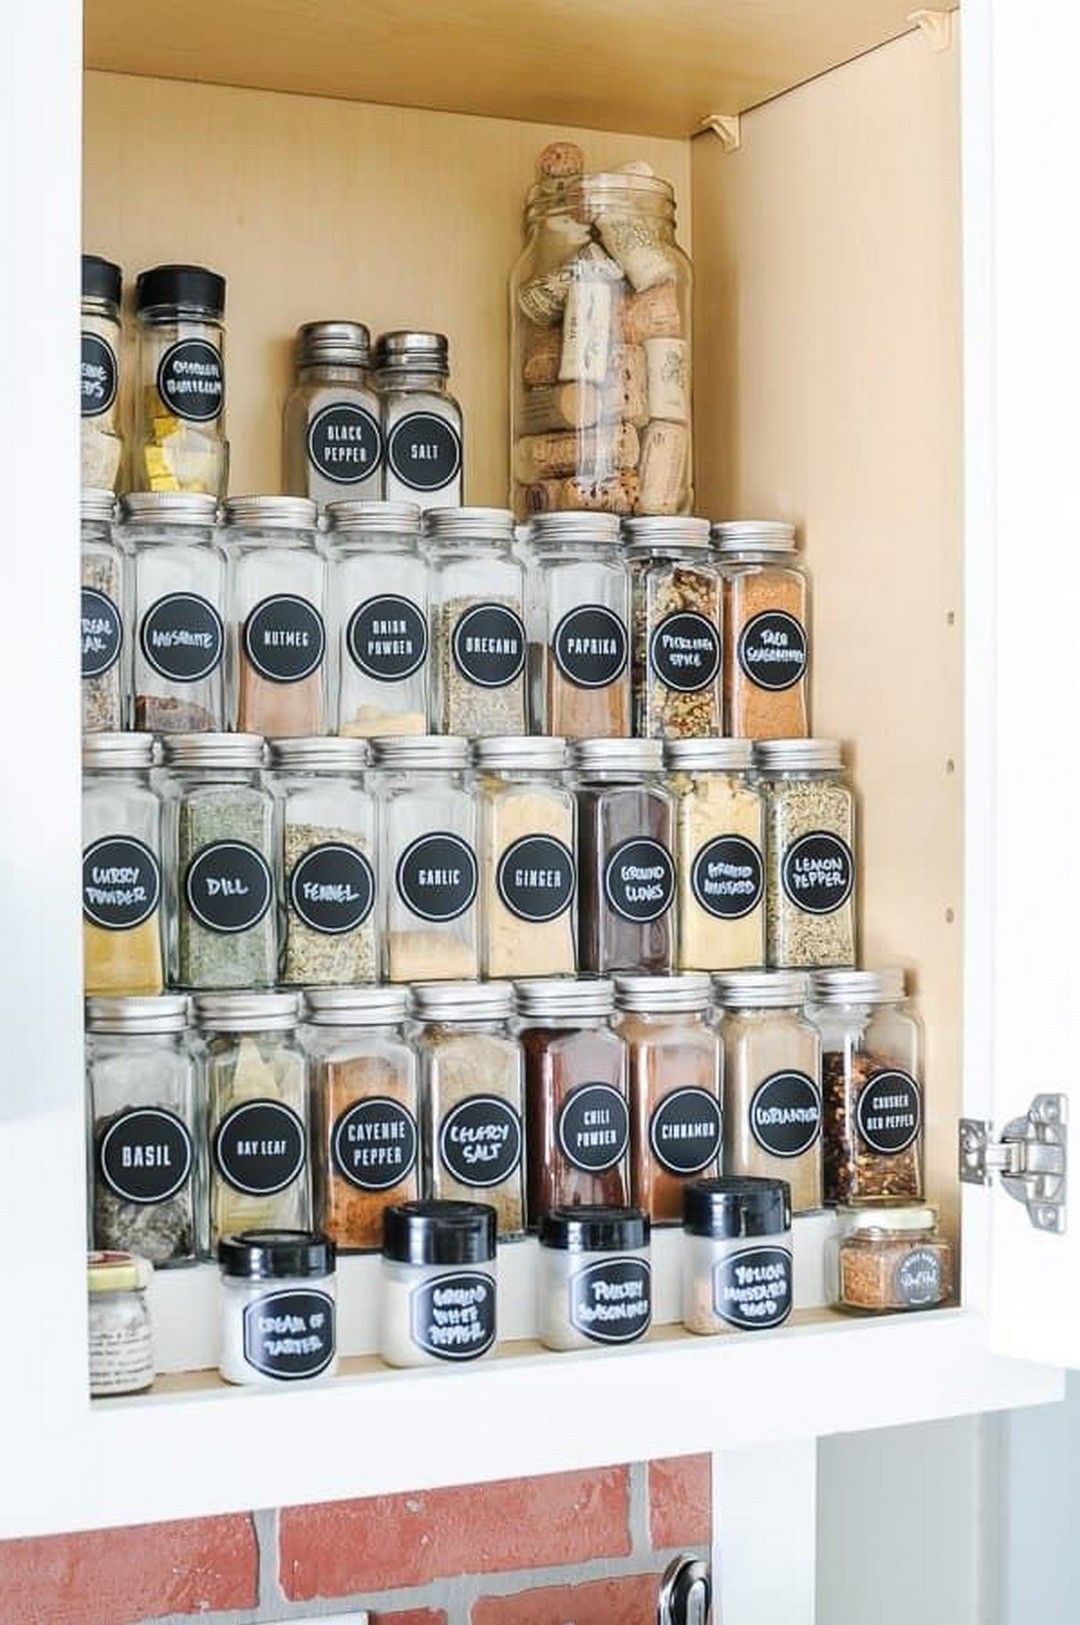 When it’s hard to look for the right spices because the other jars hinder them, it’s time to build this tiered spice rack. It lets all the jars be displayed completely, thus shortening your digging and searching time.
Step one: measure the jars’ diameter and height to determine each tier’s depth and height. Measure your cabinet dimension to decide on the board cut list, and cut the boards according to it with the table saw. After that, clear out your cabinet before installing the tiered rack. You can use a clamp to secure each tier when nailing.
For the finishing step, begin with taping the unwanted part, filling the uneven surfaces, and letting them dry for 24 hours before sanding. After removing the sand dust, coat the entire tiered spice rack with prime and paint.
3. A straightforward $10 Roll Out project for Kitchen Cabinet Idea by Ana white
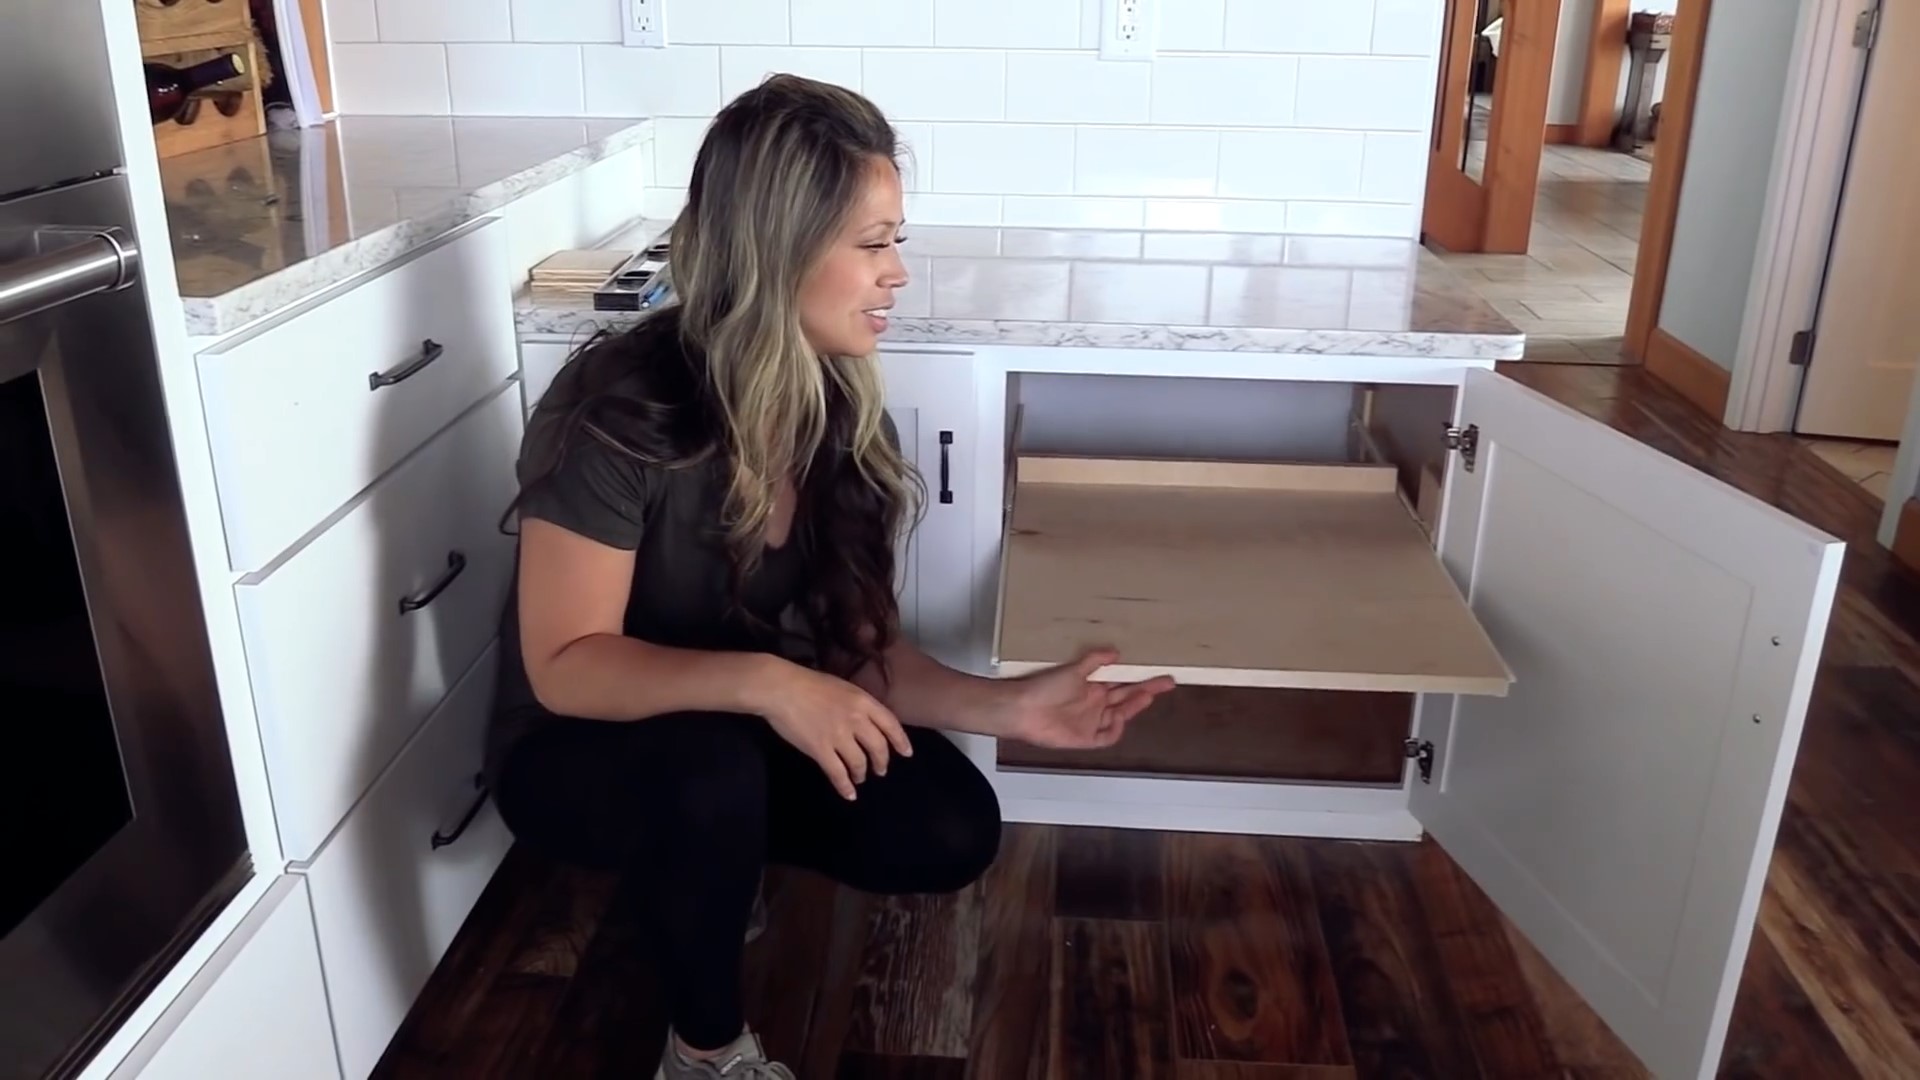 Getting the canned food stored in the back row of your cabinet is no picnic. Thus, this roll-out shelf will come in handy.
Building this shelf will depend on how the shelf is installed and what kind of cabinet you have. If the shelf is fixed to the cabinet, you can unscrew it. If it simply sits on shelf pins, you can just remove it.
Now, go check your cabinet. If your cabinet is frameless, installing a roll-out shelf will be a breeze. You only need to remove the shelf and cut it so that you get 1 inch less in overall width. Then, install the drawer slides and the shelf you removed.
If your cabinet features a face frame, you must install shims inside it so that your shelf will not bump into the trim when you pull it out.
2. A chic yet functional dresser-to-kitchen island transformation idea by Hearthwoodhome
![]() Do you have a tired dresser? Do not throw it away yet! You can turn it into a handy kitchen island.
Do you have a tired dresser? Do not throw it away yet! You can turn it into a handy kitchen island.
The first thing you do to turn your dresser into a kitchen island is remove the top.
Then, install corbels to support your countertop.
Once you have removed the top and attached the corbels, you can install your countertop to the perimeter of the dresser and the corbels’ tops. To finish it off, fill in the holes with wood filler. Finally, stain the top and paint the island white to carve out a farmhouse look.
1. A DIY Storage Console Project Idea By Woodshopdiaries
 You can usually find this storage console in a mudroom. However, you can copy this idea to overcome the clutter problem in your kitchen.
First, cut one sheet of ¾” plywood into three 16″ wide strips. Then, get another sheet and cut out another 16″ strip. Then, cut four pieces at 39 ¼” and four at 31 ½” from those strips.
Now, you need to make the carcass by attaching the 31 ½” pieces to the 39 ¼” pieces. You should get two carcasses. Attach the bottom shelf. It is supposed to be 3 ½” from the ground. Then, assemble the top.
Once you have assembled the two sides, cut two pieces from the 16″ strips to get 15 ¼” long. Then, assemble the pieces and ensure all the shelves are at the same height.
Afterward, you can add the top cubby dividers to form the storage console, face frame, back and trim, and doors. Finally, apply any finish as you wish.
References:
12. Bloomingdiyer.com
11. Queenbeeofhoneydos.com
10. Decorhint.com
9. Golubkakitchen.com
8. Thebrainandthebrawn.com
7. Thehandymansdaughter.com
6. Abbottsathome.com
5. Housefulofhandmade.com, Learn.kregtool.com
4. Joyfulderivatives.com, Joyfulderivatives.com
3. Ana-white.com
2. Hearthwoodhome.com
1. Woodshopdiaries.com