Next, we return to our ten inspiring IKEA projects and DIYs ideal for Your Living room we already mentioned in the opening.
10 IKEA Living Room Hack Idea
Ikea has become a household name when it comes to furniture, and it’s no wonder why – its stylish designs and affordable prices make it a top choice for many. But have you ever found yourself needing to tweak your Ikea pieces to perfectly fit your living room? Don’t worry; you’re not alone! That’s why we’ve got some exciting and clever hacks to share with you.
Get inspired as we reveal our next 10 Ikea hacks living room DIY project ideas. Whether you’re looking to maximize your storage space or add a unique touch to your decor, these ideas will solve any design dilemmas you may be facing. So, what are you waiting for? Let’s get creative and transform your living room into the cozy haven of your dreams! As always, Simphome curates and presents you with the list.
A Media Console transformation project from IKEA Besta
![]() Modifying furniture is sure a fun thing to do. For example, you can turn Ikea Besta into a media console.
Modifying furniture is sure a fun thing to do. For example, you can turn Ikea Besta into a media console.
Here are the tricks:
- Create the wood panels by gluing two pieces 166cm x 43cm x 1.8cm and two more 64cm x 43cm x1.8 round.
- As for the bars, you will need four pieces 20cm half round with a diameter of 35mm, along with 60 pieces 64cm with a diameter of 10mm.
- Make semi-circular marks at the top of the longer glued wood panels and cut them.
- Make some holes in it to join the parts.
- Sand and paint them.
- Remove the doors before installing the console’s bottom and top boards.
- Now glue the doors with the semi-circular pieces.
- Install the back, and you’re done.
Turn IKEA Eket into a Console Table
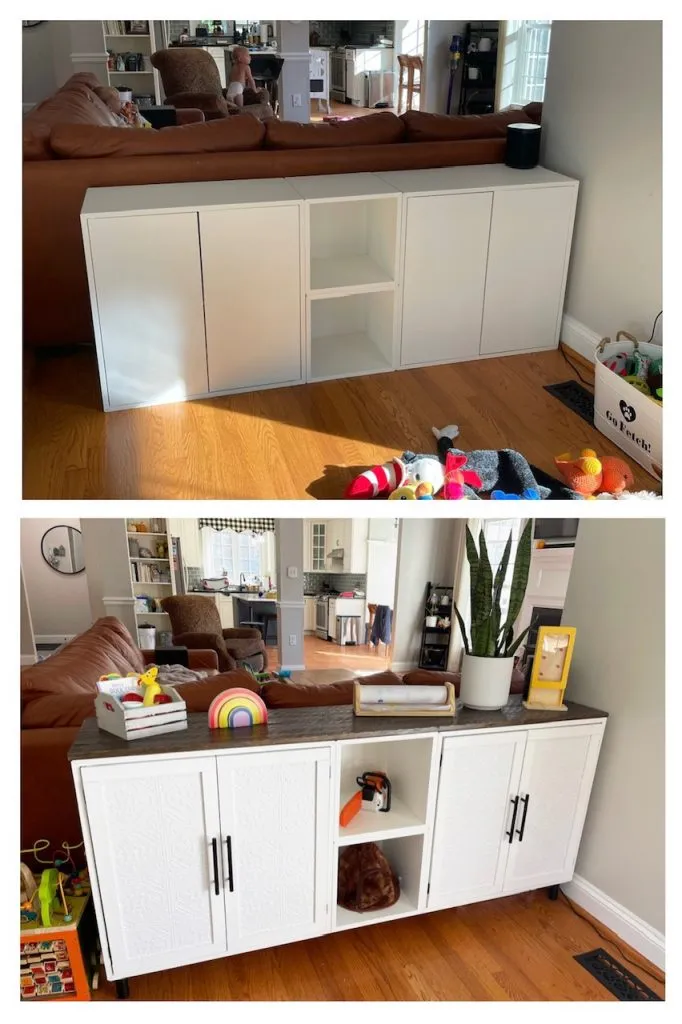 When considering a change to your furniture, prioritize function over appearance to ensure that your investment is worth the money. To enhance the functionality of your Eket cabinet, consider adding a solid top that can withstand the weight of your belongings.
To start, obtain a board that fits the length of your Eket and cut it into pieces.
- Create pocket holes in the pieces and join them until you have a wide board that fits the top of the cabinet.
- Then, remove the doors and attach the board to the cabinet, securing it with screws from the inside.
- Finally, consider giving the top a fresh coat of paint to match your desired aesthetic.
By following these steps, you’ll have a sturdy and functional Eket cabinet that will meet your storage needs for years. So, instead of just settling for a change in appearance, think about the practicality and longevity of your furniture updates.
How to Build Freestanding Window Bench IKEA Sektion Cabinets
 A bench by the window is an excellent section as you can sit while looking outside the window.
Here’s a simple and quick modified Ikea section that turns the cabinet into a comfortable seating place.
- Firstly, make the base frame. You can simply measure the length and width of the cabinet countertop.
- Cut two long pieces of board.
- Drill some holes in it and attach the shelves.
- Prepare a piece of MDF, foam, and fabric as long as the frame, and upholster it with a staple gun.
From a simple Ikea project makeover into a minimalist TV cabinet
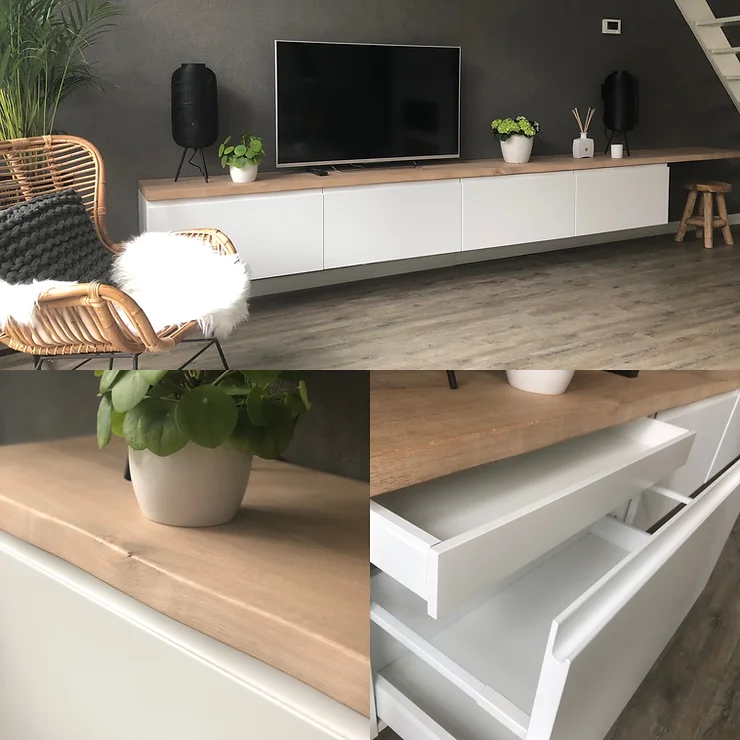 This TV unit is stylish and DIY-friendly. You can surely make it yourself. One drawer is made of IKEA Metod wall cabinet element, Voxtrop drawer, front matt white, Maximera Drawer high and low white, and Utrusta drawer front white.
Join two cabinets to have a long counter for TV and lamps. To make a stunning addition, give an oak on top of it. The oak is obviously longer than the counter, but that’s the point.
You can have it as a spare table in the corner. But first, let’s talk about the hanging procedure. Use the rail that comes with the product and follow the instruction. Ensure the wall is strong enough to hold cabinets, as they are heavy.
A Mid-Century Modern Cabinet IKEA hack with Sliding Doors
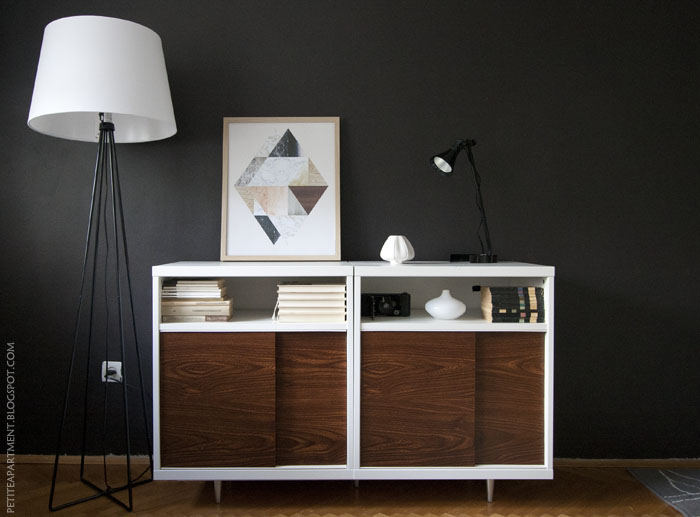 Unleash your creativity and transform your ordinary cabinets into stylish, sliding-door masterpieces with this simple hack! The best part? You don’t need to purchase sliding doors from the furniture store – you can create them yourself.
Gather your materials: fiberboard or panels for the doors, metal legs, plywood, plastic rails, and faux wood grain contact paper.
- Measure your board and make any necessary adjustments by trimming it to the perfect height and width.
- Then, cut the plastic rail to size and securely attach it to the top and bottom of the cabinet.
With this hack, you’ll be able to add a touch of modern elegance to any room in your home. So, why settle for ordinary cabinets when you can create stunning, custom sliding doors in just a few simple steps? Get started on your next DIY project today!