The area can be almost any size, but you might want to start out small, perhaps a 100-square-foot area or less. The area should be relatively flat and easy to walk on. Remember, we’re creating a “living space.” Also, be leery of possible tree roots that might invade and lift the area. Hint: If you have never worked with cement before, I’d suggest starting really small, such as with single stepping stones. Once you feel confident with this process, the mosaic patio will seem less intimidating!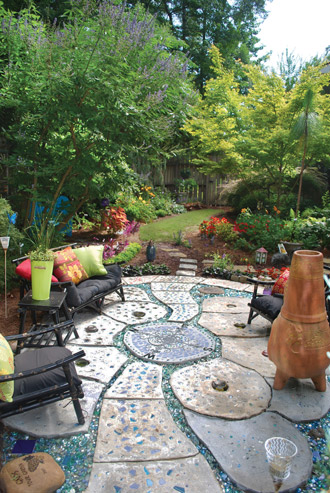
There are several techniques for creating mosaics, some much more complicated than others. We are going to keep this simple and just press our pieces into the wet cement. This will be just like creating one of those stepping-stones from kits sold in craft stores but on a larger scale. With one exception: Our molds will be defined by our creativity!
Supplies needed
(quantity of cement, sand, tiles, mosaic bits, and glass marbles will depend on the size and design):
• Quick-setting Portland cement; use 1 part cement to 2 ½ to 3 parts sand. Note: I use Quikrete Portland Cement; I’ve tried using Quikrete Mortar Mix, but it’s not as strong, and I’ve had stepping-stones crack when using it. See the quantity calculation below.*
• All-purpose sand* (I use Quikrete All-Purpose Sand; don’t use play sand as it’s too fine.)
• Glass beads, tile pieces, pebbles, shells, old jewelry, or whatever you like to create your design
• Concrete dye (optional)
• Water for a mix
• Wheelbarrow for mixing
• Use hose or buckets to carry water to the wheelbarrow; also, use a hose to define the border of the patio area.
• Bucket to scoop cement and sand; use this to measure the volume of cement/sand proportion.
• Tarp (this will be messy)
• Utility knife or heavy-duty cutting shears
• Cardboard that can be cut into long 6-inch-wide strips (quantity will depend on design)
• Hand trowel
• Dust mask
• Concrete wire brush
• Old shovel or something to mix cement with
• Scrub brush to clean up mosaic pieces
• Rubber or latex gloves
• Hammer and towel (if busting up tile pieces for mosaic)
• Safety glasses
• Landscape paint
• Tape measure
• Graph paper and pencil
• Glyphosate (herbicide) if needed to kill lawn or other ground covers in the new patio area
* Calculating cement quantity: For this mixture above and assuming your patio “pavers” are 3-4 inches thick, you will need approximately 10 bags of 94-pound Portland cement for 100 square feet. Sand will come in 60 and 80-pound bags. You will measure proportions by volume (not weight). Three to 4 inches will be thick enough to walk on and place light furniture. Note that we are not using “concrete” since it contains gravel, making it more difficult to lay in our mosaic pieces.
The Process
- Check the weather! I like to work in 50 to 80 F temperatures. Concrete is exothermic and will cure faster in cooler weather. If the temperature gets below 40 or above 90 F, then don’t do it! Also, you don’t want to do this while it’s raining.
The cement mixture should be the consistency of brownie batter. - Define the area. Take a hose or rope and lay out the border of your area.
- Use landscape paint to mark the border.
- Measure the area.
- If lawn or other ground covers exist, treat with glyphosate (Roundup). It might take two to three applications one week apart to effectively kill the existing lawn. Read the label carefully since temperature affects its effectiveness.
- Sketch out the design to scale on graph paper. Define the edges of the individual cement molds (pavers).
- When existing grass/ground cover is dead, spray paint the design (the paver edges) on the ground.
- Water the area the night before to make the soil soft to dig (not muddy). You can do this in phases, so break it up accordingly.
- Creating the paver molds: Trowel out soil along the painted lines to create a small trench. Dig about 1-2 inches deep and 1-2 inches wide. I suggest only digging out what you plan to complete for that day. If your area has a slight slope, be sure to do the lowest area first.
- Cut cardboard strips 6 inches wide and however long you need to create your paver molds. Keep pavers less than 3 feet in diameter to avoid cracking but large enough to be a stepping-stone (bigger than your feet).
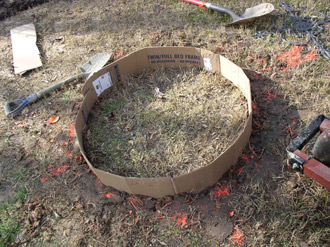
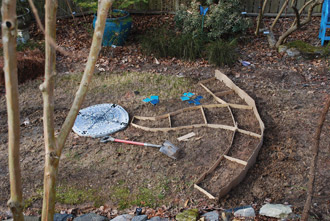
- Insert cardboard into the trenched areas, push the soil back to secure the cardboard, and ensure there are no gaps where cement can leak out. Be sure to overlap cardboard strips if several pieces are used along an edge (photo above).
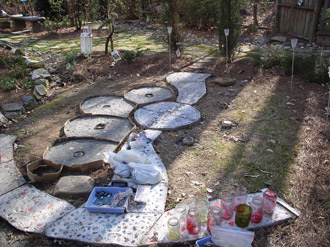
- Have mosaic décor ready to be placed. If this is a complex pattern, have the pieces arranged next to the paver. Also, pour what you can effectively decorate before it begins to set. So start small and gauge yourself. For tiles that need to be randomly broken up, place the tile in a towel, lay it on a hard surface (I use my driveway), and tap with a hammer.
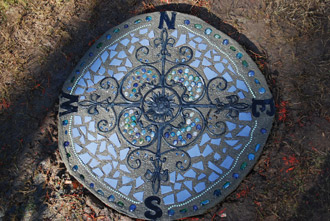
A finished mosaic paver. - Lay the tarp down on the work surface below/around the wheelbarrow.
- Put on gloves, safety goggles, and a dust mask.
- Make cement mixture. Approximately 1 part Portland cement to 2½ to 3 parts sand (by volume).
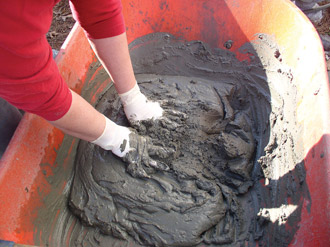
- Place dry ingredients in a wheelbarrow and thoroughly mix. Only mix what you can work within the hour. I use a combination of a shovel and my hands to mix.
- Add water gradually, slowly mixing in; it helps if one person adds water and another mixing. Add enough water, so the mixture is about the consistency of brownie batter. Temperature and humidity will affect the quantity of water needed. It would be helpful to put your water in a container before pouring so you can track how much you use. This will make mixing the next batch a little easier and more consistent. If you are adding a concrete dye, do this now.
- Shovel or scoop the cement mixture into the mold(s). Gently pat to be sure all air spaces are removed and the cement is somewhat level. Fill in the next mold. Do this until the cement mixture is finished.
- Add decorative pieces. Be sure to press pieces in so they do not stick up, creating sharp surfaces. Plus, you want to be sure they will not come loose in the future.
- Wait approximately 24 hours; the cement is almost cured but soft enough to file rough spots. Remove the cardboard edges. Gently brush off sharp edges or bumps on the surface using the wire brush. Wait another day to brush off the mosaics, as they might come loose at this point.
- The surface should be ready to walk on in three days.
- Repeat steps 8-21 when ready to do another phase.
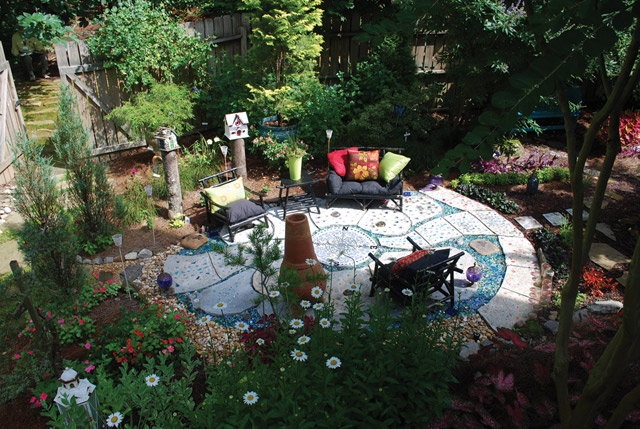
- When fully cured (about three to four days, depending on the weather), accessorize with furniture and enjoy!
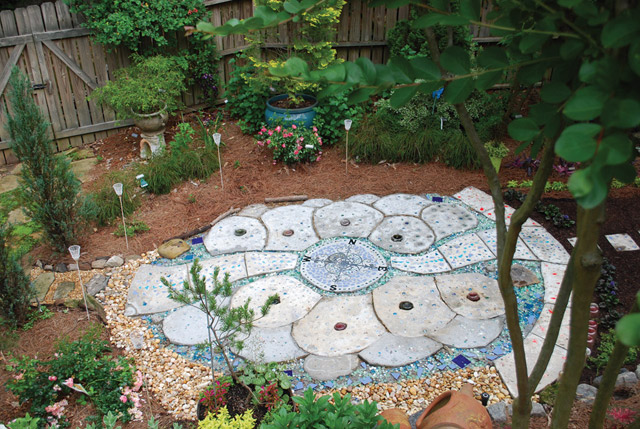
As shown in the photos, I have areas with no cement pavers, just glass beads or pebbles. For these areas, you might want to lay landscape fabric below to keep soil from washing over the loose stones.
You might have also noticed that I had jars in the center of the large, round pavers. I made these inserts so I could place LED lights inside the jars at night … your imagination only limits you. So have fun!