Key Points:
- You can simply build a new bedroom divider from scratch or buy a ready-made one from a furniture shop.
- You should spend time making a list of all things you expect your bedroom divider to hold. This idea will help you to find the right size for it.
- You should consider the material and quality before buying it.
- If you are about to build your bedroom divider, make sure it blends in with the rest of your bedroom furniture, particularly with the other items in the room, including curtains.
- If you prefer a ready-made divider, ensure it is securely attached to the wall.
- Make sure a divider matches your room décor.
- Your bedroom divider should have metal railings – like those of a staircase – to prevent anyone from falling off the top of it.
- You can install waterproof flooring if you opt for a free-standing partition, or you can use carpeting if you are planning to place it against a wall.
- Plywood and MDF boards are the best choices when selecting building materials for your bedroom divider.
- Bedroom dividers should have room for a chair and a small table.
- You can either place the door on the divider in the middle or at one end.
- A divider can serve as an independent room inside your house, especially if there is another entrance.
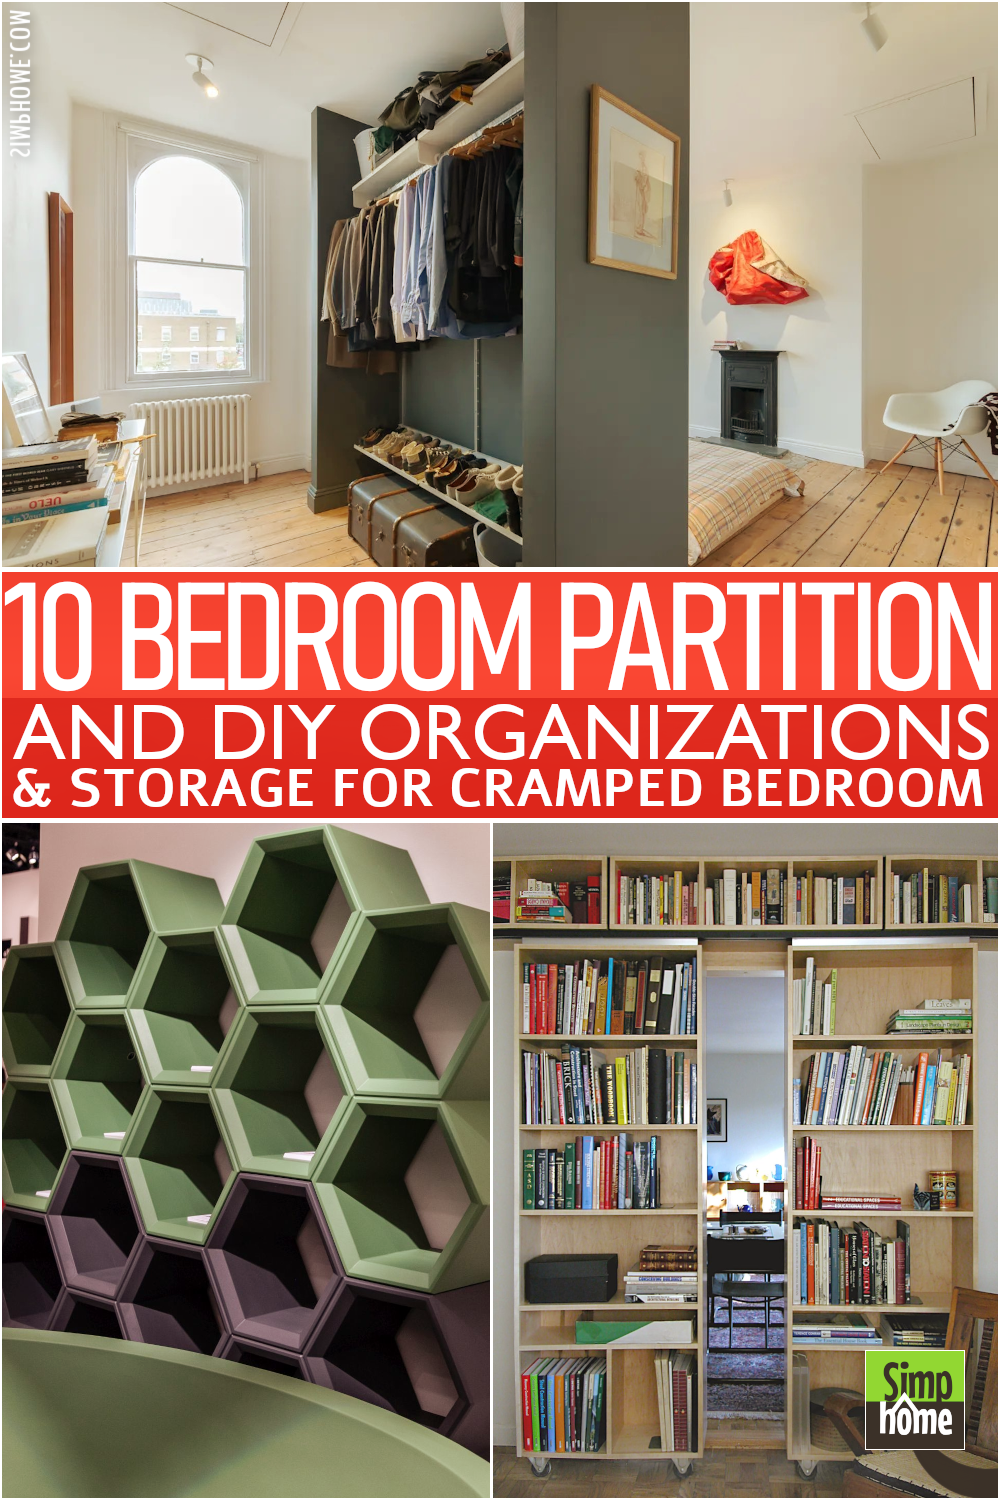
Living in a studio apartment or any other compact house forces you to maximize your creativity, especially for privacy and storage issues in a bedroom. Don’t worry! You can always find ways to solve them.
When you can get to the bottom of both, why not try it. Dividers will help you create a private and cozy bedroom. Moreover, they can help you accommodate your books or knick-knacks while making a liveable and unique area.
If you want one in your bedroom, take a peek at the following 10 bedroom partition room dividers with storage. We hope that you will gain inspiration for your bedroom refurbishment. As usual, your trusty list maker Simphome presents you with the list.
🔊10 Bedroom Partition with Storage Video:
List Entries:
10. Repurpose a Clothing Rack
 Do you have an unused clothing rack for an open closet system? Do not let it lie dormant. Clean it thoroughly and do some repair and repaint.
The clothing rack in this studio apartment, for example, acts as an embellishment rather than a place to hang outfits. It aims to separate your sleeping space while preserving the room’s open plan. You also get another benefit, which is storage for your favorites.
How you use it is up to you. You can hang your favorite outfits or plants. You can also hang ropes, beads, or macramé for extra privacy. Even better, try displaying photos, pictures, books, or miniatures on the shelf.
Relevant details:
No 1. Selects items you need to get more organized
No 2. Select the projection angle and shape of your partitions
No 3. Decide on color & theme
No 4. Decide on the size of your partitions
No 5. Decide on the materials you use
No 6. Choose the location of your partitions
No 7. Prepare a checklist of items you need to buy
No 8. Decide on the size and type of hinges, brackets, locks, or cords you need
No 9. Set up a budget and start building!
No 10. Check the materials’ viability for use outside
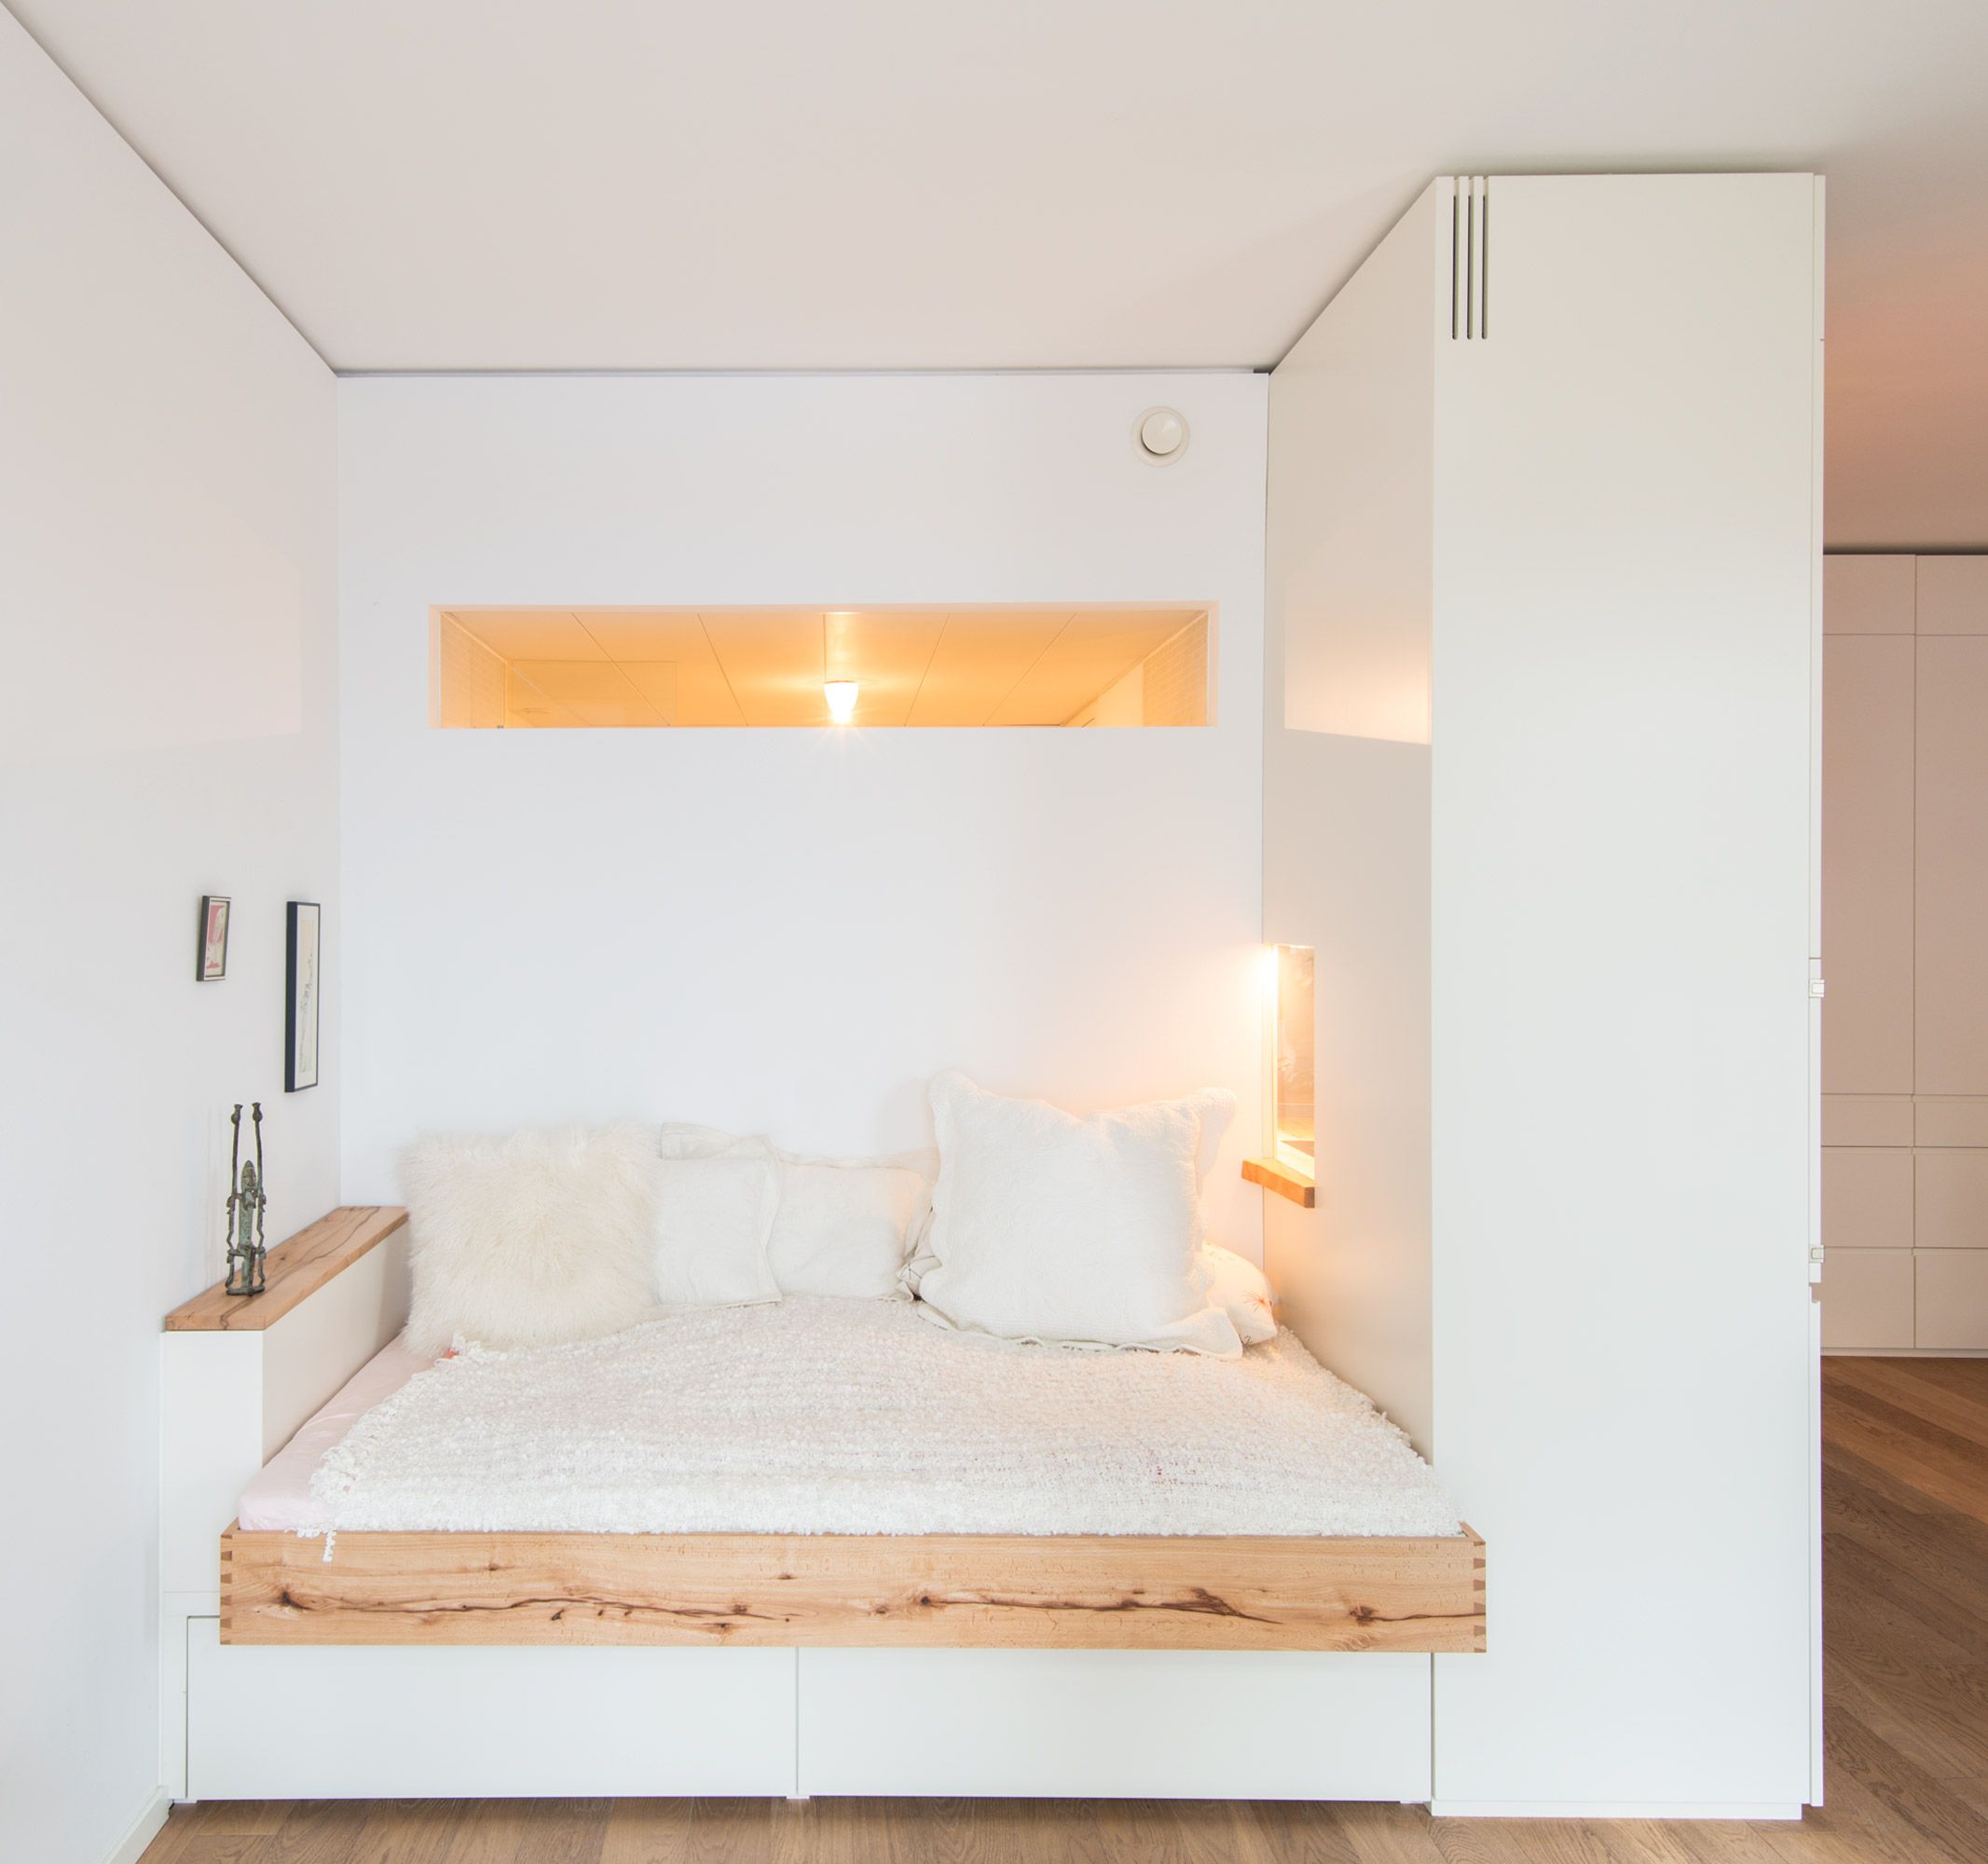
9. A bedroom divider idea with open shelving and closed cabinet
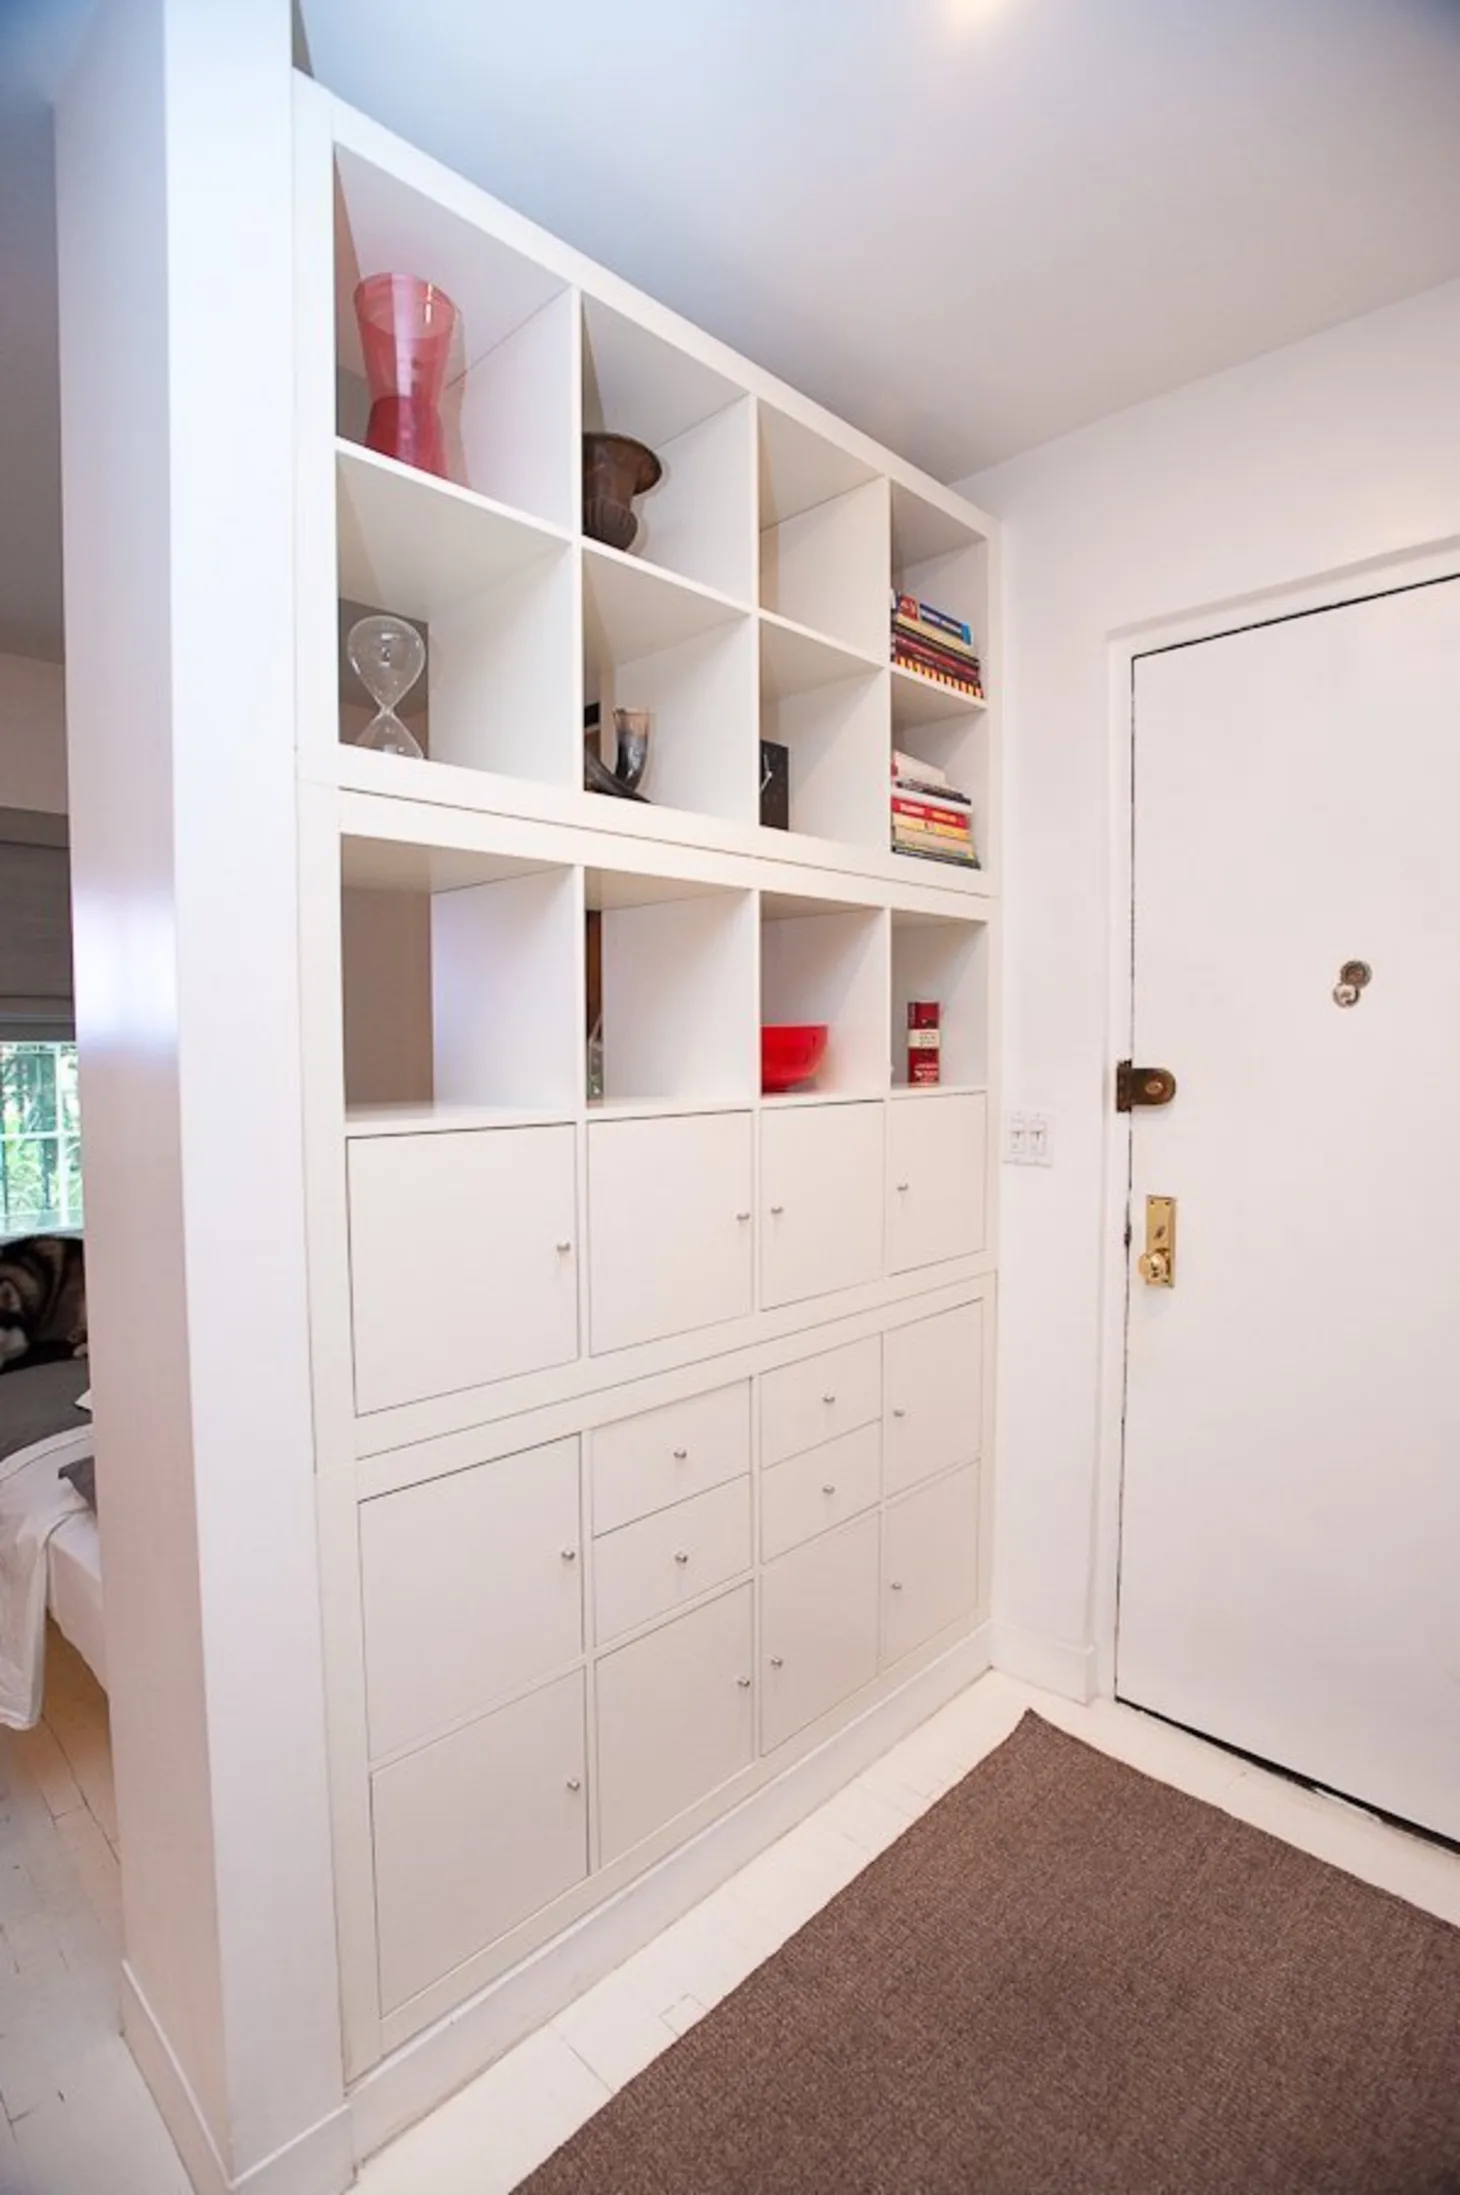 This partition conceals a sleeping area behind it from the entryway. Furthermore, it gives you plenty of extra storage.
This built-in cabinet is actually some storage units stacked and framed to look like a custom one. It consists of cabinets and drawers in the lower half and an open shelving unit for the upper part.
The drawers and cabinets provide ample storage for your stuff while completely blocking the view from the adjacent room. This way, your guests will not notice your messy bed.
The upper half remains open, allowing you to display your knick-knacks that can spruce up the space.
Basic instructions:
- Step 1: Build the frame for the upper half.
Cut four pieces of 2×4 lumber about 11″ long, and nail them to the wall studs at 32″ on center. Attach the inside face of one of the walls from the corner, then attach a pocket-door track to this side. If you are not a DIYer or handyman, the track can be purchased at your local home improvement store for about $20-30. - Step 2: Cut one door to match the width and length of your wall, and install it with hinges at one end of your 2×4 frame.
- Step 3: Build the lower cabinet.
Cut four pieces of 2×4 lumber about 12″ long, and nail them to the wall studs at 16″ on center. Attach a piece of ¾” plywood, so it sits over the frame and is flush with its top. Then, cut two pieces of clear glass that are the same size as your cabinet’s largest dimension. Layout your glass and use silicone caulk to attach to the cabinet frame by simultaneously adhering it to both surfaces. - Step 4: Finish up your partition system by installing drawers inside your cabinets and filling them with your belongings!
8. The Dressing Wall Partition Ideas
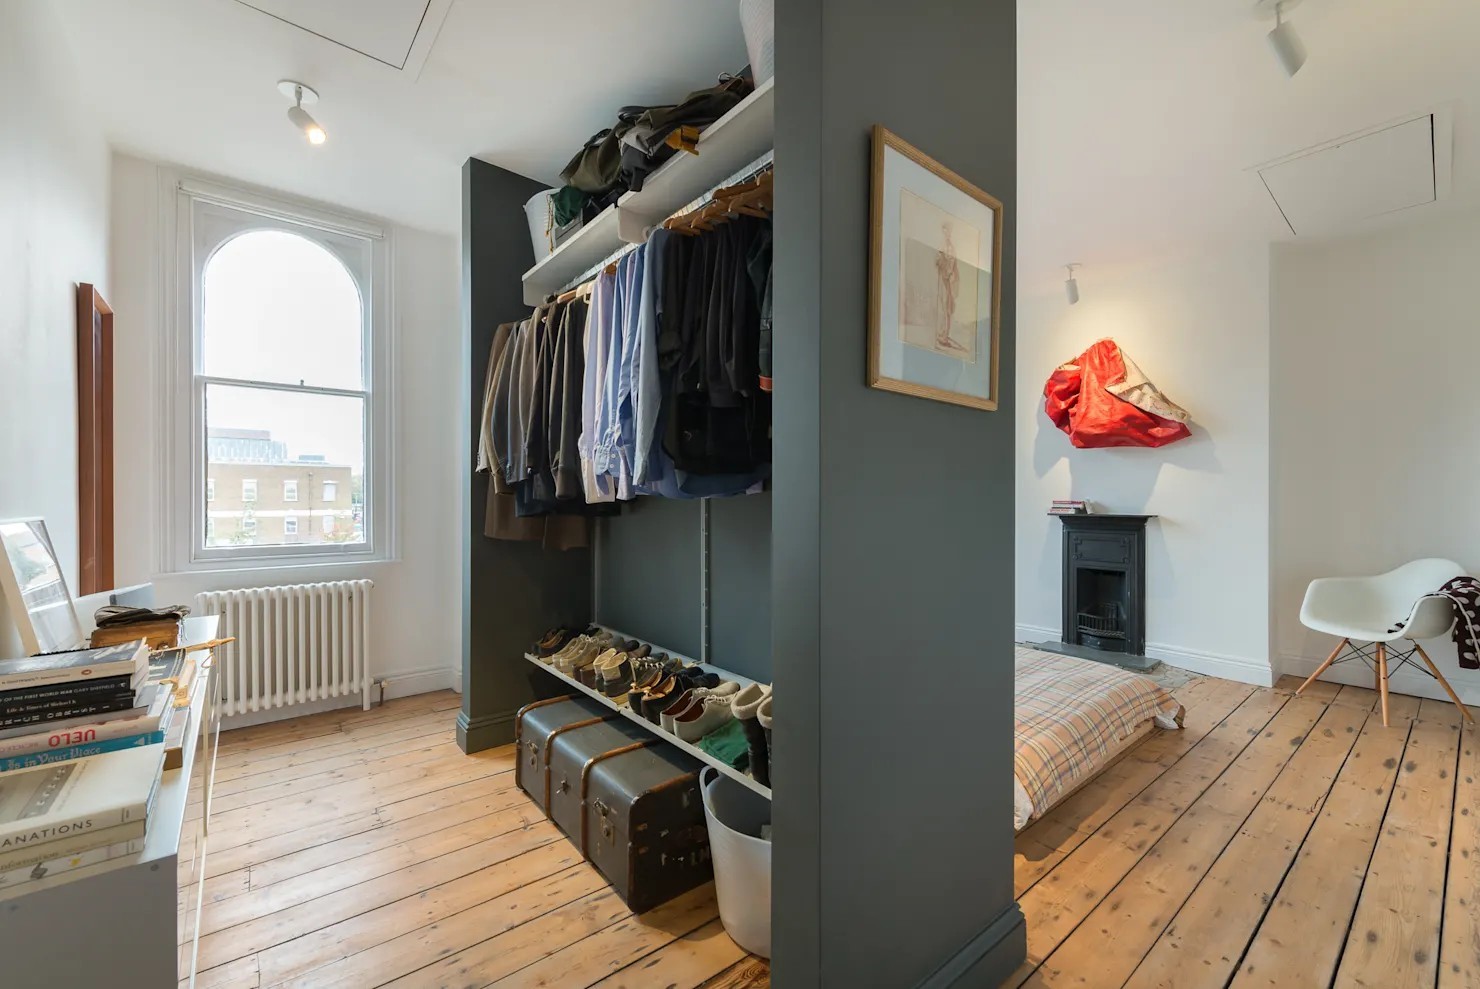 It is almost similar to the previous partition, a floor-to-ceiling room partition.
This divider gives you two advantages: a room partition and a wardrobe.
You can find many DIY wardrobes on the internet. Nevertheless, here we give you some tips.
Sketch the wardrobe you are going to build. Decide the size and style that you will use. Then select materials that will not hamper the look of your room. What next? Roll up your sleeve and get to work.
Basic instruction for the project:
- Step 1: Measure the length and width of the room and make a sketch.
- Step 2: Mark out the positions of both horizontal and vertical partitions.
- Step 3: Select the best color, texture, and style materials.
The closet should not take up too much space in your room, nor should it look bulky or be heavy. You need a firm but visually light closet that will not get in the way or cause discomfort when you are in it.
What materials do we recommend?
Those materials such as wood, metal, and plastic are easy to work with. You can cut them to any size, drill holes through them, or mount handles. - Step 4: Now, measure the size of the closet and draw out the final sketch.
- Step 5: Decide the best position for your room partition and mark it out on both side panels of your wardrobe; make sure it is straight and level.
- Step 6: Arrange for materials that will match the look of your walls; for example, if you are using wood as a wall material, use wood as a paneling material in your closet.
- Step 7: Mount a door to your partition (if you want); fix other hardware such as hinges and handles.
- Step 8: Make arrangements for shelves, shelves, and drawers.
If you have excessive time on your hands, you can have a more advanced closet design. A complicated design will consume more time to draw up but will look more interesting when it is done.
7. The Storage Wall partition Idea
 This idea hides your bed nicely while adding areas to keep your goods. If you need a wall to divide your room, this storage wall is worth building. Are you interested in DIY it?
First, measure the height and length that you want. Then, decide how many shelves you will have. Then, choose materials that are easy to work with, such as plywood.
Next, cut the boards based on your base, frame, and doors measurements. After that, assemble the parts.
Replicating the particular idea is definitely won’t be easy; for that reason, you must know:
- The exact measurement of the space you want.
- The materials & the tools you need to get the result you want.
- The length of each wall, height, and width of the door.
- For what purpose will this partition be? How much space do you need?
- What materials to buy and where to buy them.
- And for last, measure how many shelves will fit in your room so that everything is well organized without order problems.
Most people think that living with a storage wall is expensive and stressful to build, but it is not as challenging as it looks at first sight.
Remember, a partition can transform a messy room into a classy bedroom in no time. It makes a small room looks spacious and big. The possibilities are endless; just keep in mind that every wall is important. You can change your room’s look without spending too much money or effort. So start building and have fun!
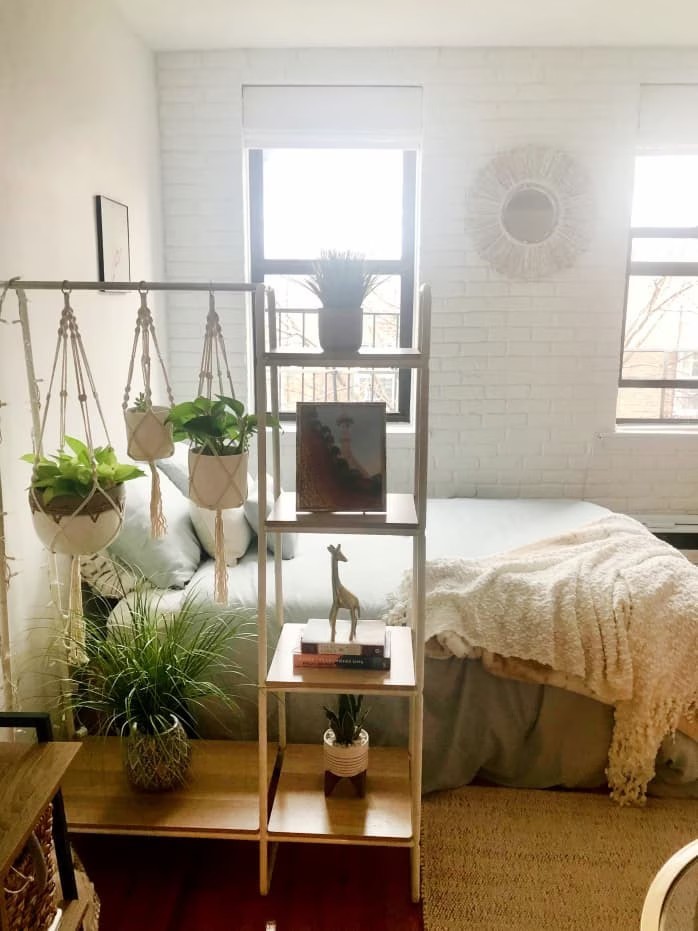
6. The Open Shelving System Partition idea
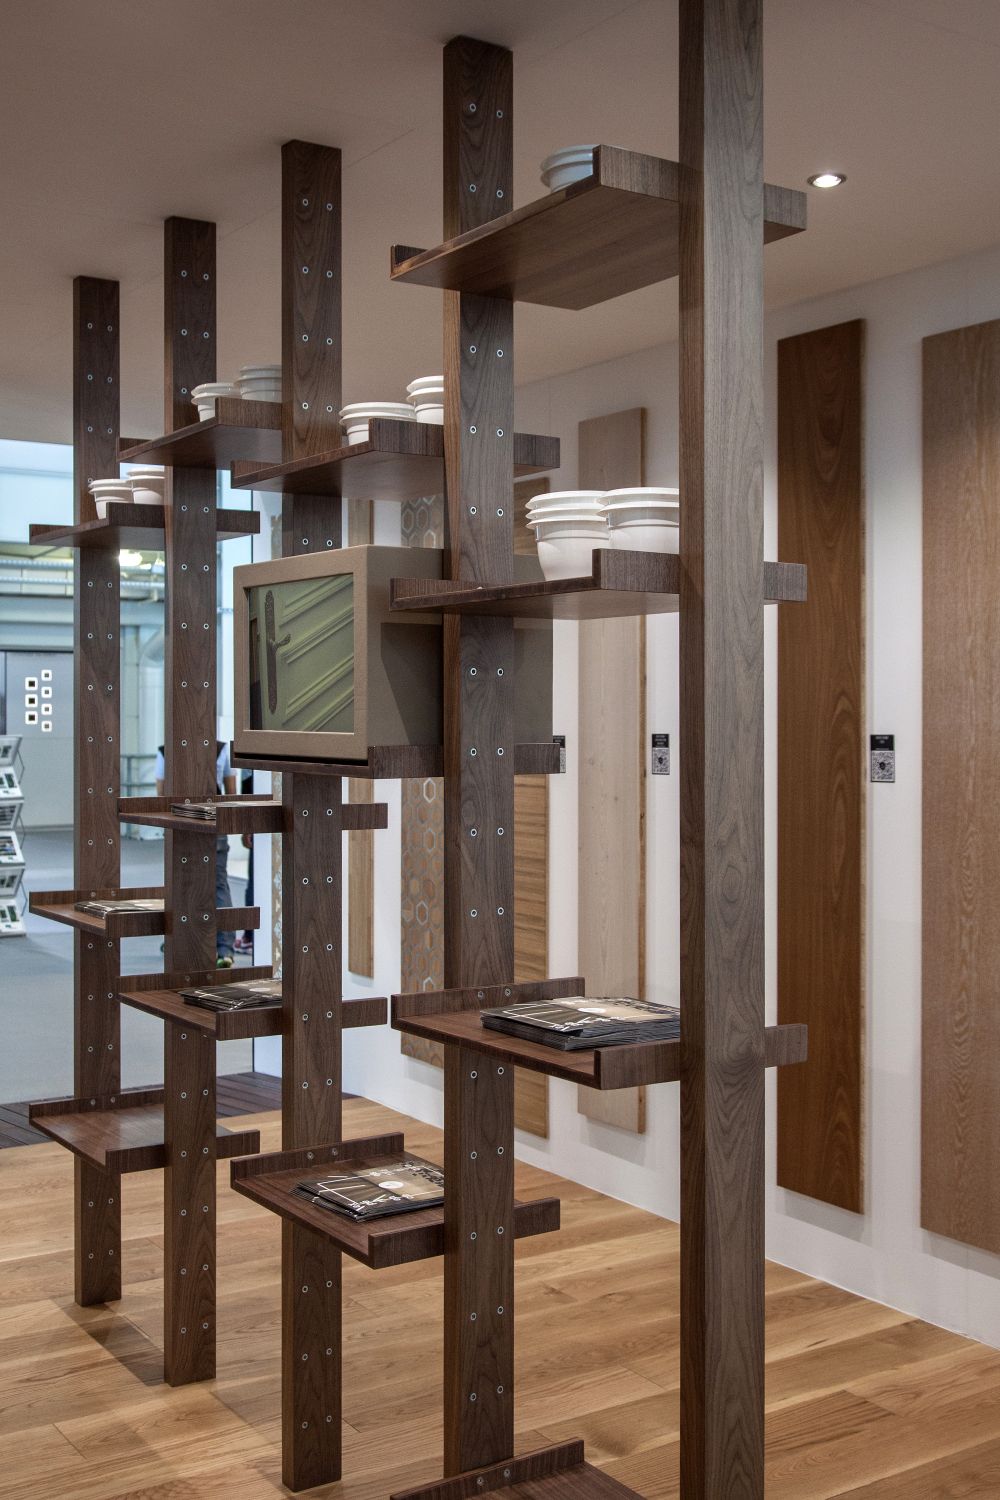
A properly selected shelving system not only performs partition functions but also becomes a vital décor element. You can purchase various shelves in stores if you don’t have the knack to make one. They come in plenty of models that you can build to meet your needs.
Relevant instructions:
- Step 1: Find a suitable design for your shelf, this can be from a store, or you can make it yourself.
- Step 2: Measure the distance from the floor to the ceiling and from one wall to another. If the garden is closed or has one partition, use that distance to determine how thick each shelf will be. You can also use another wall on the opposite side of your room as a reference point when you draw parallel lines.
- Step 3: Divide the width of each shelf by two, then you will get a number between 1 and 4. You need to choose either 1 or 2.
- Step 4: Measure and mark the desired length of each shelf. If the partition wall is on the same side that you will build, ignore it as a reference. Draw a line on where you will place each shelf, and then cut the wood required to build your shelves. Be sure to leave enough space on both sides so that you can open them easily after they are attached in place.
- Step 5: Construct the shelves by joining them and inserting all parts into the frame.
- Step 6: You can now connect an L-shaped bracket to hold on to your decorative curtain rods to give your room a new look with storage in elegance, without losing precious floor space for furniture or other things you want to store.
5. The Modular Shelving partition idea
 If you are a dynamic person who tends to get bored easily, this partition could be the best option because you can rearrange the units differently.
They are available individually and in various colors. You can try to mix and match them to match your color scheme.
Since it comes in a single unit, you can easily stack and combine it to make a tall free-standing structure if you want more privacy. Or stack it at a few feet to let the separated rooms connect.
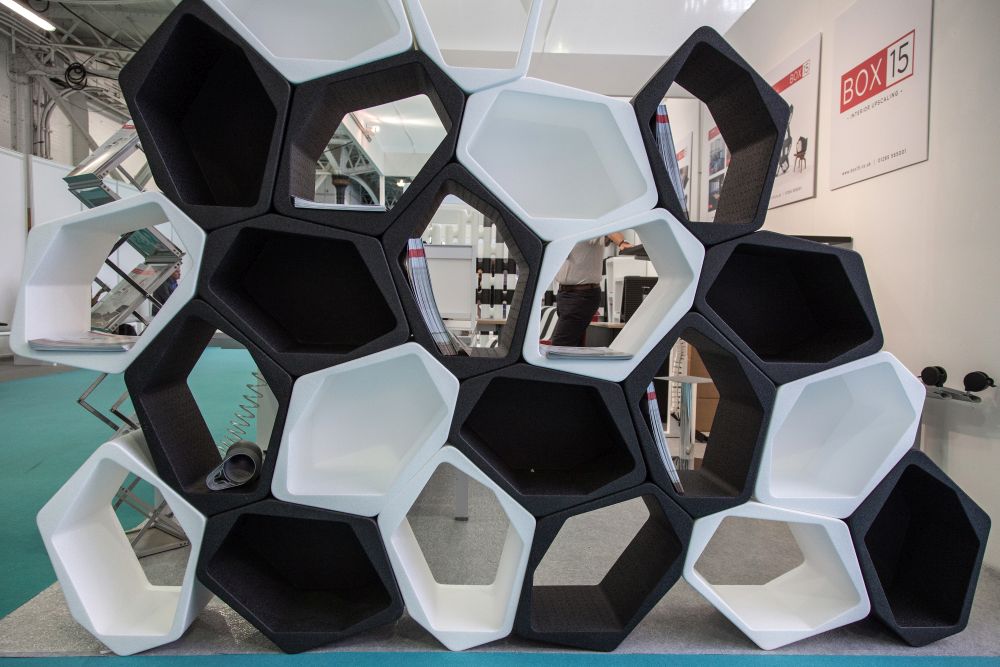
4. The Honeycomb Partition project Idea
 Honeycomb is also a modular structure you can use as a partition in your bedroom. The hexagonal shape is eye-pleasing, simple, and practical.
Like the previous modular shelving system, this hexagonal shelf comes in individual units and various colors. You can integrate it in many ways, even in a complex structure. When you need more room, you can move the shelves easily, giving you extra space.
The good thing is you can assemble and reassemble them when you need a change in your room.
Relevant instructions:
- Step 1: Gather all materials needed and not forget the plan to build your first hexagonal wood piece
- Step 2: Arrange the hexagons to have the desired number of shelves.
- Step 3: Attach a second piece to both sides and connect them with a dowel. Make sure not to overlap the precut pieces.
- Step 4: Screw it in place, adjust it as needed, and ensure your kit is stable to prevent any movement.
- Step 5: Repeat that step but on the other side, this time, make sure you attach the third piece at both ends.
- Step 6: Attach dowels to connect the piece from step 4 with those from step 5. then screw in place for stability again.
- Step 7: You are done! Enjoy your new partition system!
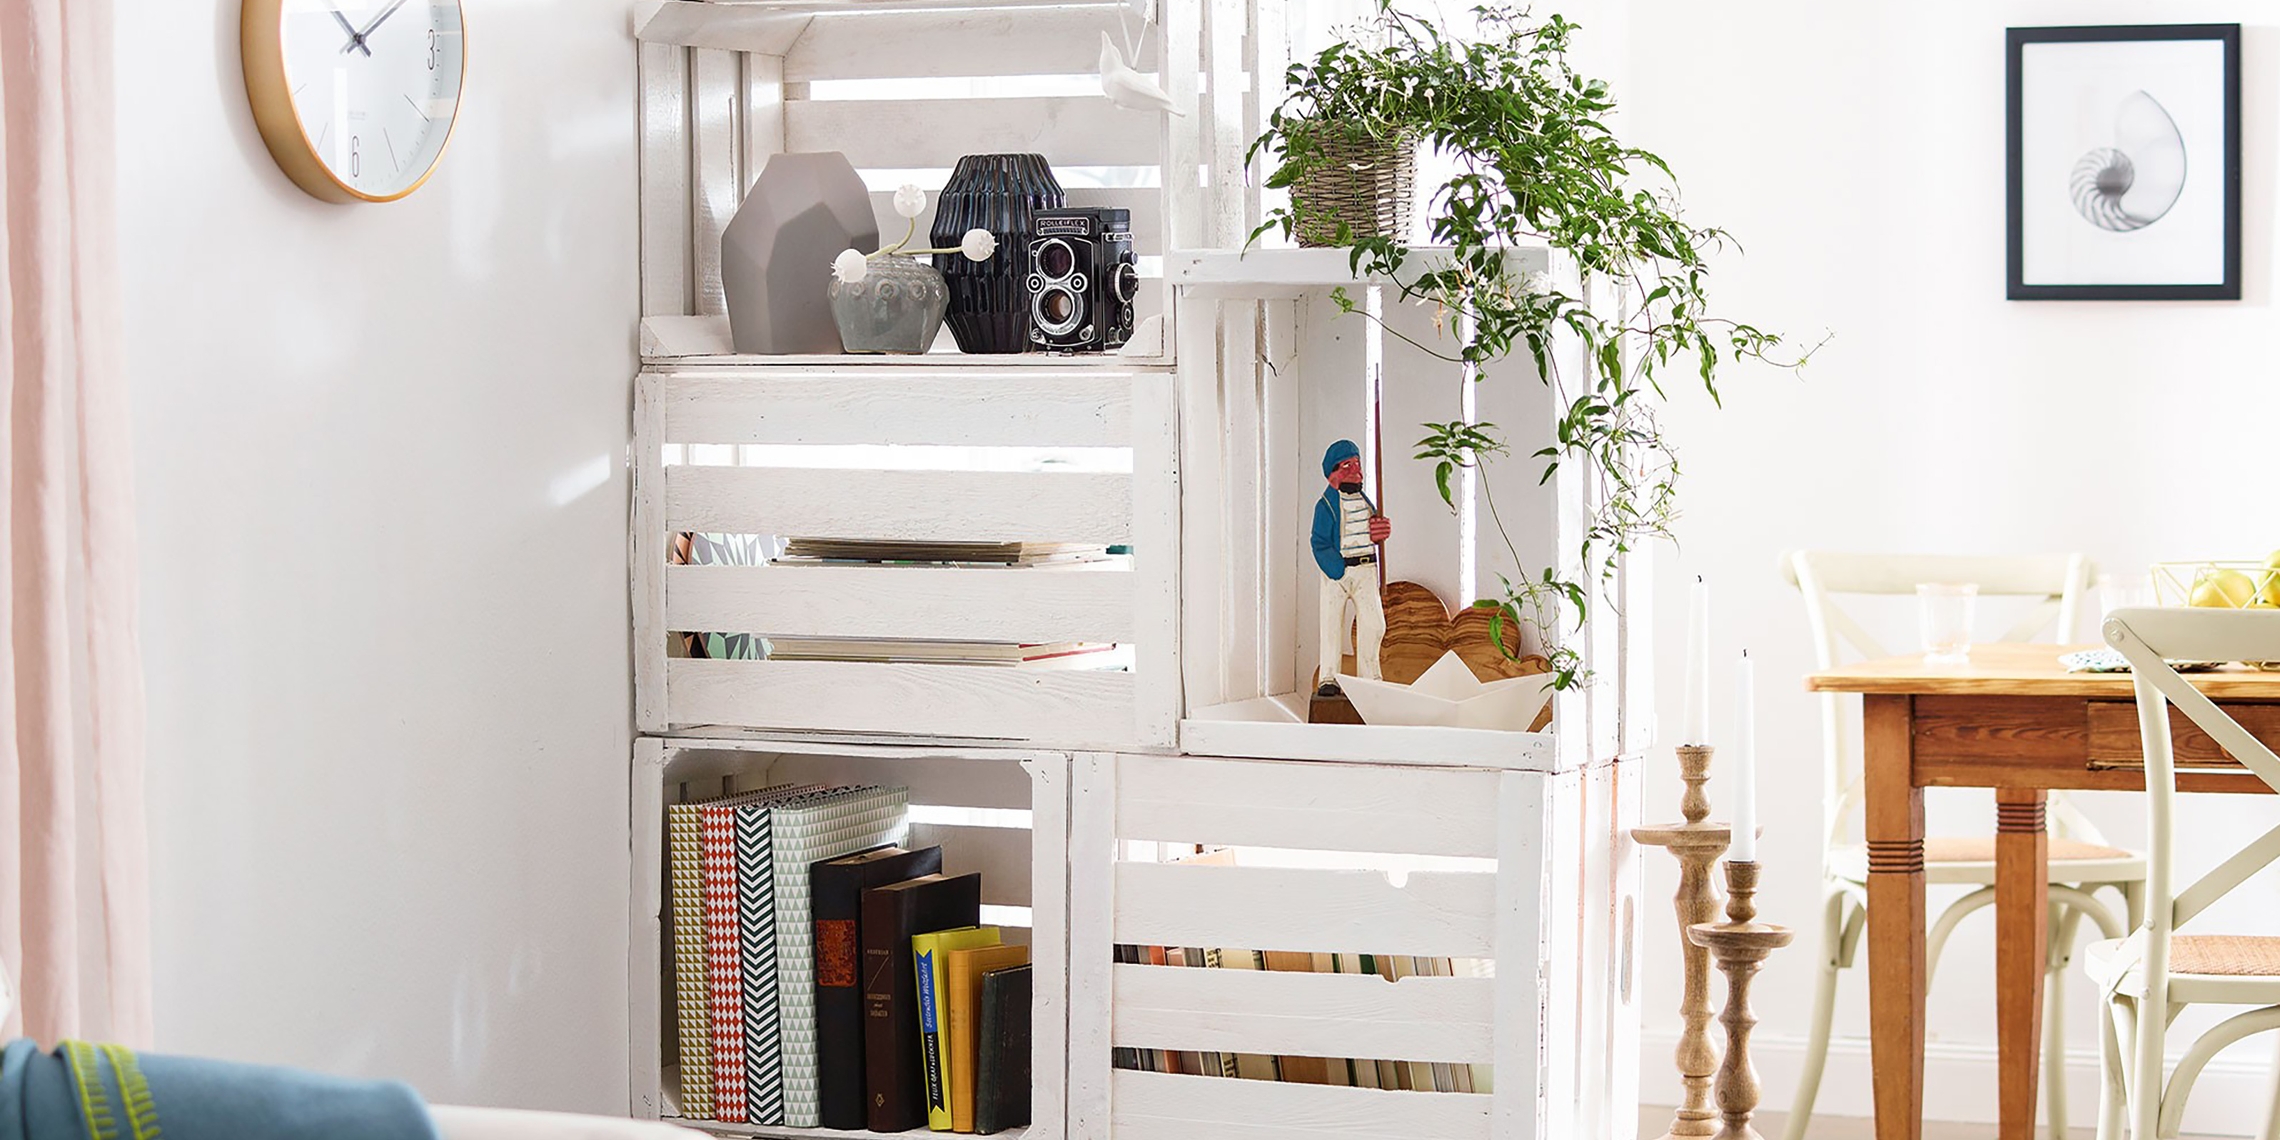
3. The Simple box divider idea
 These boxes are adorable and versatile pieces that you could combine to create a room divider. It is a multi-functional addition to your bedroom since it provides a partition, storage, table, and seating.
When you stack them together, you have a divider and shelving system. When you need seating, the boxes can serve as benches and tables.
These stacked boxes are not only handy but also intriguing, which is suitable for a minimalist interior. Choose the color that matches your bedroom theme, or make it a focal point by having them in contrasting colors.
These boxes come in wood or marble with a bottom pad. Those materials may be a bit expensive. Nevertheless, they are sturdy and long-lasting. Just think of a long-term investment.
2. The Sliding Bookcase Partition project idea
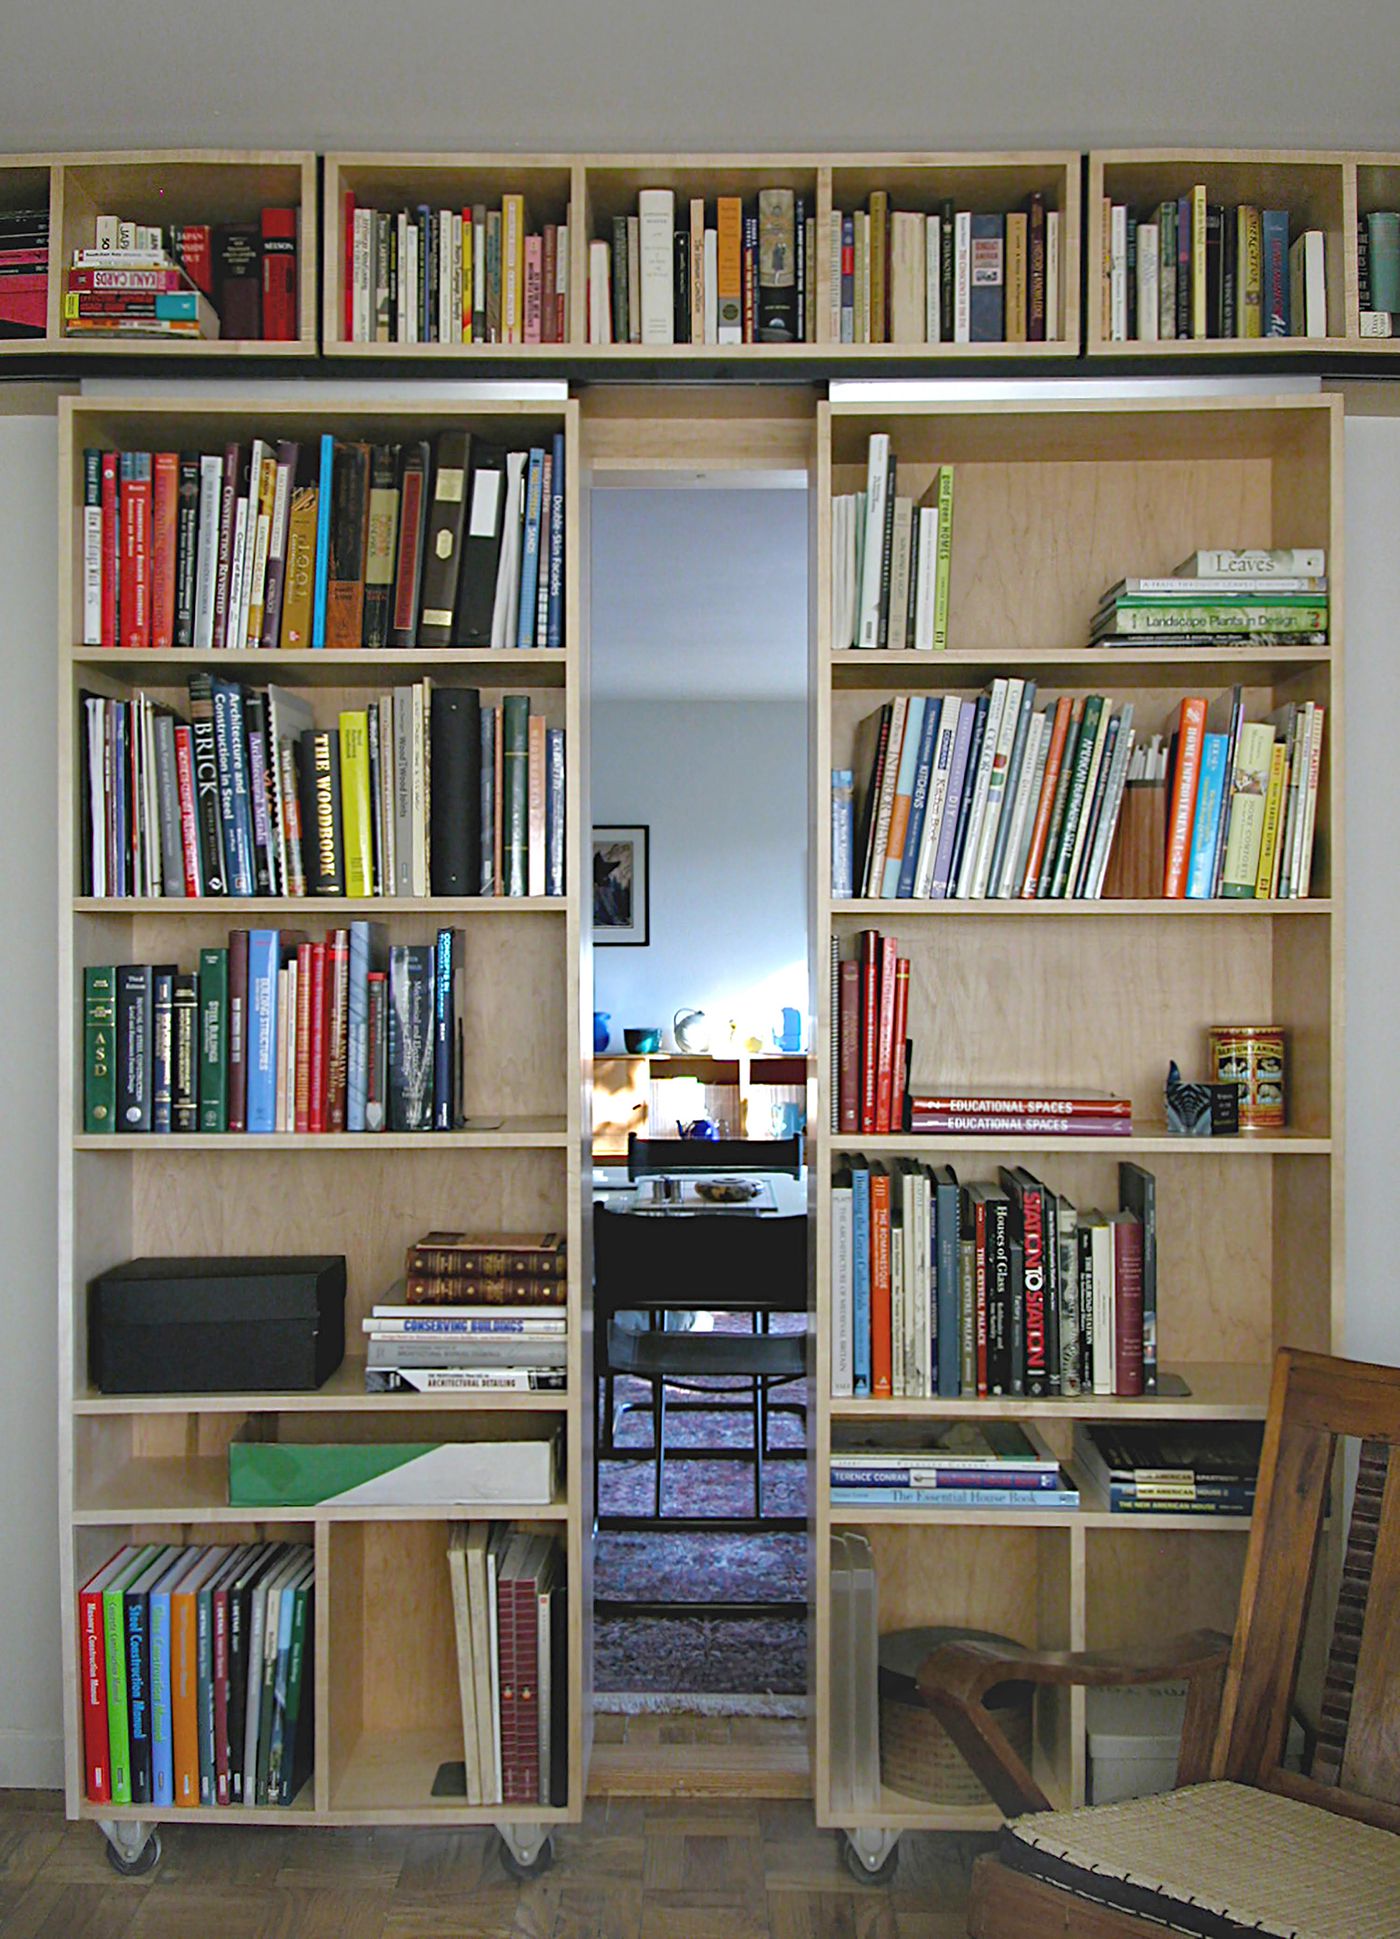 A bookcase is a common partition in many households because it’s practical and functional. Why don’t you make it unique by installing it as a sliding bookcase? It is like having a secret room in your bedroom. What can you have behind the sliding divider? You can use it as a dressing room, workspace, or reading nook.
Installing bookcases in sliding track and wheels allows you to have the utmost flexibility. If you have a big room like a basement or loft, you can separate it into two different areas with a bookcase.
Lastly number 1. From the neglected fruit pallet to the warm of your bedroom
 To ensure you don’t end up with a stack of old fruit pallets, sand the inside and outside the shelves before assembling. This step will enable you to remove irregularities like scratches while roughening the surface of the wood ready for painting.
Gently sand the first fruit pallet without pressure as you move in one direction. Once you’re done, use a small brush to wipe away any sawdust.
It is now time to apply the fruit layers to a coat of paint. Prior to starting the process, lay down or cover a sheet or two. And then apply a coat of primer. Let the primer dry for about an hour, then paint another coat.
Set up the fruit pallets on temporary supports or directly on the floor.
Using a half-inch paintbrush apply two coats of paint over the first fruit pallet in one direction.
After applying two coats, let it dry thoroughly before applying a second layer in the opposite direction of the previous layer to certain areas, mainly those needing it.
Use a fine brush to help you out in those areas that need a little more attention, such as corners and edges.
In contrast to using the aerosol spray system, painting with a roller or paintbrush is also an option. Use the roller to cover the flat surfaces and a brush to paint the corners and edges.
In conclusions:
- No 1. A bedroom partition project should not have to cost you a fortune. It should be worth it, both in terms of its appearance and its functionality.
Hence, before buying a partition, you should always consider several aspects such as the price, availability, upgrades, and the installation process. - No 2. Don’t make a bedroom partition project alone; seek help from your friends or family members who are smart and capable enough to learn how to build one before you can use it.
- No 3. Before crafting a partition project, remember to do some research, especially regarding your requirements, budget, and personal taste, to get yourself a quality product that will serve as an investment for years to come.
- No 4. If you want to upgrade your bedroom, changing the walls by placing a partition is the way to go.
- No 5. If you are looking for ways to save money on your next project, you can use old materials that you may have discarded from other projects; you could repurpose such objects in several ways.
- No 6. You can also use other materials like recycled wood or metal scraps and use them as partitions around your house.
- No 7. For additional privacy, install curtains or shades with easy-to-reach controls. No one will get suspicious when you switch off the lights behind the partition to go back to sleep after sitting there for a while reading a book or using the computer.
- No 8. It is also possible to make partitions out of the existing bookshelves in the house without purchasing a special kit or expensive materials.
- No 9. If you are looking for ways to customize your bedroom partition, try using wallpapers that match the room’s color.
- No 10. Don’t attempt to make your partition too high or too wide. It should be no more than six feet and need not exceed two feet thick; it will only take you more time to position and assemble them.
- No 11. If you are using a kit, make sure that it is stable and has sided with a certain thickness to prevent any movement and keep them firm after they are installed.
- No 12. In addition to being attractive, your partition should also be well built. Make sure that it has been designed to fit the space and can be easily moved from one place to another.
- No 13. Finally, make sure the partition you choose can be painted easily; if it is not solid, pick a paint that matches the room’s wall color.
There is also a wide variety of ready-made wall panels and kits available. However, if you’re not willing to spend money on an instant solution, it’s best to research before buying something that claims that it will help you quickly build a partition.
A divider can transform your bedroom. Whether for creating the illusion of privacy, decorating the room, or having more storage, these storage bedroom partitions might meet your needs and style. Check out our list of bedroom partitions and get inspired.
References:
10. Google.com
9. Google.com
8. Homify.sg
7. Homify.sg
6. Homedit.com
5. Homedit.com
4. Homedit.com
3. Homedit.com
2. Google.com
1. Bosch-diy.com