Key Points:
- Beds come in many shapes and styles, so the best way to choose the right one is to start looking at bedrooms in magazines.
- No matter what type of bed you choose, you might want to play around with the color scheme. For example, if you do not want to use a traditional white or blue-toned one, you can simply mix different colors or use color blocks. With bedding and other decors, it’s okay for some areas to be monotonous while others are interesting.
- The most popular bedding style is soft and comfy, but you can also choose a more modern one. The latter can be made out of materials such as leather or velvet.
- Beds can be cumbersome, so if you eventually want to remove the headboard, you must consider purchasing a headboard that will not add too much weight in the first place.
- Another option for making your room look cozier is using art decors and accessories reminiscent of country western style.
- For small spaces, you might consider having more than one bed in your room. This idea will make it seem bigger and less stuffy.
- If you are looking for bedding ideas that will give your bedroom a western country look, the options include chaps and cowboy boots.
- It is vital for beds to be large enough to accommodate both you and your partner. Equally important is that they should have enough storage space underneath them.
- If your room lacks a headboard, you should consider buying one or making one out of wood or other material.
- A bed could be nasty-heavy, so if you’re thinking about removing it, you could build a wooden frame around the bed instead.
Furnishing a small bedroom can be a challenge because you have to balance functionality and style. You will also have to consider the foot traffic to create a conducive area to relax. You do not want clutter to conquer your space, do you?
Unfortunately, it is not that easy as. Luckily, it is not impossible, though. With extra consideration and a clever approach, you can earn the ultimate comfort despite the diminutive proportions. Now, let’s begin with the most prominent piece of furniture – the bed.
We’ve listed 12 fascinating bed ideas for small room projects to tackle the diminutive space without compromising a well-designed area. Head on to the Simphome.com link pasted inside the description for more detail.

🔊12 Fascinating Bed Improvement Ideas for A Small Room Video:
List Entries:
12. A small Platform Bed project from Pallet Wood @Polygelnaglar
You may wish you had a bigger house with a more spacious bedroom. Unfortunately, it will cost you a fortune. You have no option but to add a twist to the remaining space with this small platform bed.
If you are not into DIY projects because you are not good at woodworking, do not worry! This platform bed is effortless. You only need to get six wooden pallets, a nightstand, and plywood boards.
First, you need to sand the pallet thoroughly to remove any splinters. Then, stack up the pallets creating two piles with the nightstand in between. Cover the sides and tops with plywood boards. Finally, top them with a comfortable mattress.
Basic instructions to replicate the project or similar one:
1. Prepare the project with some wood glue to secure the pallets to each other.
2. Cut the plywood boards at 36 inches and 12 inches.
3. Lay the boards on top of the pallet and screw them into place using wood screws.
4. Attach four legs to the nightstand (total of 4 legs) and set it up inside one of the piles on top to form a rectangular shape.
5. Trim the edges at the end of the pallets to make them look clean by using a chisel and hammer.
6. Securely fasten them together using some screws, a flat head, and wood glue.
11. Basic Idea on How to acquire your own Strong and Tough Platform Bed
 As a good rule of thumb, you need to earn peace of mind to sleep well. An effective way to make it tangible is to create a strong and tough platform bed that ensures your safety.
- To make this strong platform bed, you will need one 4×4 in 32 “x40”, three 2x6s in 10′ long, one 2×4 stud support bracket, and four castors.
- You can begin by cutting 4×4 into four pieces to create the leg. Then, make the head, foot, and sideboards using 2x6s.
- Next, attach the legs to the headboard and footboard, which are shorter than the sideboards. After that, install the long pieces to create the sideboards.
- Once the frame is ready, you can install the center support beam using 2×4 stud support brackets. You may also need to nail support rails to the sideboards.
- Finally, install the four castors to the bed legs, lay plywood boards onto the support rails, secure them in place, and top them with a mattress.
*Or take a little lesson from the specialist on how to secure your queen size bed and make it more reliable*
If you think the previous idea is not sturdy enough, maybe you want to try this platform bed.
It consists of a base and top frame. You will have to center the top frame to the base. After that, lock them together using 3 ½” screws.
If you want to make it look more stylish, try fitting 1×4 trims to the top of the bed.
10. The tufted bed project idea @karolinapolitowicz
Do not let your small bedroom hinder you from getting a stylish sleeping space. If you cannot afford a fancy platform bed, you can always make one yourself.
You only need to make a bed frame.
- Then, cover the headboard, footboard, and sideboards with foam.
- After that, secure the foam with a layer of batting or thin fabric.
- Next, drill holes to create tufts. After that, cover the boards with fabric.
- Then, use a long upholstery needle to thread the buttons through the holes you drilled.
- Make a little knot and secure the thread using a staple on the back of the boards.
Basic instructions to replicate the project or similar one:
1. Carefully measure the upholstery fabric to cover the sideboards.
2. Use fabric glue to secure the fabric onto each board.
3. Use a staple gun to attach a foam strip between each board and slide buttons through the fabric and foam layers.
4. Fold the top of the outer upholstery fabric gently over it and secure it in place with some staples to look clean and neat.
5. Finally, attach some castors to the base and wheels to the top frame.
9. How To Make Your Everyday Neutral Bed @sbkliving
The ultimate comfort is not only about a tough and durable bed but also an appealing one.
If you are seeking a way to style your bed to make it look more attractive and comfortable, here are some tips:
- First, cover the mattress with a bamboo sheet.
- Then, top it with a linen coverlet, and try to apply hospital corners.
- After that, position four sleeping pillows against the headboard.
- Next, cover the half end of the bed with a textured duvet.
- Let it dangle a bit to conceal the footboard.
- Then, add three euro shams and two decorative pillows.
- Finally, lay a chunky knit throw onto the duvet.
Basic instructions to replicate the project or similar one:
1. First, you need to measure and cut the bamboo sheet.
2. Then, add a mattress pad to its top and fasten them together using some elastic straps.
3. Next, fasten a coverlet to the bottom of the pad using elastic straps.
4. Finally, position four sleeping pillows against the headboard and place three euro shams in front.
8. The hover bed project idea @sophialoren1993
This is another brilliant idea to style your bed and make your small bedroom look fabulous.
When you notice it for the first time, you might think that the bed is floating. Well, that is not true.
- To get this “floating” effect, you need to create a base and a top frame.
- Once the base is ready, run the LED string light along the outer sides.
- After that, put the top frame in place.
- Next, top it with plywood boards and a mattress.
- Now, try to turn on the LED string light.
Since you install it around the base frame, people will not see it, which creates a “floating” effect.
Basic instructions to replicate the project or a similar one:
1. First, take foam and cut it to fit over the headboard.
2. Then, measure and cut three sheets of plywood boards to the size of the mattress.
3. Next, use wood glue to secure them together.
4. Cover the headboard with cotton batting, lay some layers of sheet protectors on top of it, add a duvet cover, and then place the mattress on top before securing all things together using some screws and nails.
5. Finally, put some extra sheets of plywood on the legs.
7. The Urban Chic Industrial Bedroom transformation
![]() When space is the issue, people tend to shove the bed against one of the walls. They hope it can give them extra room for foot traffic. However, it may look awkward.
When space is the issue, people tend to shove the bed against one of the walls. They hope it can give them extra room for foot traffic. However, it may look awkward.
Instead of shoving the bed against a wall, you can try positioning it in the middle. This way, you can create balance. Besides, jumping into and out of bed will be much easier because you can do it from both sides.
With the bed in the middle, you may find it “floating.”
You can overcome this problem by creating an accent wall that anchors the bed in place.
Since you want to carve out the industrial style, you can expose your brick wall.
If ripping the mortar is too painful, you can always use faux exposed-brick wallpaper.
Flank the bed with metal nightstands on both sides and add greenery for the finishing touch.
6. A small bedroom interior transformation by @rasselcatapang
This design is for small bedrooms measuring 2.5×3.0 meters with a ceiling height of 3.0 meters.
Do you have to sleep in a minute bedroom?
Do not worry! It is not the end of the world. In fact, it is the beginning of your creativity.
This bedroom is so tiny that you do not have much space to move. Luckily, you can make the most of it with a thoughtful design.
You can begin by investing in a bunk bed to tap into the vertical space. You can place the bed on the floor level and elevate the desk. This way, you can have a comfortable place to sleep and work in the same spot. Even better, you can incorporate drawers into the stairs to have more storage.
Next, place a wardrobe on the other side of the room. Make sure you have enough space for foot traffic.
Basic instructions to replicate the project or a similar one:
Step 1: Get creative with the bed placement and make it comfortable.
Step 2: The room walls must have enough space for foot traffic.
Step 3: Use a piece of fabric to cover the window and the curtain.
Step 4: Install metal nightstands on both sides to give you more storage options.
Step 5: Add some accent to the design with a plant and some greenery.
Step 6: Finally, add a desk to the other end of the room for your computer and more storage.
5. The inspiring Loft Guest Room project idea by Miss Liz
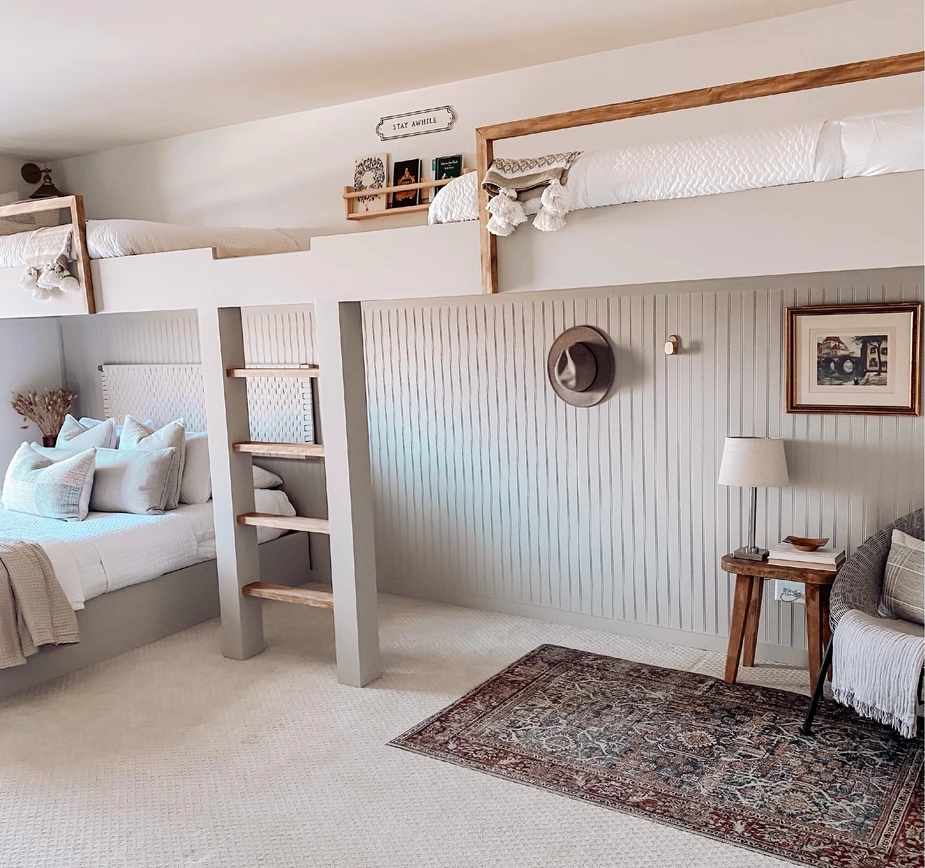 This loft guest room can be the inspiration you have been looking for. It allows multiple users to share one bedroom comfortably.
You only need to attach frame pieces along the wall. Since it is a long loft, you may need to consider installing crossbeams held by deck braces to make it sturdier.
If you want to add some style, you can install beadboard paneling on the underside of the loft bed.
4. The other inspiring small bedroom transformation you can adopt and experiment with (this time for double) @rasselcatapang
This one is another inspiration for those who have to share a room. You can try making double loft beds.
These loft beds take up two walls of this bedroom, allowing you to have comfortable space to step in the middle.
It features a workspace on one side and a sitting area on the other side. You can reach the bed by taking a short trip through the stairs. The good news is they are actually drawers that will help you control clutter.
Basic instructions to replicate the project or a similar one:
- Draw your plan on the drawing board.
- Decide where you want to locate the drawers and choose a type of drawer for each space.
- Install wooden panels here and there along with the existing wall areas.
- Build the loft bed frame that you can use as shelves at the sides of your bed.
- Make a loft bed using wood beams and boards, ladders, ceiling braces, lumber, and other hardware that you can find in most home improvement stores.
- Use wire hangers to hang them up on the loft bed.
- If you want windows, add them ahead of time.
- You may also be able to use wooden blinds for your windows. However, you would have to ensure that no one will fall behind them.
- Decide where to store the extra beds if you need more than two rooms for your guests.
- Figure out where you can build storage for your guests’ clothes.
- Plan where you will set up your seating, sofas, and beds for your visitors.
- Decide where you would like to add a mirror and other items that can help freshen up your look.
- Consider adding a small bathroom to accommodate your guests’ needs.
- Make sure that the construction is finished before inviting anyone over to stay the night. It is recommended that you test it first by jumping on one of the beds to check its durability.
- Make sure you have plenty of time to finish the construction and cleaning.
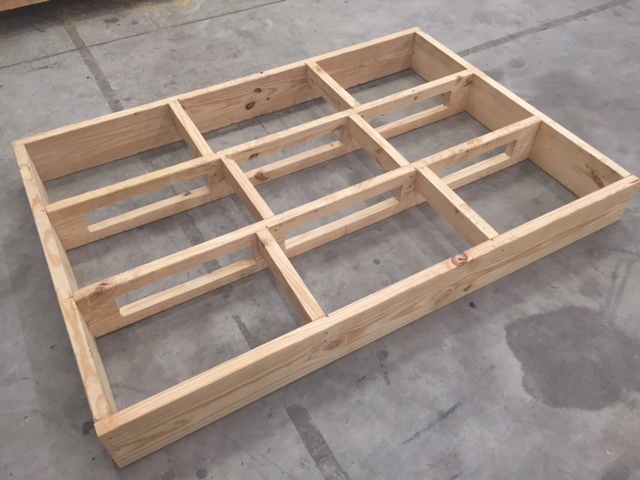
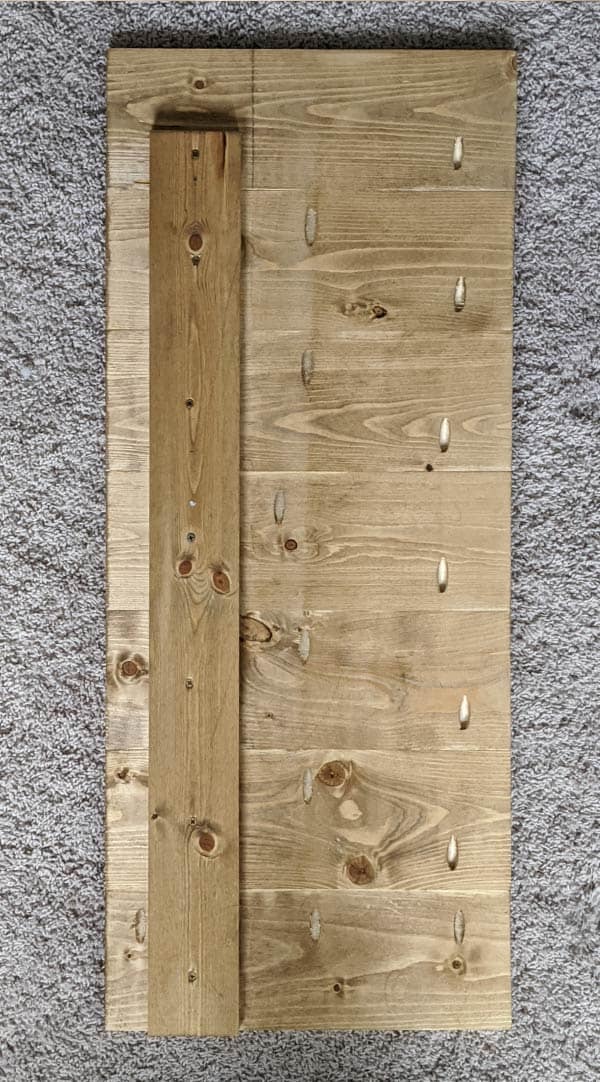
3. The DIY Platform Bed Frame and Headboard with Built-In Nightstands
 Small space may make you forgo nightstands. However, it is not really necessary.
This headboard can be your greatest bet. It not only anchors your bed in place but also provides floating shelves acting as nightstands.
Basic instructions to replicate the project or a similar one:
- Drawing your plan on the drawing board, decide where you want to install the built-in cabinet.
- Decide where you want to locate the stand-alone cabinets on each side of your bed.
- Remember to choose the same drawer type for each space for the cabinets.
- Add your drawers and cabinets to the designated spots.
- For the floating shelving feature, use a drill to make holes on both sides of your bed’s headboard, where you will install wooden support brackets.
- Install metal rods used as wires or support braces.
- Build the shelves out of wood and make sure that they are the same size as your floating shelves. You may also want to add a bit of embellishment to them to give them some style and color.
- Use wood glue to hold the wooden planks together.
- Attach the floating brackets in your designated spots by drilling holes through any portion of the wooden support bracket that can be found on one side of each shelf.
- Drill screws through these holes and into your headboard’s wooden board to secure one side of each shelf at a time until all are secured firmly in place by using enough screws and bolts for stability, depending on the number of shelves you will put up there.
- Use a screwdriver to secure the other side of each shelf by drilling screws through the planks and into the wooden support brackets.
- Mount the shelves using your drill and screws.
- Remember to hide your holes when you are done by painting over them with a matching color of paint or sealant.
- Hide your wires and cables behind each shelf. You can also temporarily use wood splinters to temporarily conceal these wires/cables while installing them into their permanent spots, where you can hide them from view.
- Make sure that you can support everything you have built weight-wise. You can check this by jumping on one of the floating shelves.
- Make sure that everything is sturdy enough and that your headboard does not fall apart when jumping on it a couple of times to test its durability.
- Make sure that your floating shelves are slanted towards the person sleeping in bed to prevent falling off.
- If you want, you can install lights underneath so you can switch them on even when it is dark, and they won’t be seen from the floor or dangling around to make things look weird or distracting once they are turned on at night time only.
- Install a mirror or other embellishment you prefer on the upper side of your bed.
- If you want, you can also add drawers to store linens, baskets, and other items.
2. The DIY Idea on how to build your own House Loft Bed – Twin Size idea
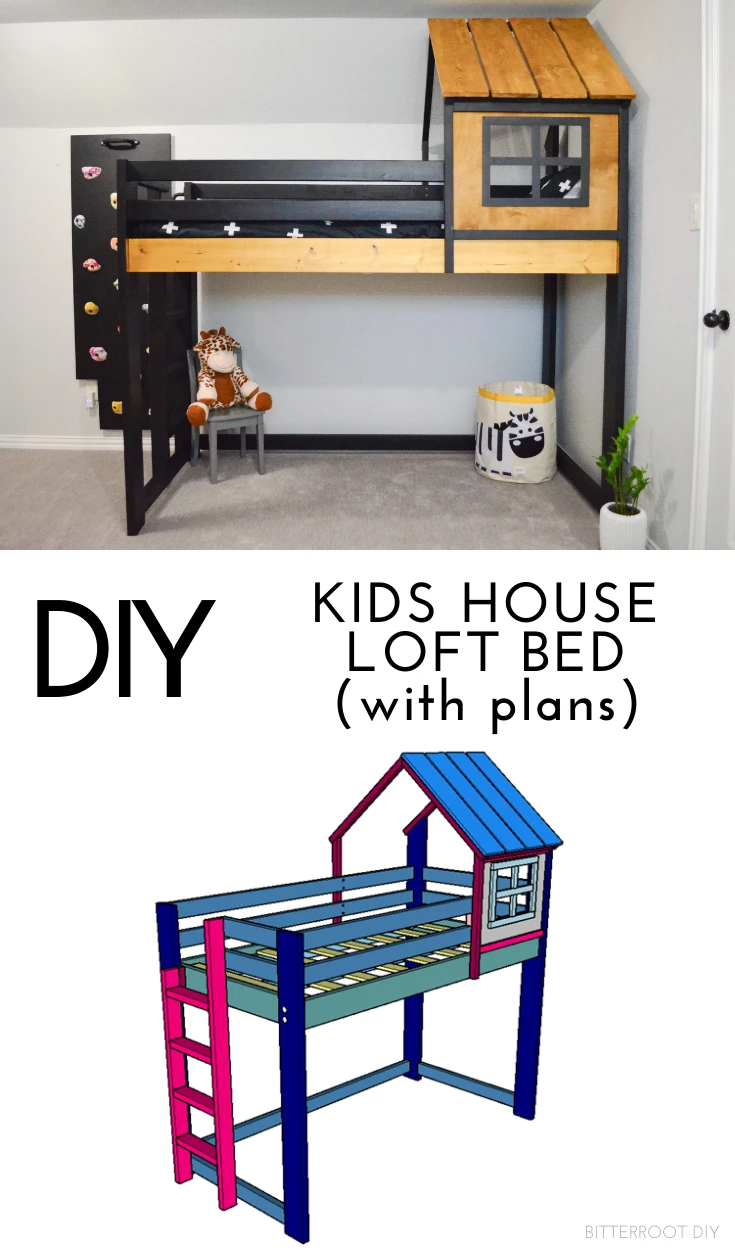
This loft bed features a small house that makes it look fascinating. It will evoke the moment when he played in a treehouse.
Most loft beds usually have a ladder on the sideboard. However, you will install it on the footboard instead. This way, your kid can access the area beneath the bed easily.
1. The other floating bedframe project, this time from @mr.jordan1416
This floating bed will ensure your ultimate comfort. It is like the previous floating beds. However, it is bigger. Therefore, you will need a larger base frame. Do not forget to install LED string lights to the base frame to create a mesmerizing look.
Relevant details:
- Start the project with some simple carpentry techniques.
- Using a 2-by-8 wooden board, build a base frame. This item will serve as the foundation of your floating bed frame.
- The next step is to install the support bracket on one side of your base frames using screws and bolts.
- Add two more support brackets on the other side of your base frames using screws and bolts. Your project will look like a rectangular box with three support brackets installed.
- Using more 2-by-8 wooden planks, construct two more rectangular boxes similar to the previous ones but bigger to fit beneath each support bracket you installed earlier for additional strength and stability for your floating bed frame’s base structure. The size you choose for your floating bed frames will depend on the base frame.
- Using 4-by-4 wooden planks, build your floating beds’ side, headboard, and footboard using a hammer and nails.
- The next step is to install a support bracket that will hold all three base plates together by installing it between the two base plates you built earlier. You may need to apply wood glue or nails to secure it in place and wood splinters/filler on each end to hide any gaps between each plank to remove them when smoothing out each board with sandpaper for a smoother look later on.
- Now, use 4-by-4 wooden planks to build two more rectangular boxes similar to those you just built but bigger. You will need to add another support bracket inside it.
- Now, take your floating frames to paint and let them dry for at least 24 hours before using them.
- Attach the footboard and sideboards of your frame using some screws, bolts, and wood glue.
- Add a shelf underneath each side of your bed and a small storage box underneath the bed to store linens, clothes, or other things you will not regularly use after spanning over time.
- The last thing you need to do is install the bed stand.
Now, you know that it is not impossible to get a comfortable and well-designed bedroom despite the minute space if you have no idea what. To begin with, you can try those 12 fascinating bed ideas for a small room.
References:
12.Tiktok.com/@polygelnaglar
11. Instructables.com, Howtospecialist.com
10. Tiktok.com/@karolinapolitowicz
9. Tiktok.com/@sbkliving
8. Tiktok.com/@sophialoren1993
7. Decoholic.org
6. Tiktok.com/@rasselcatapang
5. Misslizdidit.com
4.Tiktok.com/@rasselcatapang
3. Craftedbythehunts.com
2. Bitterrootdiy.com
1. Tiktok.com/@mr.jordan1416