A bedroom is a place where you can take a rest and be yourself. But how can you be more relaxed if the clutter has conquered the whole space? You have to end this mess and take your safe haven back again.
If you are in your quest for some foolproof tips and tricks to organize your sleeping space, it is your lucky day! We have summed up these 12 minimalist organization ideas for the bedroom. They are not only practical but also chic. Let’s have a look! And as always, Simphome presents you with the list and relevant detail you can find on the website.

🔊12 Minimalist Organization Ideas for Bedroom Video:
List Entries:
12 Minimalist Bedroom Organization Tips
12 Modern Minimalist Bedroom Design and Makeover Ideas
12 Space-Savvy Bedroom Ideas
12 Small Bedroom Dresser ideas and Styling
12 Bedroom Reparations and Upgrades
12 Hidden Storage Ideas to Declutter Your Small Bedroom Mess
12. How to build a Bed under another bed
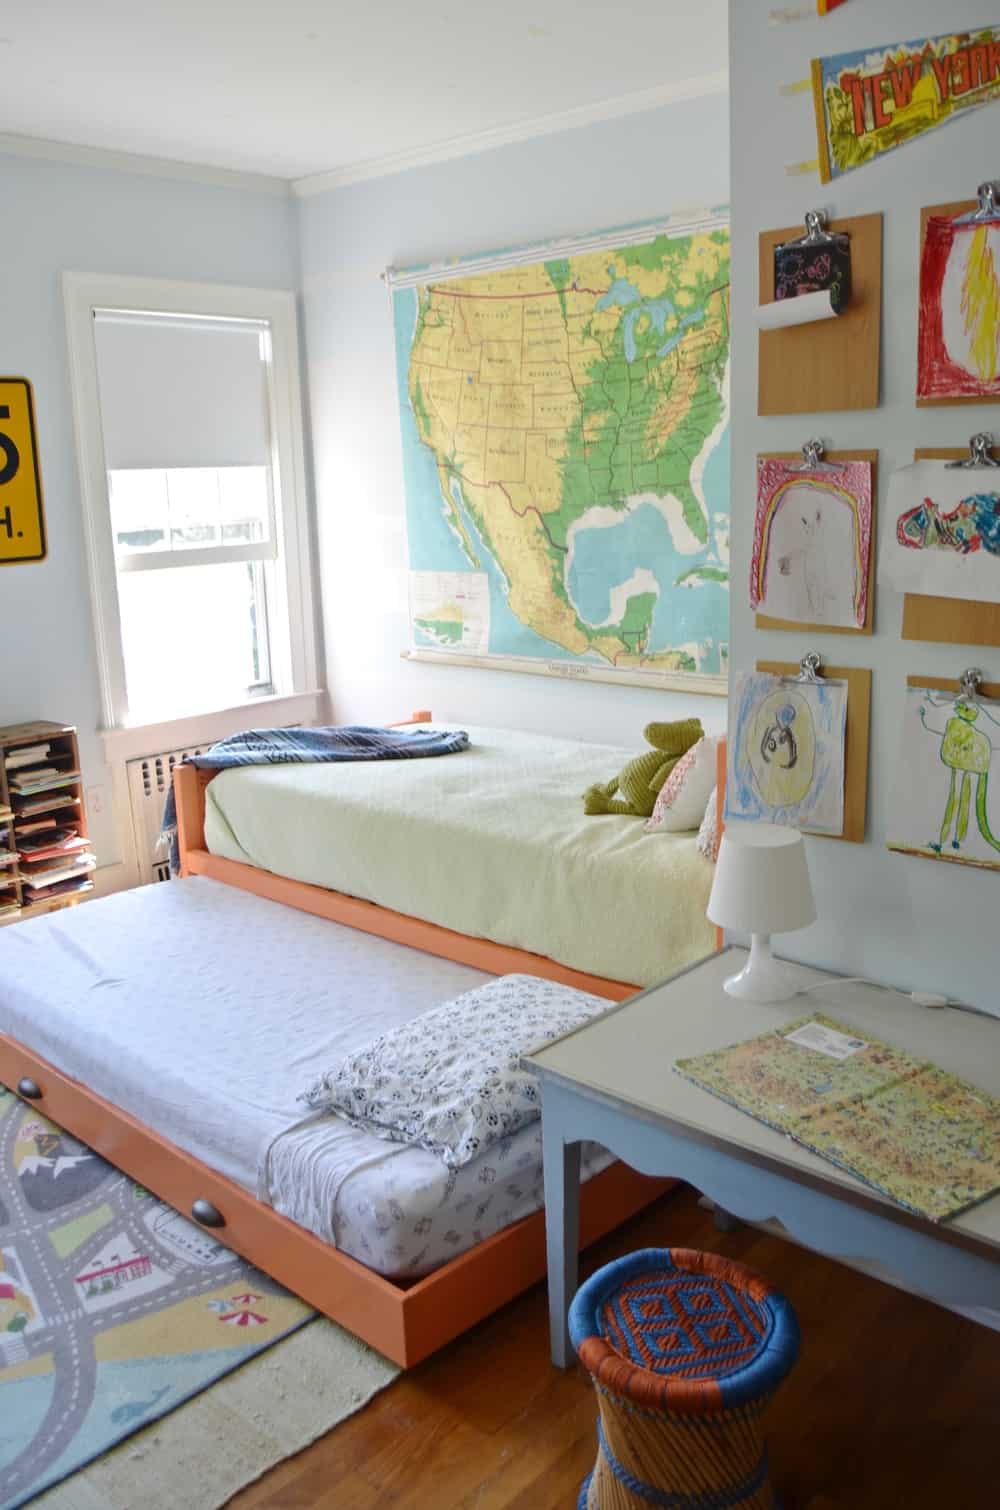 A small room makes you put up with the limited space. Therefore, your kids may have to share a bedroom.
If you cannot have two beds in different spots, you can just stack them by building a trundle bed. First, you need to construct the frame using 1x8s. Then, screw two 1x3s to the inside edge to support the plywood board that you will use to hold the mattress.
After that, attach 1×3 crossbeams to the frame to keep the trundle bed aligned and sturdy.
Then, you can screw the plywood board. Next, attach the handles and casters.
11. 2 Unique Ways to hide The TV in the bedroom
No 1. The DIY TV Lift Electric Cabinet Idea
 Some studies have found that the TV should not be in the bedroom because it can have several destructive impacts. It can disrupt sleep cycles. However, some people just do not have more space for the TV in the living room. Therefore, they have no choice but to place it in the bedroom.
If you have the same problem, you do not need to remove the TV whatsoever.
You just need to make a DIY lift TV cabinet.
It is a multipurpose piece of furniture.
It is basically a cabinet that looks like a dresser.
When you open the top and press the button, you will find the TV coming out of it.
This way, you will not see the TV all the time.
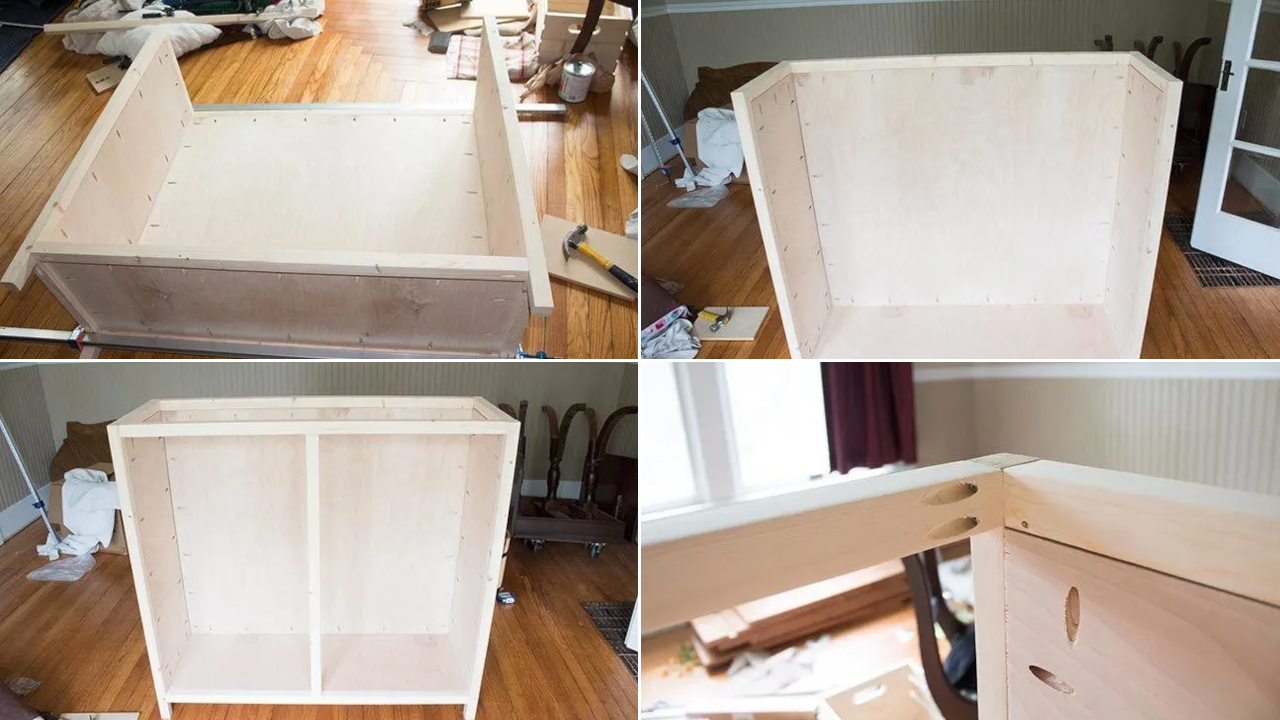
To make this cabinet, you need to make a box.
The dimension will depend on the size of your TV.
Then, install the front doors of the cabinets using surface mount hinges.
Next, add the pulls or knobs onto them.
After that, install the cabinet top using hinges.
You can also add safety chains that will hold it in place so that it will not flop backward and injure somebody. Finally, install the lift mechanism and TV, and you are all set.
No.2. Non-electric one by Deuce Cities Hen House
If you think a cabinet with a lift mechanism is rather expensive and complicated, you can try this more straightforward idea. You do not even have to make it from scratch.
Just grab your old dresser and give it a new look with some fresh paint.
After that, remove the top and add piano hinges to get better access.
You can also consider replacing the top altogether with a sturdier piece like solid pine because you will use the top of your dresser to hold the TV.
Next, install lid supports that will hold the top at a perfect angle.
Then, install the TV mount to the top of the dresser.
Finally, you can hide it away.
Other important details you need to know are:
- A professional cabinet maker will be able to cut the necessary parts for you.
- You can mount your TV on a less expensive stand that comes with the cabinet after you finish setting it up.
- You can find hardware to install hinges and handles at your local hardware store or home improvement store.
- The whole project could take a day or two to complete. If you have a helper, you could finish it much faster. You just need to put a lot of thought into the design and cutting process because you have to work with the existing furniture.
To complete the project, you can build your Tiered Magazine rack.
Do you have piles of magazines on the floor by your nightstand? You should set up a tiered magazine rack to be organized and displayed attractively and be functional.
10. The minimalist idea with Vintage Concept
 Doing a bedroom makeover can be thrilling. However, it can be expensive, too. Therefore, you need to prepare more than $350 to carve out a brand new look. Still, the options to overhaul the sleeping space on the cheap are always available.
This bedroom, for example, offers the charm of modern vintage style. Most importantly, you will not spend a lot of money to create it.
You can try installing faux wainscoting paneling from some boards. Paint it charcoal gray for a more modern look. Instead of covering walls with wallpaper, which may be pretty expensive, you can just stencil it. It will help you salt away some money.
The dresser accentuates the vintage look immensely. You can also have it by purchasing an old dresser from a flea market. Then, remove the pulls and apply two coats of strippers to renew the look and emphasize its antique appearance. Next, sand it down and apply an oil-based gel stain. Finally, replace the pulls, and that’s it!
Detailed Instructions you also need to pay attention to are:
- You can do most of the work yourself, such as moving furniture and cleaning walls.
- You can choose a dresser rather than a night board since they both work the same way and hold things in place.
- The price will depend on how expensive your dresser is. If you get one from the flea market, you can get it free or under $100.
- A little bit of elbow grease and some elbow grease, and you should be good to go!
10 Minimalist Wardrobe Ideas
10 Refreshing Yet Cozy Bedroom Improvement Ideas
10 Inspirations to Give Your Bedroom Instant Upgrades
10 Windows with Access to more Storage ideas
20 Smart DIY Hidden Storage Ideas that keep clutter in check
9. The Hairpin Make-up Vanity Idea
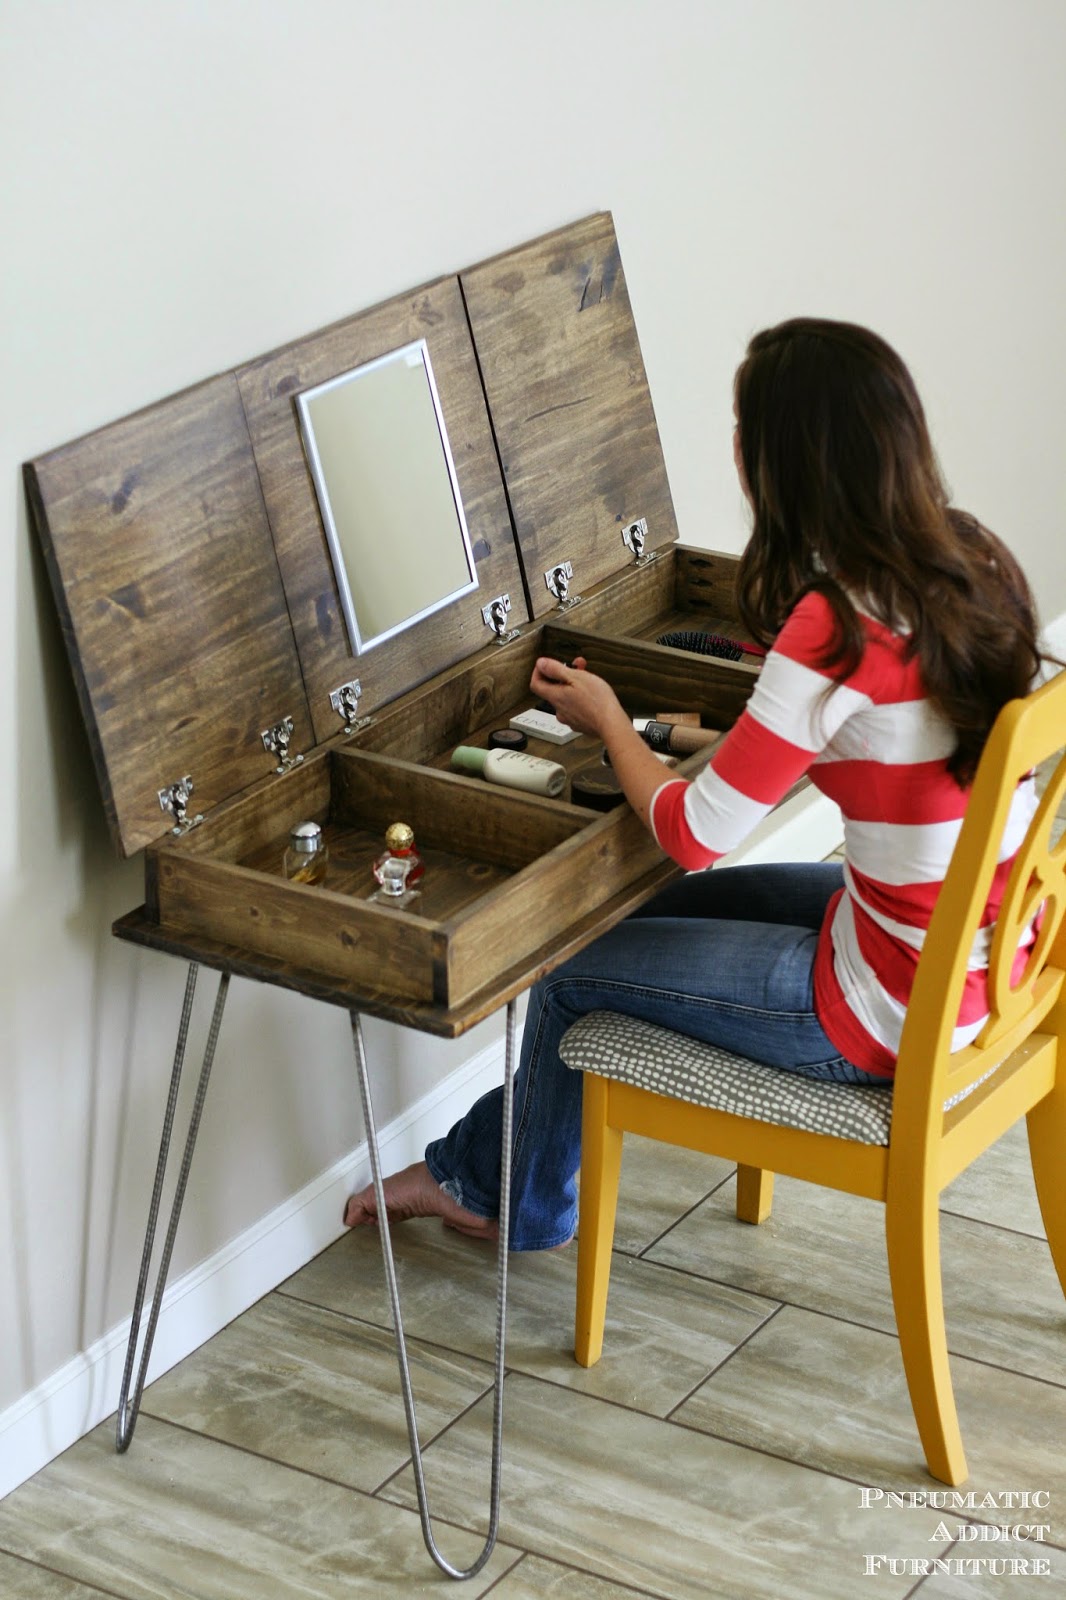 Having a multipurpose set of furniture can save a lot of space in your small bedroom. This makeup vanity, for instance, serves you double duty.
When you close the tops, you will find a handy desk for your home office. Then, open the lids, and you will get more storage and a mirror helping you put on makeup.
Making this makeup vanity is not that hard. You just need to make the frame. Once it is ready, attach the lids using full overlay cup hinges. Now, install the hairpin legs.
Detailed Instructions:
- The frame:
Use 1/2” plywood, cut in the shape of a C. Attach an X-shaped crosscut jig to your table saw and cut the frame. Then, attach two hinges at the top and bottom edges to open and close the vanity. - The lids:
It would be best if you cut a 1” by 3/4” strip in the shape of a hinge so that it will fit on both sides of one side of the frame. Then, attach two full overlay cup hinges with screws on both sides of both frames. - The legs:
Cut two 1” by 2” strips in the shape of 1/2” legs to fit on both sides of the vanity. Attach 1/4” threaded rod using glue and screws. - The frame of the tops:
Cut out two 1” by 2” strips in the form of 1/2” legs to fit on both sides of each frame. Attach 1/4” threaded rod using glue and screws. Repeat this step with the bottoms of the makeup vanities, but make them longer. - The hairpin legs:
Attach hairpin legs on both sides of each top and bottom piece using glue and screws. - Install the tops:
Attach the tops with hinges on both sides of each vanity frame, then screw it in place to make sure that it fits nicely before you attach it permanently using wood glue. - Install the lids:
Attach the lids on both sides of each vanity frame. Use two hinges per lid that are placed opposite to each other. - The finish:
Remove all dust from the vanity, then sand it with 120 grit sandpaper. Apply a coat of primer, let it dry, then apply two coats of semi-gloss latex paint in your favorite color.
When you are dealing with hairpin legs, it is always better to have a prototype piece ready before starting your project. Making one will help you figure out whether you can cut the legs at the right angle or not.
8. A Queen Size Bed Makeover Idea
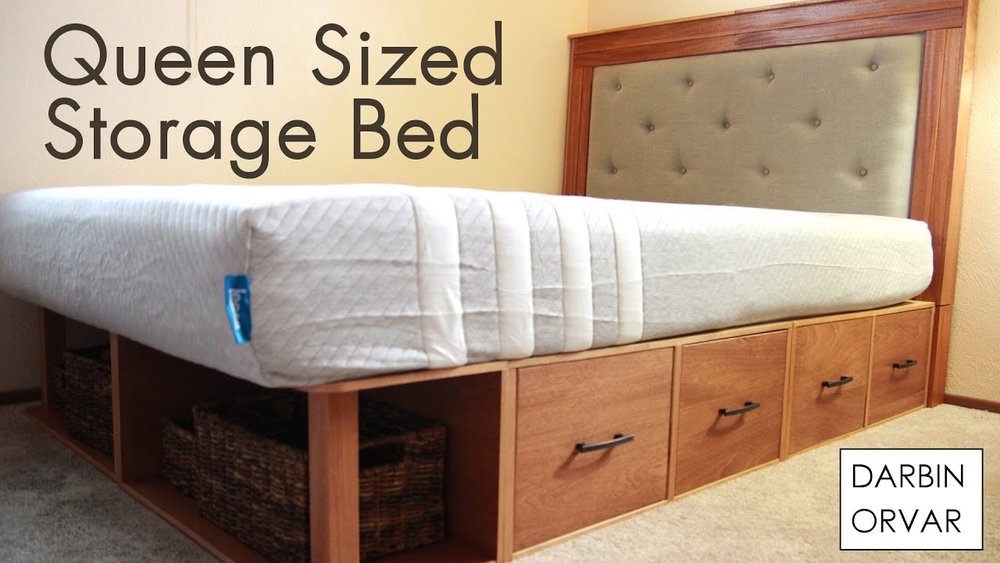
You can simply add some drawers with casters, baskets, suitcases, or – even better – this platform bed.
This modular platform bed consists of four main boxes and two front boxes that feature a basket area. Two of the main boxes have drawers, while the others do not. You just need to attach them together using screws so that they stay in place.
The good thing about this modular bed is you can take them apart easily if you move out. You will find it easier to carry each box without any help.
7. A DIY Tilt laundry hamper idea
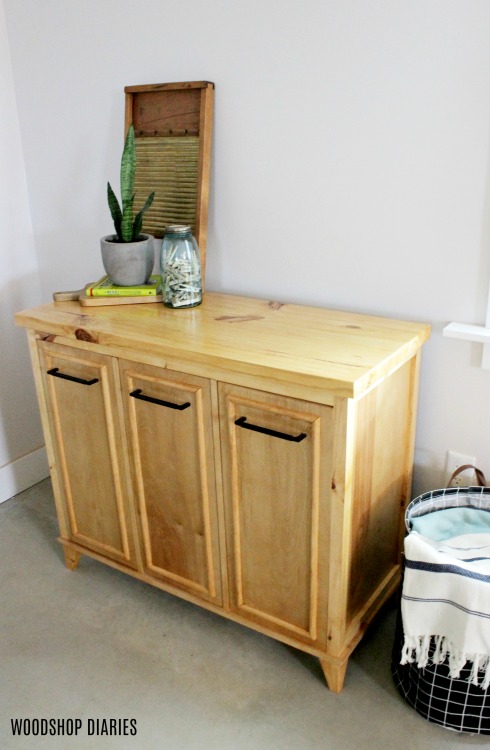 Having a laundry basket in a bedroom is necessary. It helps you cut the clutter instantly.
However, a bunch of dirty clothes can be an eyesore. Therefore, you need to hide it away.
This tilted laundry basket can hold the clutter at bay while keeping the minimalist look at its finest.
If you are interested in making it, you need to build a cabinet. You will not use a piano hinge for the door.
Use inset European concealed hinges, instead.
You will screw the hinges to the base of the cabinet to allow it to pivot and tilt out.
Then, attach the bottom of the tilt doors right above the hinges, along with two sides that connect the door and bottom. These sides will hold your laundry basket in place.
Since the hinges will be likely to pull in further than you might expect, add a block under the bottom panel so that it can rest on the top of the scrap wood. You may also need to screw another small scrap into the cabinet. This way, the door will tilt at a certain angle you want because it will catch the scrap wood.
6. A Hanging Fabric Organizer Idea
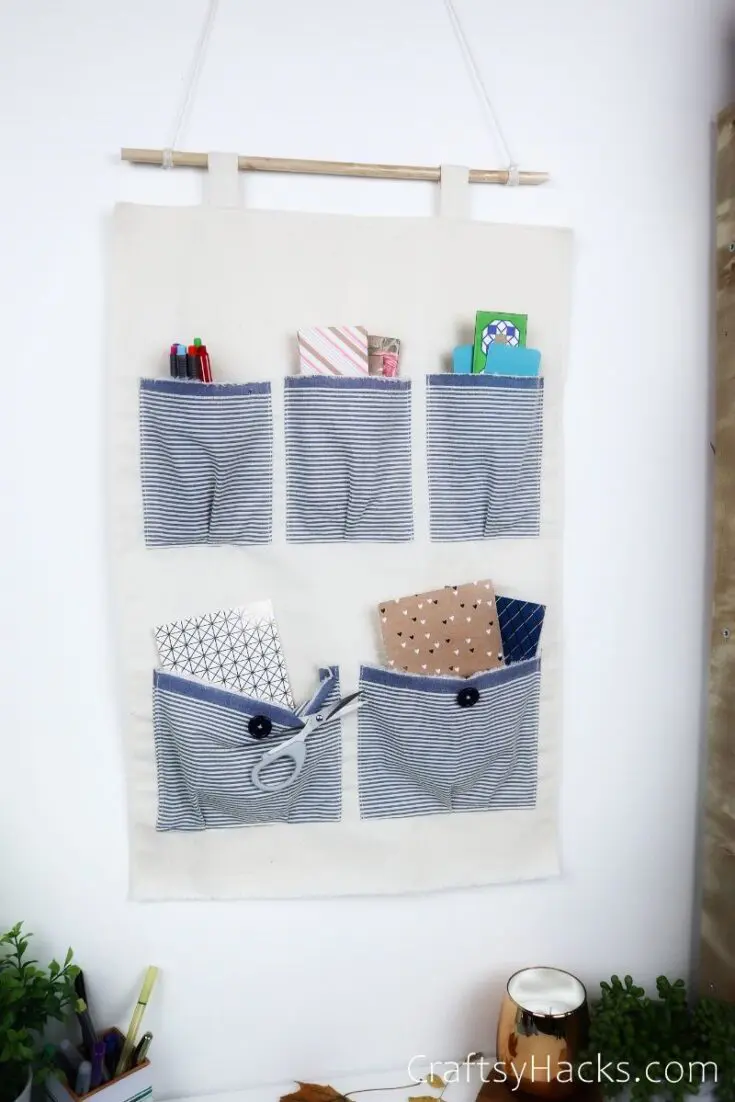 Using the vertical space is always a terrific idea to eradicate clutter. That is why you need to make this hanging fabric organizer.
First, make the base by cutting a piece of heavy textile. The size will depend on where you will hang it. Second, mark the spots where the pockets will go. Now, some other pieces of fabric to create the pockets.
Each fabric piece should be larger than the sketch you have made so that you can pleat it. Now, you can sew the fabric onto the base.
Once the pockets are ready, you can make the hanging mechanism by cutting two fabric pieces to create suspenders. Finally, you can hang it with a dowel or rod.
Other details you need to know:
- No 1. The fabric is soft polyester.
- No. 2. The pockets are not the exact size of the fabric, so you need to adjust their size based on what needs to be stored in them.
- No 3. You can do this with either a large or small sewing machine with an appropriate needle and thread or a serger if your machine is equipped with one.
- No 4. Don’t forget to use masking tape on the outside of each pocket to prevent it from bursting when you put something heavy into it.
- No 5. You can hang it from a wall or a surface. If you want to, it is better to draw the location of each pocket on a piece of paper before sewing it all together.
- No 6. It would help if you made the pockets to keep even the bulkiest items in place. However, if you need something to stand out, this hanging fabric organizer is your answer.
5. A Door Shoe rack Idea
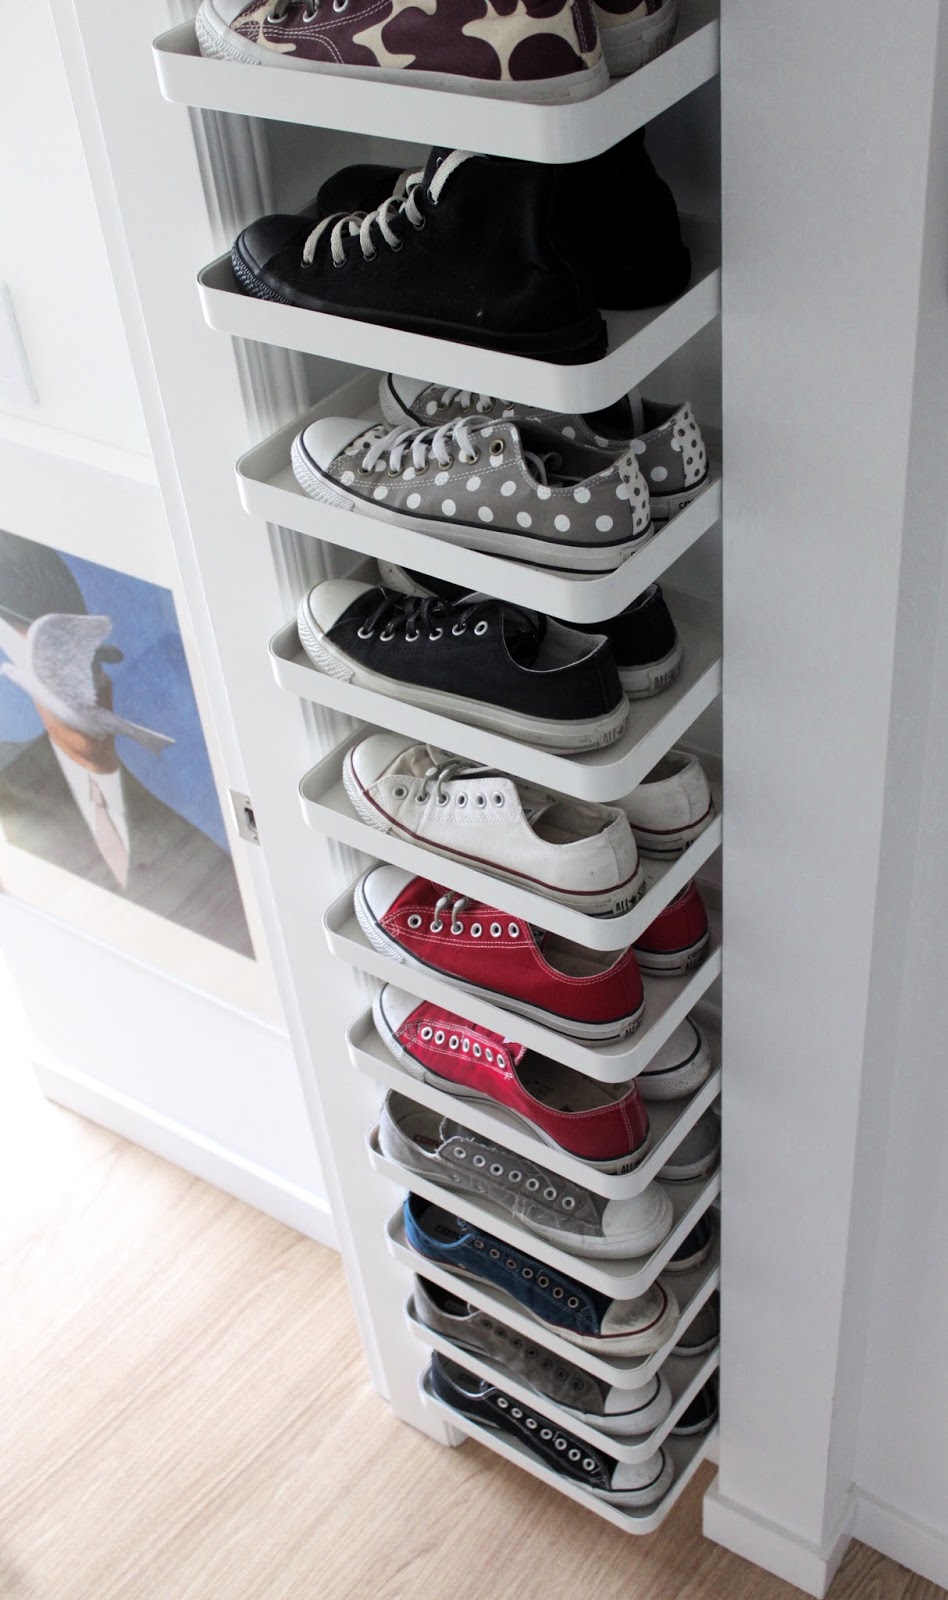 Look around and see whether you still have some vertical space that you have not tapped into yet. What about the area near the door? You can use it to organize your shoes.
Simply attach some boards a few inches off the floor all the way up to the ceiling. Well, it depends on the number of shoes you have. It will also be more excellent if you vary the height between the shelves so that you can put your boots there, too.
Other details:
- Use whatever kind of wood you have around or whatever works best for your environment.
- You can start this project with a low-cost coat rack, then upgrade it if you wish, adding additional shelves and hooks as time goes by. No doubt, you can also use the space under your coat rack for your shoes!
- If you want to use wall-mounted shoe holders, then measure the distance between the wall studs and screw nails into them at regular intervals so that they do not budge when your shoes are hung there.
- Use sturdy wood bolts and stand them vertically to create the support structure for each shelf.
- A pair of wooden dowels on either side of the door shoe rack will offer more support and keep the hooks on your coat rack on track.
- A coat rack can fail if it is loaded with heavy coats, so make sure you place heavier items at one end and lighter ones at the other end (like boots).
- Purchase or make a few hooks and drill holes in each shelf to make them look even more appealing.
4. A Sliding barn door Idea
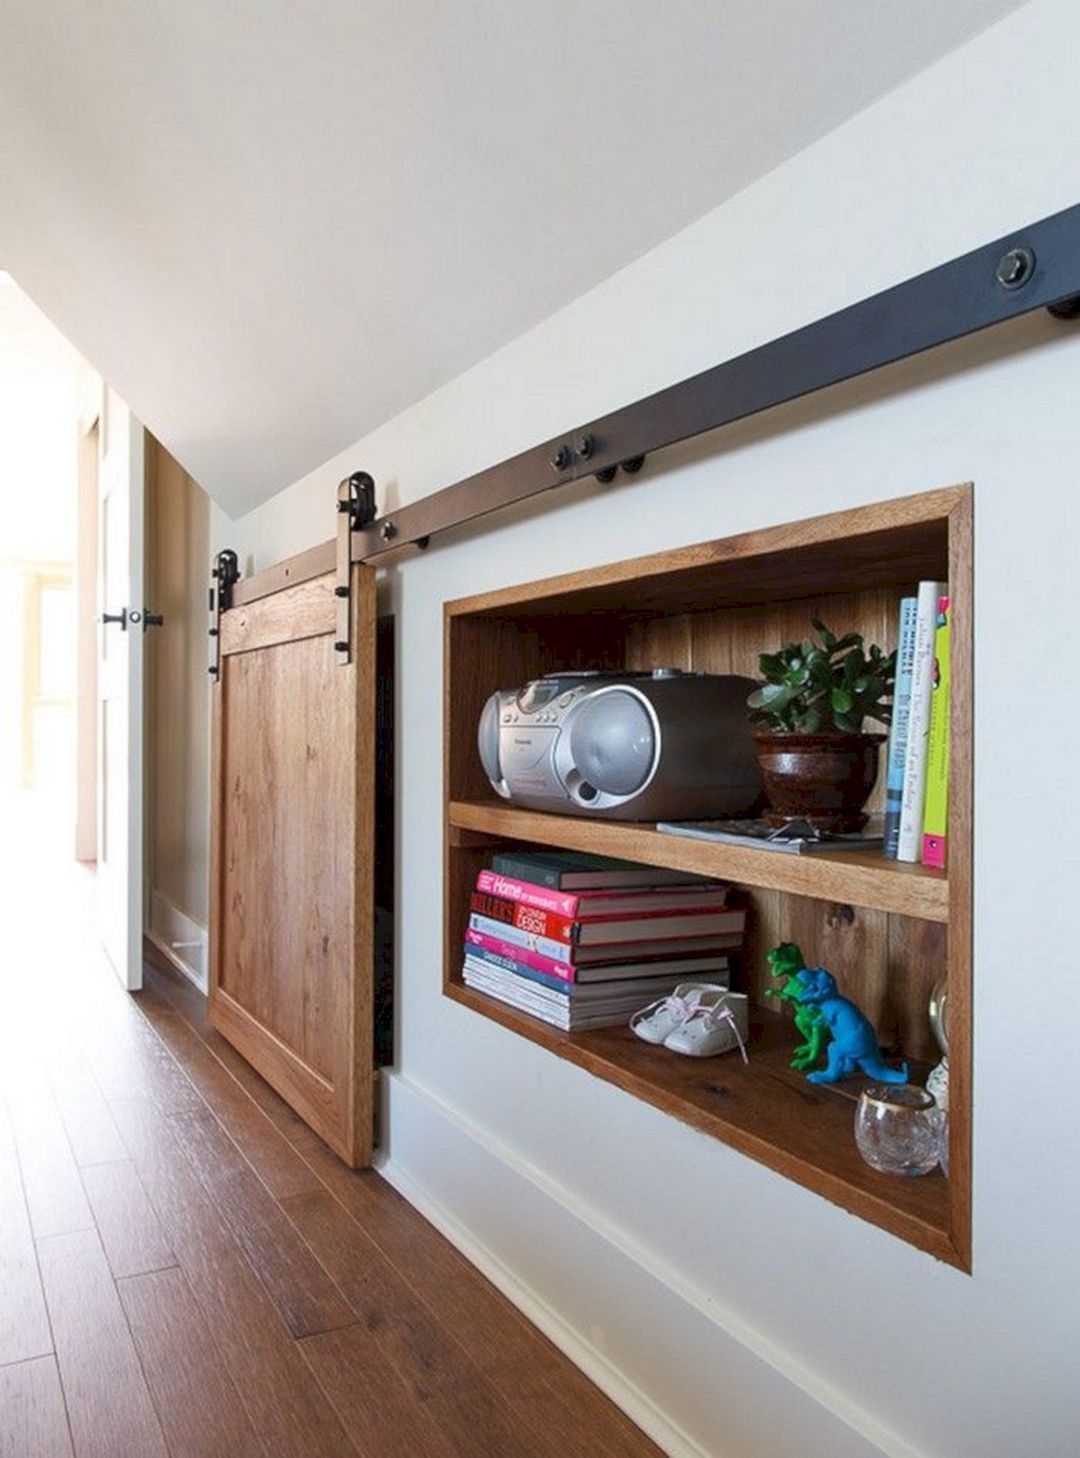 The attic tends to be small. Therefore, you will find it hard to place a cupboard or a dresser. Still, you can find many ways to get rid of clutter. You can try creating this hidden closet.
First, you need to create the knee wall. To incorporate a more rustic look, you can install sliding barn doors.
Other details:
- You need to make a small area in the entire ceiling.
- To create the room, you need to cut a piece of wood and install it without bolting it into place.
- Now, you can install the barn door, and the floor will be raised (the ground) by an inch or two.
- Attach brackets onto the wall and attach them to the wall studs using screws or nails as per your choice, at regular distances from each other so that they fit snugly so as not to fall off any time!
- Install a wood board as horizontal support beneath the ceiling so that the sliding barn door stays stationary at all times!
- A double barn door will ensure no gap between the one you install and the walls.
- For extra support, you can use a line of tension springs to keep your sliding barn door in place.
- Drill a row of holes to install the tension springs, having the exact distance between them as you have between the bolts on one side.
- Place your sliding barn door against the support board.
- To conceal the brackets, you can paint them in any color to look like brackets but are invisible under any conditions!
- Even if you install your sliding barn door with an open footboard to accommodate the small width of the loft space, do not forget to install a good set of tension springs, or it will collapse!
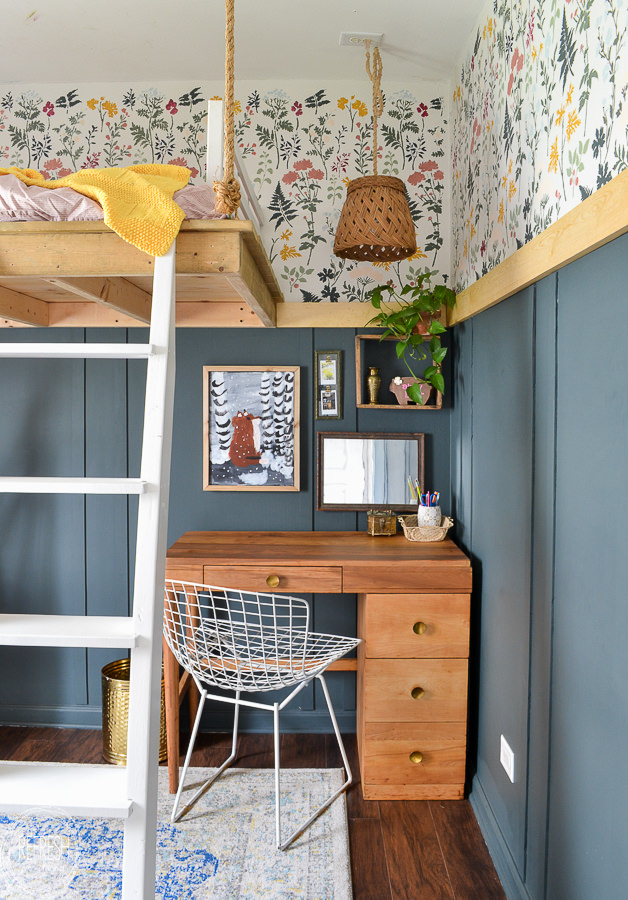
3. A DIY Flip-top secretary Desk Idea
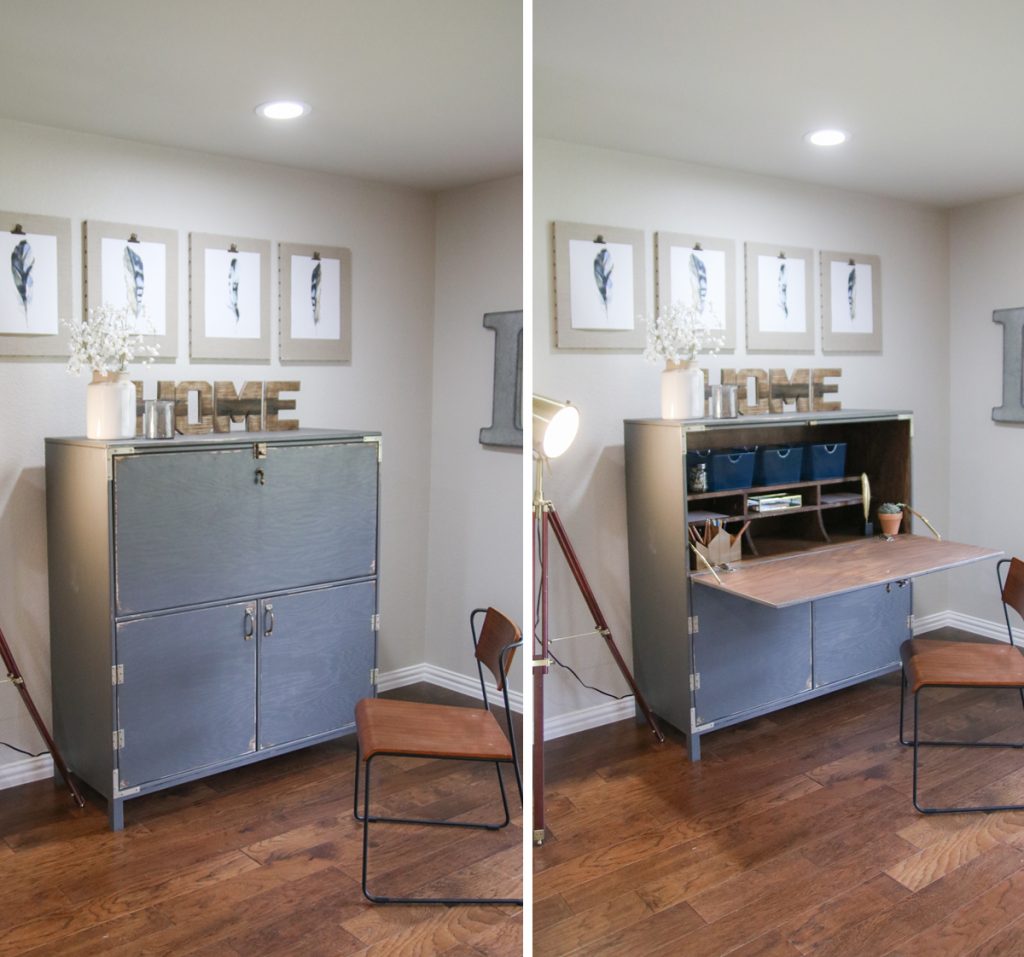 Having a home office in the bedroom is such a great idea. However, the desk may take up some valuable space. Therefore, you should opt for this cabinet and desk combo.
This desk features cabinets that you can use to store blankets or bedsheets at the bottom. You can find a lot of shelves on top to organize books, files, and stationery.
The door that conceals the shelves features a brass latch that secures it in place. When you unlock it, the 90-degree surface mount hidden spring hinges and the lid supports will hold it in place, allowing you to have a functional desk to work on.
Detailed Instructions:
- 1. Planning: This desk is a project that you will start from scratch, so there is no room for mistakes. Therefore, you need to draw a plan for the entire desk and cabinet. You can use a piece of paper or your laptop’s screen to draw the sketch on the floor and then work on it with scissors, your drill, and an electric cord until you get what you want.
- 2. Cuts: Work on the cuts with a hand saw and a hand screwdriver. You can also use some wood glue and some nails for support.
- 3. Screws: Now, you need to screw each piece together with a cordless drill and an appropriate size bit.
- 4. Side Panels: Create the side panels using 3/4-inch lumber, then cut them down to size and add on some decorative semicircles to make them look like bookends!
- 5. Locks: Now, you need to create the locking mechanisms to ensure that your work area is well-protected.
- 6. Springs: You will need to drill holes into the side panels to install the cord springs.
- 7. Add some decorative moldings and paint the entire thing in any color you wish!
- 8. This DIY project is perfect for people who are not used to working with wood or for beginners because it requires basic knowledge of working with wood and tools.
2. A TV Cover that works as a Decor as well
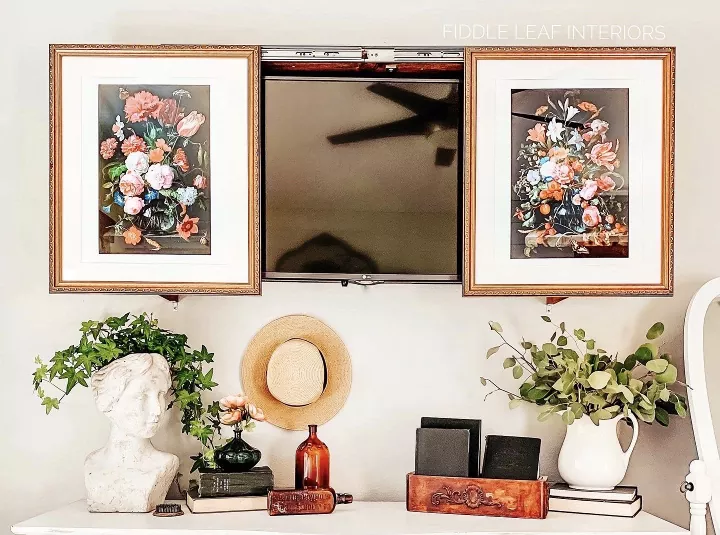 The TV may disrupt your sleep. Thus, you need to conceal it if you still insist on having it in your bedroom.
This TV cover is such an ingenious idea to hide your TV away. You just need to cut the board to length. There will be three pieces of wood board that you will use to make the frame. Then, install drawers slides to the frame.
After that, install the French cleat and large L-brackets that support the frame. For peace of mind, try adding smaller L-brackets on both sides of the frame. Finally, hang the artwork.
Detailed Instructions:
- Planning: First, you need to draw your plan. Then, cut the board to length. As the board is circular, you can use a compass to find out where you need to cut the boards.
- Cut the exposed edges of the exposed side edges of each board. Then cut each exposed edge at a 45-degree angle before continuing with cutting the exposed side up until about six inches left on each end of both boards.
- After that, drill holes along the sloped edges so that they have a tighter fit when sticking onto other boards or nails onto studs or other supports
- The final step is to mount the artwork using screws through their respective holes on the other two boards.
10 TV Cabinet Ideas and Mounting System Best for a Small Living Room
10 Various Unique and Clever Closet Door Ideas
10 Wall Mounted Bedroom Cabinet Upcycling ideas
Lastly, Number 1. DIY CAMA Tatame from the DIYcore Karla Amadori
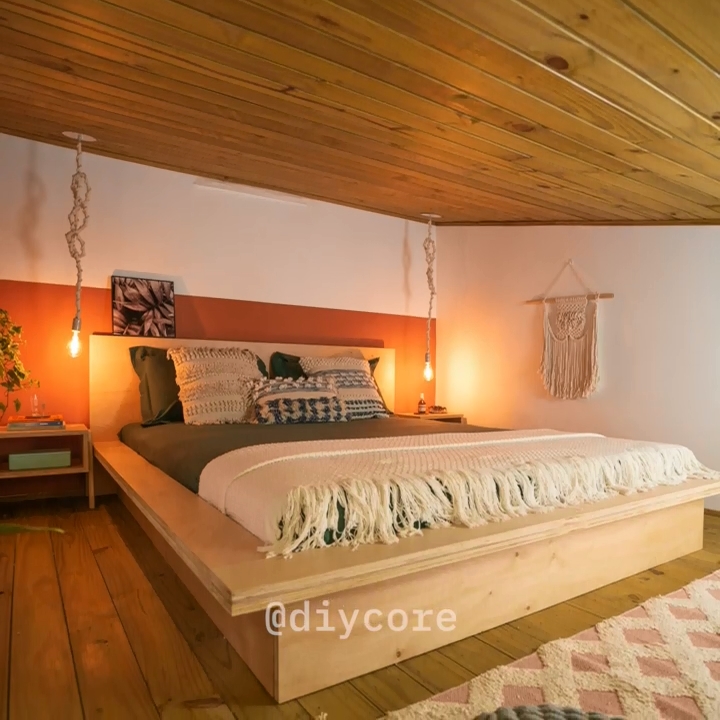 If you want to carve out the minimalist style in your bedroom, you should try this platform bed.
First, you need to make the frame. Each side has to have an overlapping board on top. You will also need to screw corners to the four corners.
This way, you can connect the frame and headboard.
Then, attach a long wood piece that connects the headboard and the opposite side right in the middle. Now, you can screw the slats. Finally, put the mattress on the platform bed.
Other details relevant to the specific idea:
- No 1. Sketch the exact layout of all parts for this project
- No 2. Design the entire thing with a compass and a ruler. You can also draw lines on a piece of paper to draw your plan.
- No 3. Cut all the wood parts with an electric saw or a circular saw
- No 4. Use drywall screws and metal corner brackets to attach the slats onto the frame’s four corners
- No 5. Use three different colors of paint stroke on the mattress cover to make it stand out from other furniture in your room
- No 6. You can also use a table saw to cut the boards into the right lengths
- No 7. The final step is to screw the mattress onto the frame
- No 8. Look at this entire project with an orangewood stain to make it blend in with your white furniture!
Conclusion:
Your bedroom is an intimate place—you’ve only got the one, so why compromise with something that you don’t care for? Personalization is crucial because it creates a comfortable, relaxing environment to get work done in, so why not start with your bedroom? These easy projects will help ensure that you have the minimalist decor that you want in your bedroom.
Interior design is an art. All the pieces of furniture look amazing when all put together in just one room. For example, if you have a mid-century modern bed, your room will look like a Mies Van der Rohe manifesto just created overnight. Similarly, a contemporary bed frame and headboard give a clean silhouette and modern look to the bedroom.
So finally,
The key to a comfortable and cozy room is an organized space. If everything is clean and neat, you will feel more relaxed and happier. Therefore, these 12 minimalist organization ideas for the bedroom can help you make it tangible.
References:
12. Acharlotteshouse.com
11. Abutterflyhouse.com
10. Refreshliving.us
9. Pneumaticaddict.com
8. Darbinorvar.com, Youtube.com
7. Woodshopdiaries.com, Youtube.com
6. Craftsyhacks.com
5. Jenniferkucherka.blogspot.com
4. Homebnc.com, Thehousediaries.com
3. Shanty-2-chic.com
2. Hometalk.com
1. Youtube.com @DIYCore