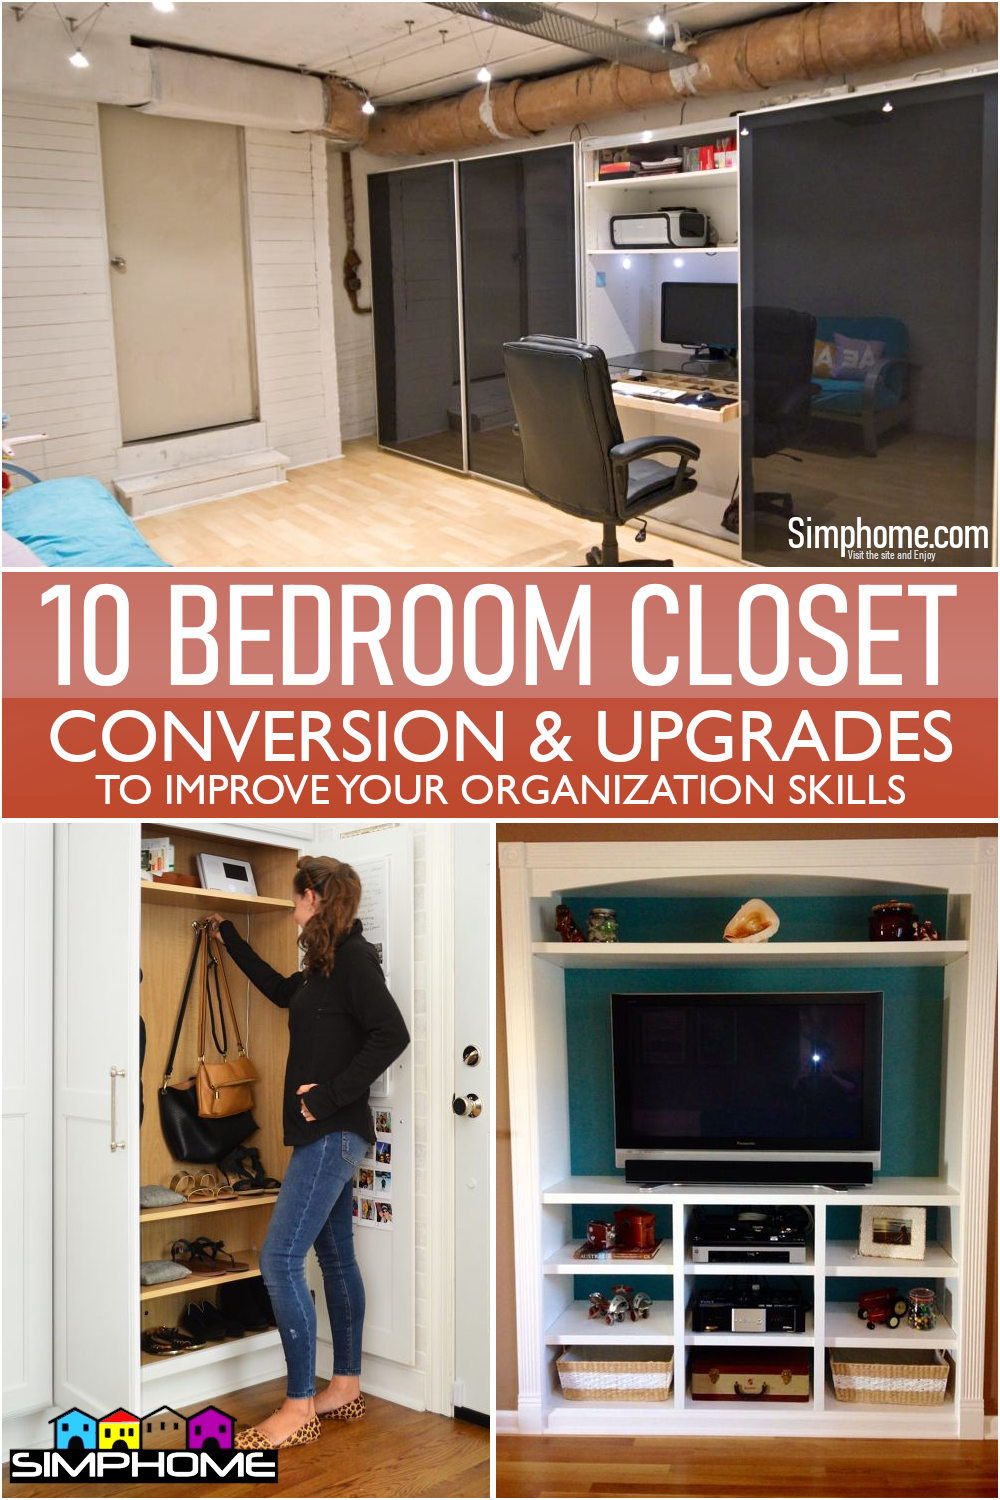
When you’re shopping for your house or apartment, what’s on your list? Is it a beautiful view, spacious kitchen, close to the park or school? How about a closet?
The closet might not always be at the top of your shopping list. Whether you’re looking to add more value to a space in your home or just a quirky way to make use of some unused closet space, these ideas are sure to blow your mind. If you wish your home had a visible office, a bar, or even a sleeping area, it can with a bit of creativity.
Get inspired by these 10 closet bedroom conversions for turning a tiny closet into an extra room.
As always, Simphome present you with the list
🔊10 Closet Bedroom Conversions Video:
List Entries:
- 10 Open Closet Ideas
- 10 Closet Adaptations for Cheap
- 10 Narrow Closet Design and Storage ideas with Walk-In
- 10 Closet Alternative Ideas for Anyone with Tight Space
- 10 Clothes Storage Ideas with ClosetMaids
- 10 Reach-in Closet Ideas
- 10 Walk-in Closet Ideas
- 10 Closet Layout Ideas
- 12 Bedroom Closet Organizations
- 12 Bedroom Organization With No Closet Ideas
10. Turn a closet into a Reading Nook
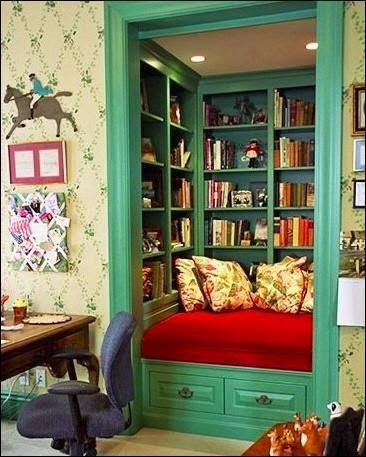 What is one of the most remarkable things you can make from a spare closet? A reading corner, of course. Many people love the book corner because they’re attractive and straightforward. The hall closet makes an ideal space for cuddling to read a novel or take a nap.
This small getaway incorporates lots of wall-mounted bookshelves and offers additional storage space under the built-in bench. This idea is ideal for all ages.
Instructions:
-
- Step 1. Decide where to place the reading spot, which is a definite plus if you enjoy books. Place it against a wall, so there’s Step space between the bookshelf and the wall. Also, make sure that the furniture fits well in this confined space.
- Step 2. If you’d like to build a reading nook, measure your area first and build a set of collapsible shelving that will hold all of your favorite books in one place. This idea also makes it easier to get at and search for specific titles when needed.
- Step 3. You’ll need to cut the sections, and they need to be exactly the same length. Once you have your bookcase kit set up, place them against the wall in a vertical row.
- Step 4. Use wider molding to build a new top for this fixture. You’ll also need to attach trim on the front of the reading area, and it will be used as your new door as well as a finished piece for your shelves. Use finishing nails or liquid nails.
- Step 5. Add a few chairs and a small side table, and you’re done. You can pick up some throw pillows as well to compliment your new reading nook.
If you need more storage space, add it to the top of the shelves or build another closet or two to hold all of your books.
9. Out-of-Sight Office Space
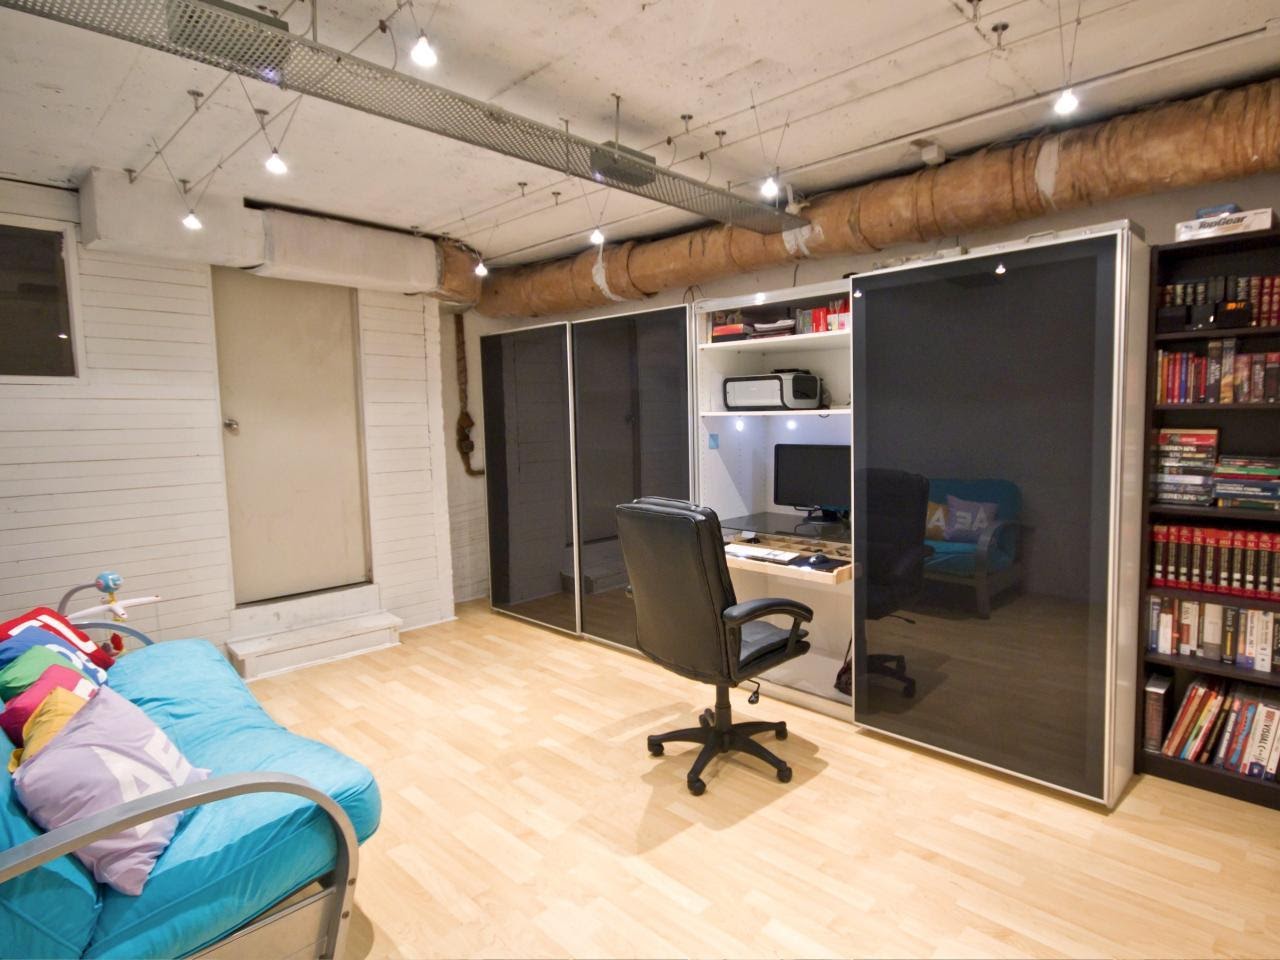 Those who work from home realize the importance of separating the living room from the home office. But if you doubt about using your whole bedroom for the office area, tucking your desk into a closet is an efficient way.
With the door removed from its hinges, even a claustrophobic person can work in a small office.
Instructions:
- Step 1. Decide where to place the desk.
- Step 2. Measure the distance of your desk from the wall or the walls of your room.
- Step 3. Build a movable wall using 2-by-2s and face it towards your desk area.
- Step 4. After constructing your movable wall, dismantle the door and store it away somewhere safe.
- Step 5. Decide in which direction you want to turn your regular handle into a hook for hanging file folders and books.
- Step 6. Reattach the door to the wall, along with any hooks you may have added.
- Step 7. Use this space for a home office and a cozy place to work at home!
8. Turn it to A new Sleeping Quarter
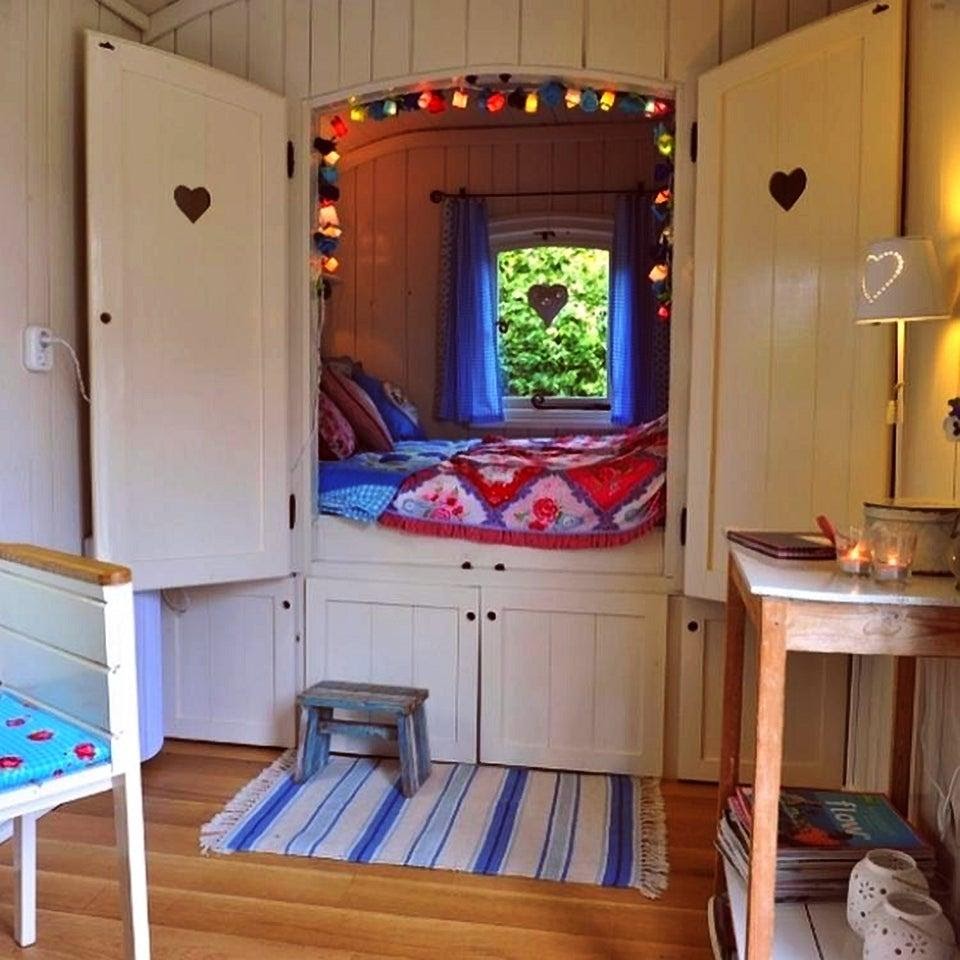 The opposite idea of using your closet for a table in a spare room is to use it for an extra bed. Make your guests comfortable by adding space for bedside lighting and reading.
If your closet is large enough to fit twin mattresses, you have the makings of a comfortable bedtime retreat. And if you decide to stack the two beds as this family, not only will you create a fabulous fortress-like children’s room, but you’ll also leave the rest of the bedroom open for storage, play, or a homework station.
Other information that you need to pay attention to are:
- No 1. Measure your room.
- No 2. Add a little thought to storing items that would stay in the closet for long periods, such as clothing, books, and electronics.
- No 3. Consider how you can make your bedroom more comfortable by adding storage hardware, such as mounts that can hold a monitor or TV underneath the bed and shelving units that function as additional headboards when stacked one on top of another.
- No 4. Consider adding artwork or photos to emphasize the storage units for clothes, electronics, and books.
- No 5. Consider installing a plug-in desk light on a nearby wall.
- No 6. Consider installing a safety bar in the doorway for added security while you sleep or work in the bedroom at night.
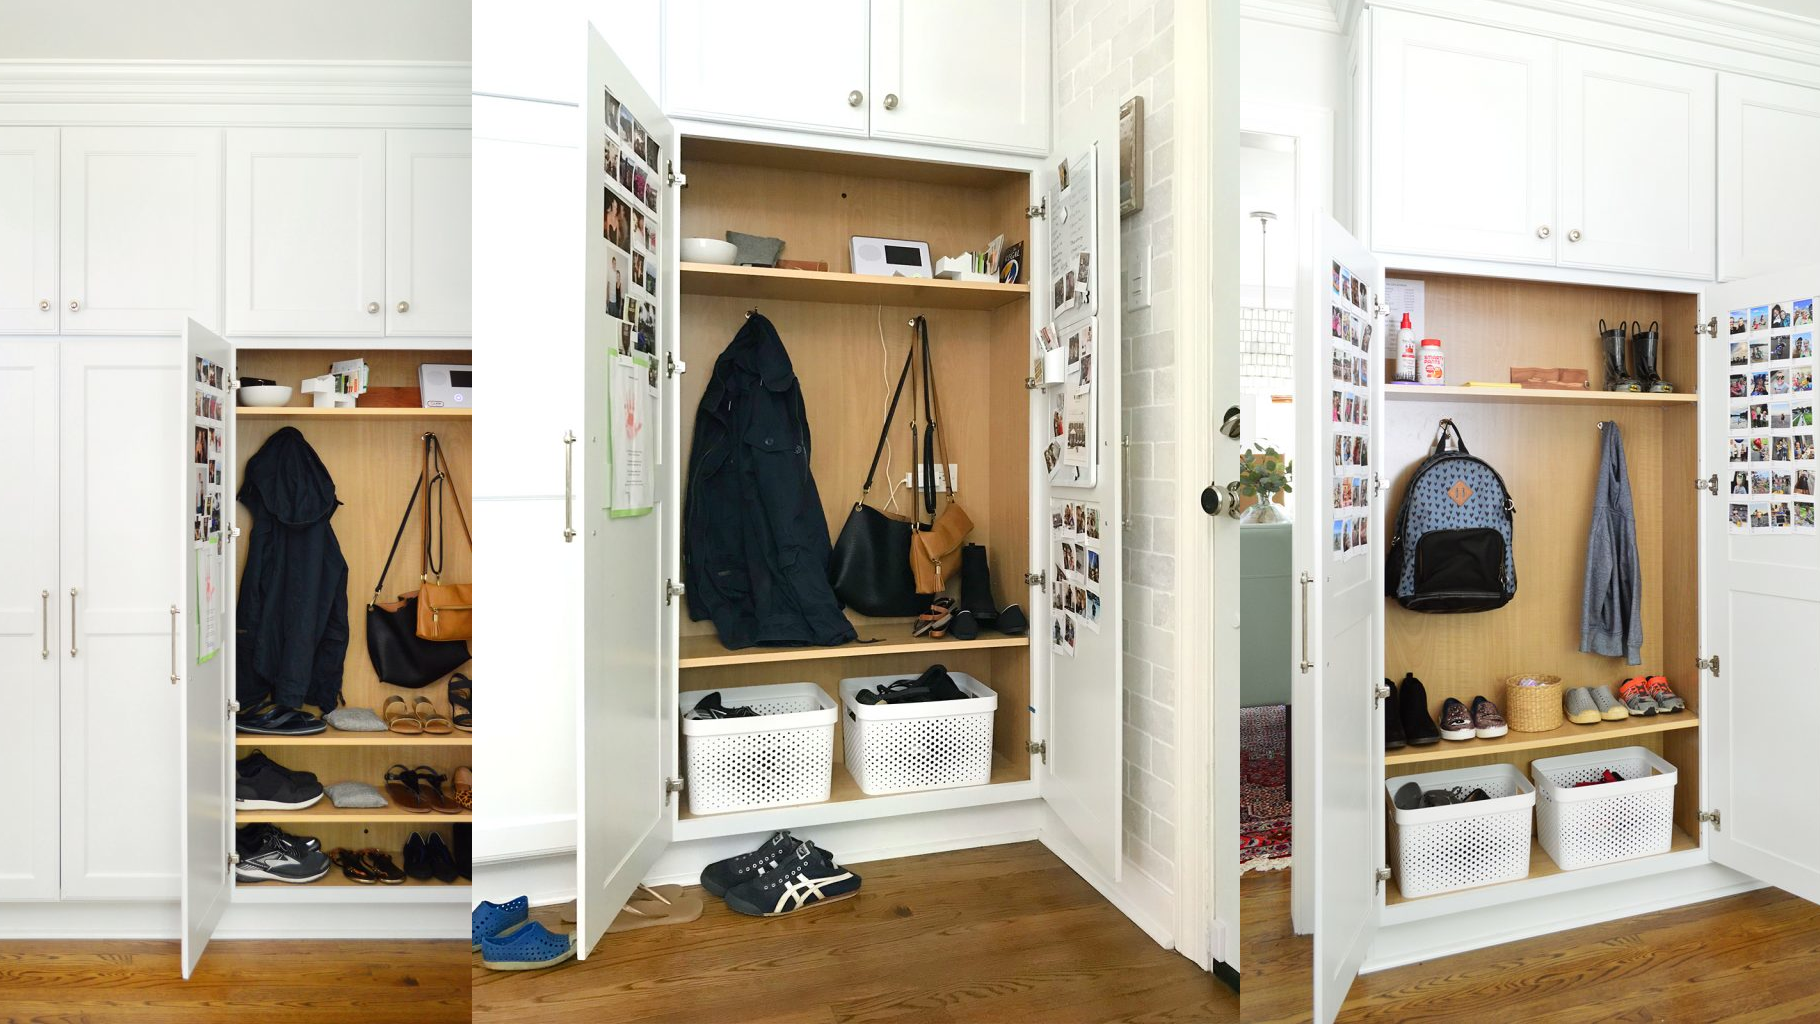 A mudroom brings a barrier between the dirty outside world and your clean home, but not every home is equipped with a special room. Also, for those of us who live in homes that don’t need a mudroom, it doesn’t mean we can’t have one.
That’s what prompted this idea to clean up the hall closet and turn it into a place to hang coats, purses, take off shoes, and store backpacks and bags, and anything you might need. Now you have a perfect low-budget alternative mudroom.
Instructions:
- Step 1. Measure the closet’s location accurately you wish to convert and make a plan for building the wall.
- Step 2. Ensure that everything is in place the day you begin construction, as it will not be easily touched or moved once it is in place.
- Step 3. Build your wall by constructing studs on top of the floor joists and supporting them with 2-by-4s spaced 16″ apart.
- Step 4. Add corner braces and vertical joists to turn the closet into a corner.
- Step 5. Install a small recessed light over the doorway.
- Step 6. Add hooks on the closet walls to hold bags and coats and any other extras that you may want to keep in the room.
- Step 7. Finish the closet by adding a floor-to-ceiling cabinet for shoes, bureaus, a bench, shelves, or whatever else you’d like to store in there.
6. Turn A Closet into A New Dry Bar

Dry bars do not have sinks or require plumbing, like wet bars, so you can place them easily if you know the basics of putting them in. Whether you opt to make your custom pieces or buy the parts you want, turning a closet into a dry bar can make your home feel warmer.
The benefit of a dry bar over a wet bar is that it can go anywhere without the need for water supply and drainage lines. You also don’t need to include a table with bar stools in your white wine bar.
Eliminating the seat will give more space for your wine cooler and other beverage storage needs. Seating means you have to leave the area under the table exposed to allow for legroom rather than using it for storage space. A seat-less drink center is often an excellent solution at a mocktail party. The lack of bar stools has the added advantage of encouraging your guests to walk around and hang out more with each other.
Instructions:
- Step 1. Measure accurately the area that you intend to convert – including a doorway or passageway between two rooms.
- Step 2. Decide on the size of the seat-less bar that you would like to put in your new space and add it to your list of materials.
- Step 3. Build the bar on the floor of your room. And then fill the bar with all of the supplies you would like to store in there.
- Step 4. Cut a hole into the corner of your room, Step larger than 24 inches x 48 inches and Step higher than 7 feet.
- Step 5. Build a wall approximately half as deep as the doorway opening to cover up the exposed brick or plastered surface and create a passageway around it in an L-shape.
- Step 6. Hang the exposed brick to disguise it as a wall with curtain rods.
- Step 7. Install a small recessed light over the doorway so that your wine cooler has plenty of illumination to store in and display for all to see.
- Step 8. Haul in your bar chairs and get ready to welcome all who enter your home!
5. Turn a Closet into Kids’ Space
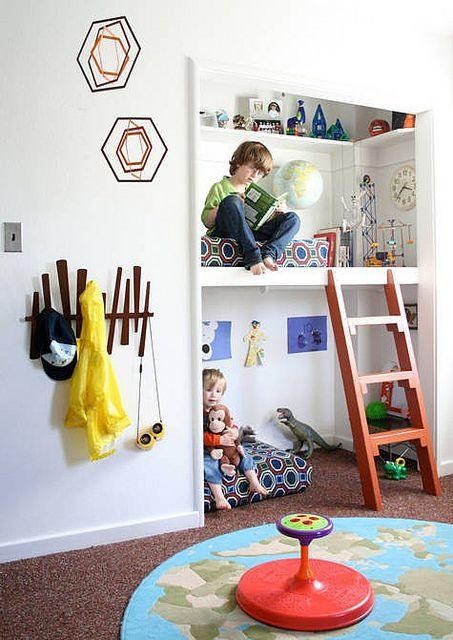 Perhaps a closet can do the same for moms who desperately want a playroom but Step-free space. It’s a general fact that kids find lofts or bunk beds innately cool, and owning one makes them feel like little rock stars.
You can enjoy the look of joy on your favorite little face once you use the top of your child’s closet to create a loft bed complete with stairs to go up or down, just like in the house seen here in the picture.
The expression on your child’s face is the best thing. Still, second is the indisputable fact that you can use the space under the loft bed to hold clothes, storage, a small homework studio, or any other organization you want.
Other Instructions:
- Step 1. Measure your room accurately, as this guide will only help guide you on the key points of working with space in a small room with limited space.
- Step 2. Decide on the size of the loft bed you wish to build and add it to your list of materials.
- Step 3. Then build your loft bed on top of your new wall, leaving space for the stairs behind the bed and allowing for storage underneath.
- Step 4. Cut a hole into the corner of your room, Step larger than 24 inches x 36 inches and Step higher than 6 feet.
- Step 5. Build a wall approximately half as deep as the doorway opening to create a passageway around it in an L-shape.
- Step 6. Install a small recessed light over the doorway so that your child’s room has plenty of illumination to store in and display for all to see.
4. Turning a Closet into Entryways
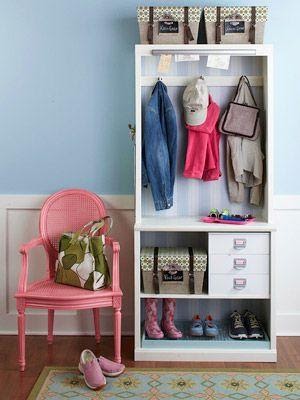 Because the entryway offers the first look into the house, it is a very neglected and underrated area. Sure, your hall might be small, sparse, dark, or cramped, but you should know that it has style and great storage potential.
With an excellent layout and a few de-cluttering, you will easily maximize the space in your entryway closet to suit everything you will possibly need.
Do not underestimate the function of high shelves in the entryway area, as seen in the picture above. Store your things up high that you don’t need every day, like bags or something.
Install some hooks to store clothes, hats, and trousers. Store your shoes at the rock bottom of the closet. And add a mini drawer to store accessories like gloves and scarves in it.
You can also display some decor on this shelf, which can help the entryway area blend into the design of your home.
Instructions:
- Step 1. Measure your room accurately, as this guide will only help guide you on the key points of working with space in a small room with limited space.
- Step 2. Decide on the size of the entryway closet you wish to build and add it to your materials list.
- Step 3. Build your entryway closet by installing a wall directly behind your door. Take measurements that are 3 inches smaller than the actual opening so that you can use one 1/2-inch wood screws to hold it together.
- Step 4. Cut a hole into the corner of your room, Step larger than 24 inches x 32 inches and Step higher than 6 feet.
- Step 5. Build a wall approximately half as deep as the doorway opening to create a passageway around it in an L-shape.
- Step 6. Add an access door to your closet for more room when you need it later on.
- Step 7. Install a small recessed light over the doorway. This way, your entryway will have plenty of illumination to store in and display for all to see.
- Step 8. Haul in your closet storage and get ready to greet all who enter this home!
3. Turning a Closet As a Slide-out Pantry
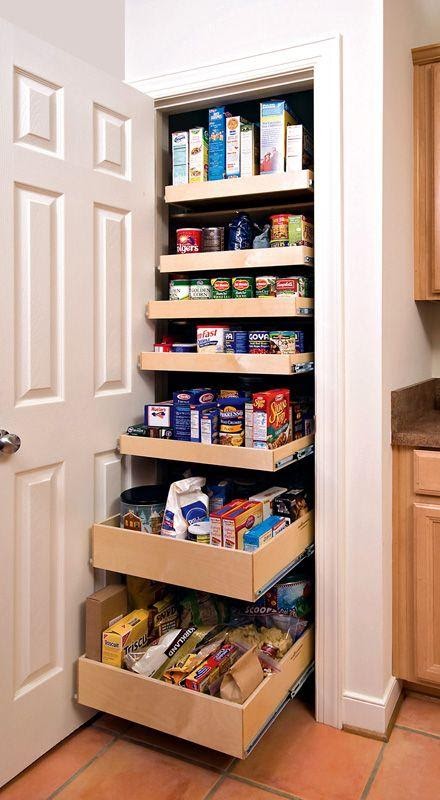 If you do not have a pantry in your home, you may use the pantry rack ideas like the picture above. The only alertness in using some spaces is the concern about temperature and humidity control.
If you plan to use a closet, measure its width, and purchase brackets and shelves with netting, wood, or planks that fit in the closet. You can also choose a ready-to-assemble mesh or metal shelving unit that fits your space.
Video by Elysian
Instructions:
Step 1: Measure the closet’s width, then add 2 inches to your measurement.
Step 2: Determine the height of your sliding shelf by taking into account where you want to place the shelves in your closet.
Step 3: Add 4 inches to this measurement for wooden shelving brackets that will help you hold up your shelves.
Step 4: Purchase a sliding shelf kit that fits perfectly in your closet and install it on both sides of the door so that it travels when opened and when closed.
Step 5: Measure your shelves’ height and purchase the grooved boards or netting with hardware that best fits your shelf size.
Step 6: Install the boards to slide them out when opened and push them back in when closed.
[amazon bestseller=”cabinet roll out tray” items=”3″]
2. Turning A Closet into A TV Room
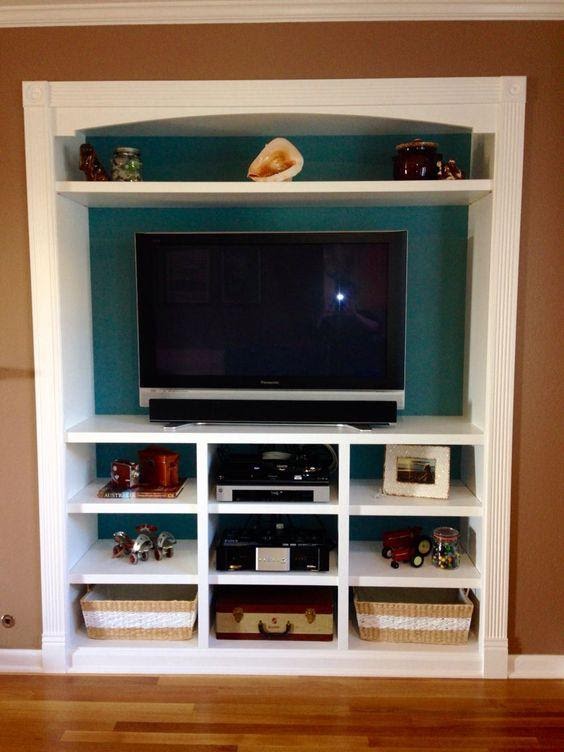 If you don’t mind seeing your TV indoors, placing it in a closet is a great idea you can consider. This special design maximizes your closet space.
This TV closet design is for those looking for an option to combine your bedroom closet with storage options in a variety of shapes and sizes. The combination of open shelves and drawers gives you enough and more space to organize everything neatly.
Instructions:
- Step 1: Find out the size of your closet.
- Step 2: Measure the width of the closet door.
- Step 3: Measuring first from the wall, add 3 inches on each side.
- Step 4: Measure your television and floor cabinets; it is helpful to measure each cabinet separately, then add 4 inches between them.
- Step 5: Measure the width of your side-by-side cabinet doors and subtract 4 inches for each door.
- Step 6: Measure the width of your vertical cabinet door (the one that will be on the side of the closet) and subtract 3 inches.
- Step 7: Measure your side-by-side cabinet doors’ length and subtract 1 inch on each door.
- Step 8: Measure the width of your vertical bottom drawer again and make sure that it is not wider than 2 inches.
- Step 9: Measure the width of the vertical cabinet door, and subtract 3 inches from each side.
- Step 10: Measure the length of your vertical cabinet door and make sure that it is not wider than 2 inches.
- Step 11: Measure the width of each vertical bottom drawer, and make sure that they are not too wide or too narrow.
- Step 12: Install brackets on two walls in a way that will support your shelving units on both sides with your side-by-side cabinets.
- Step 13: Purchase 2 4-inch-square particleboard shelves or shelves with one 1/2-inch opening for the shelving units.
- Step 14: Measure to find out the width of your horizontal cabinet door and subtract 6 inches from each side.
- Step 15: Measure the length of your horizontal bottom drawer and make sure it is not wider than 4 inches.
- Step 16: Measure the width of your vertical bottom drawer and make sure it is not wider than 2 inches.
- Step 17: Measure the length of your vertical bottom drawer and make sure it is not wider than 4 inches.
- Step 18: Measure the width of your vertical cabinet door again and subtract 3 inches from each side.
- Step 19: Build a 45-degree angle at the top of one wall, about 1 inch down from the top, with a miter saw or a table saw.
- Step 20: Install a 90-degree angle on the two other walls at the top of the closet.
- Step 21: Install a cabinet door on each wall right under the 45-degree angle at the top, making sure it is not wider than (8 inches + 1 inch).
- Step 22: Measure to find out your shelf height (from top to bottom) and make sure that it is at least 6 inches higher than your TV.
- Step 23: Measure the distance between your vertical cabinet door and your horizontal cabinet door; it should be 3 inches.
- Step 24: Measure the width of your vertical cabinet door again and subtract 3 inches from each side.
- Step 25: Use 1 x 2 wood to build horizontal support at each corner of your closet, which can hold some shelves.
- Step 26: Install the 4-inch-square shelves flush against both sides of the vertical drawer and attach them with screws on both sides of the drawer.
- Step 27: Attach the horizontal supports to the wall at 4 inches from both sides and 1 inch from the top.
- Step 28: Measure the distance between your vertical cabinet door and your horizontal cabinet door; you should have a space between them of 1 inch.
- Step 29: Use 1 x 2 wood to build right-angle support on each wall that goes above or below one of these shelves and insert it underneath your shelves.
- Step 30: Make sure that the length of each right-angle support is equal to the vertical bottom drawer.
- Step 31: On both sides of your horizontal bottom drawers, measure the distance between them and attach two right-angle supports at those places.
- Step 32: Attach your vertical bottom drawer to the right-angle support with screws on both sides of the drawer and both walls.
- Step 33: Measure to find out the width of each door in your vertical cabinet door and subtract 4 inches from both sides.
- Step 34: Measure the length of one door in your vertical cabinet door and make sure it is not wider than (8 inches + 1 inch).
- Step 35: Attach these doors to the right-angle supports on both sides, ensuring it is flush against the shelves.
- Step 36: Attach the vertical cabinet door to your right-angle support with screws.
- Step 37: Use 1 x 2 wood to build horizontal support at each corner of your closet, which can hold some shelves.
- Step 38: Install the 4-inch-square shelves flush against both sides of the vertical cabinet door and attach them with screws on both sides of the drawer.
- Step 39: Measure to find out the width of your horizontal bottom drawer and make sure it is not wider than 4 inches.
- Step 40: Attach the horizontal bottom drawer to the right-angle support on both sides with screws.
- Step 41: Measure the width of your horizontal bottom drawer again and make sure it is not wider than 4 inches.
- Step 42: Attach the horizontal support to the wall at 4 inches from both sides and 1 inch from the top.
- Step 43: Measure your shelf height (from top to bottom) again and make sure it is at least 6 inches higher than your TV.
Lastly, Number 1. Turning A Closet into Makeup Space
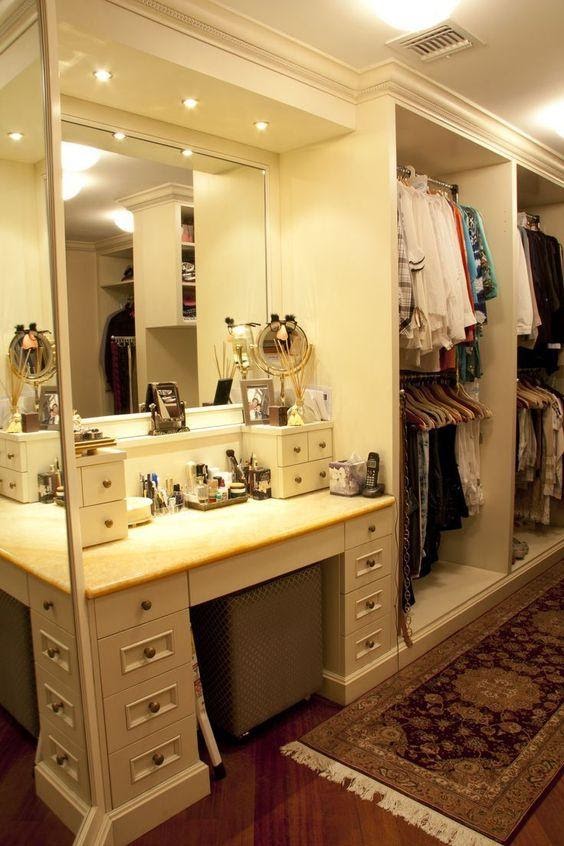 Similar to the previous ideas, an unused linen closet can be excellent makeup storage. Add some drawers and fantastic mirrors for a glam station straight from heaven.
Closet makeup provides many advantages that the average homeowner craves. They can help turn your closet space into a personal sanctuary.
Equipped with mirrors and lighting, they give a fancy space for applying makeup, styling hair, and using other toiletries.
Conclusion:
Closet conversion ideas might be complex for some people. We do know this issue. Therefore, we hope these 10 closet bedroom conversions will come in handy. Good luck!
One More Thing,
Turn A Closet into a Media Room.
A media room is an excellent utility, and you can make it out of almost anything you want, even an empty closet or storage area.
Instructions:
1) Clean the closet and paint it in a neutral color like white.
2) Put in shelves
3) Hang your favorite media elements, such as a projector or a flat-screen TV. Of course, if you want to go all out, use LED lighting for a more beautiful look.
4) Add an audio system with surround sound, such as ceiling speakers, so you can hear what is playing on your television from any room where the speakers are located.
5) Add a floor rug to compliment the rest of the room and add even more color (blue is always a good choice).
6) Other valuable additions include blackout curtains and furniture.
7) Consider using a projector for your audio/video entertainment needs.
References:
10.Blog.teepeejoy.com
9. Decoist.com
8. Reddit.com
7. Housebeautiful.com
6. Pinterest.com
5. Pinterest.com
4. Pinterest.com
3. Pinterest.com
2. Pinterest.com
1. Pinterest.com